2006 SUZUKI SX4 section 9
[x] Cancel search: section 9Page 162 of 1556

Downloaded from www.Manualslib.com manuals search engine 1A-112 Engine General Information and Diagnosis:
DTC P0327 / P0328: Knock Sensor Circuit Low / HighS6RW0D1104040
Wiring Diagram
DTC Detecting Condition and Trouble Area
DTC Confirmation Procedure
1) Connect scan tool to DLC with ignition switch turned OFF.
2) Turn ON ignition switch and clear DTC, pending DTC and freeze frame data by using scan tool.
3) Start engine and run it for 10 sec.
4) Check DTC by using scan tool.11Engine mechanical system check
1) Check engine mechanical parts or system which can
cause engine rough idle or poor performance.
• Engine compression (Refer to “Compression Check in
Section 1D”.)
• Valve lash (Refer to “Valve Lash (Clearance)
Inspection in Section 1D”.)
• Valve timing (Refer to “Timing Chain and Chain
Tensioner Removal and Installation in Section 1D”.)
Are they in good condition?Check wire harness and
connection of ECM
ground, ignition system
and fuel injector for
intermittent open and
short.Repair or replace
defective part. Step Action Yes No
E01C01
3 4
18 19 5 6 7 10 11
17 20
47 46 49 50 51 21 22
5216 259
24 14
29
55 57 54 53 59
60 582
26 27 28 15
30
56 4832 31 34 35 36 37 40 42 39 38 44
45 43 41 331 12 13
238 3 4
18 19 5 6 7 10 11
17 20
47 46 49 50 51 21 22
5216 259
24 14
29
55 57 54 53 59
60 582
26 27 28 15
30
56 4832 31 34 35 36 37 40 42 39 38 44
45 43 41 331 12 13
238
12
REDC01-56
5 V
I6RW0D110030-01
1. Knock sensor 2. ECM
DTC detecting condition Trouble area
DTC P0327:
Voltage of knock sensor is lower than specified value with engine
running.
(1 driving cycle detection logic)
DTC P0328:
Voltage of knock sensor is higher than specified value with
engine running.
(1 driving cycle detection logic)• Knock sensor circuit (open or short)
• Knock sensor
•ECM
Page 163 of 1556

Downloaded from www.Manualslib.com manuals search engine Engine General Information and Diagnosis: 1A-113
DTC Troubleshooting
NOTE
Before this troubleshooting is performed, read the precautions for DTC troubleshooting referring to
“Precautions for DTC Troubleshooting”.
Step Action Yes No
1Was “Engine and Emission Control System Check”
performed?Go to Step 2. Go to “Engine and
Emission Control
System Check”.
2Knock sensor circuit check
1) Remove ECM from its bracket with ECM connectors
connected.
2) Measure voltage between “C01-56” terminal of ECM
connector and vehicle body ground with engine running.
Is voltage within 1.23 – 3.91 V?Intermittent trouble.
Check for intermittent
referring to “Intermittent
and Poor Connection
Inspection in Section
00”. If OK, substitute a
known-good ECM and
recheck.Go to Step 3.
3Knock sensor circuit for open check
1) Disconnect connector from knock sensor with ignition
switch turned OFF.
2) Turn ON ignition switch, measure voltage between
“RED” wire of knock sensor connector and engine
ground.
Is voltage 4 – 6 V?Go to Step 6. Go to Step 4.
4Knock sensor circuit for open check
1) Turn ON ignition switch, measure voltage between “C01-
56” terminal of ECM connector and engine ground
Is voltage 4 – 6 V?“RED” wire is open
circuit.Go to Step 5.
5Knock sensor circuit for short check
1) Disconnect connectors from ECM with ignition switch
turned OFF.
2) Measure resistance between “C01-56” terminal of ECM
connector and vehicle body ground.
Is resistance infinity?Go to Step 6. “RED” wire is shorted to
ground circuit.
If wire is OK, substitute
a known-good ECM and
recheck.
6Knock sensor circuit for short check
1) Disconnect connectors from ECM with ignition switch
turned OFF.
2) Turn ON ignition switch, measure voltage between “C01-
56” terminal of ECM connector and vehicle body ground.
Is voltage 0 V?Go to Step 7. “RED” wire is shorted to
other circuit.
I2RH01110089-01
Page 166 of 1556

Downloaded from www.Manualslib.com manuals search engine 1A-116 Engine General Information and Diagnosis:
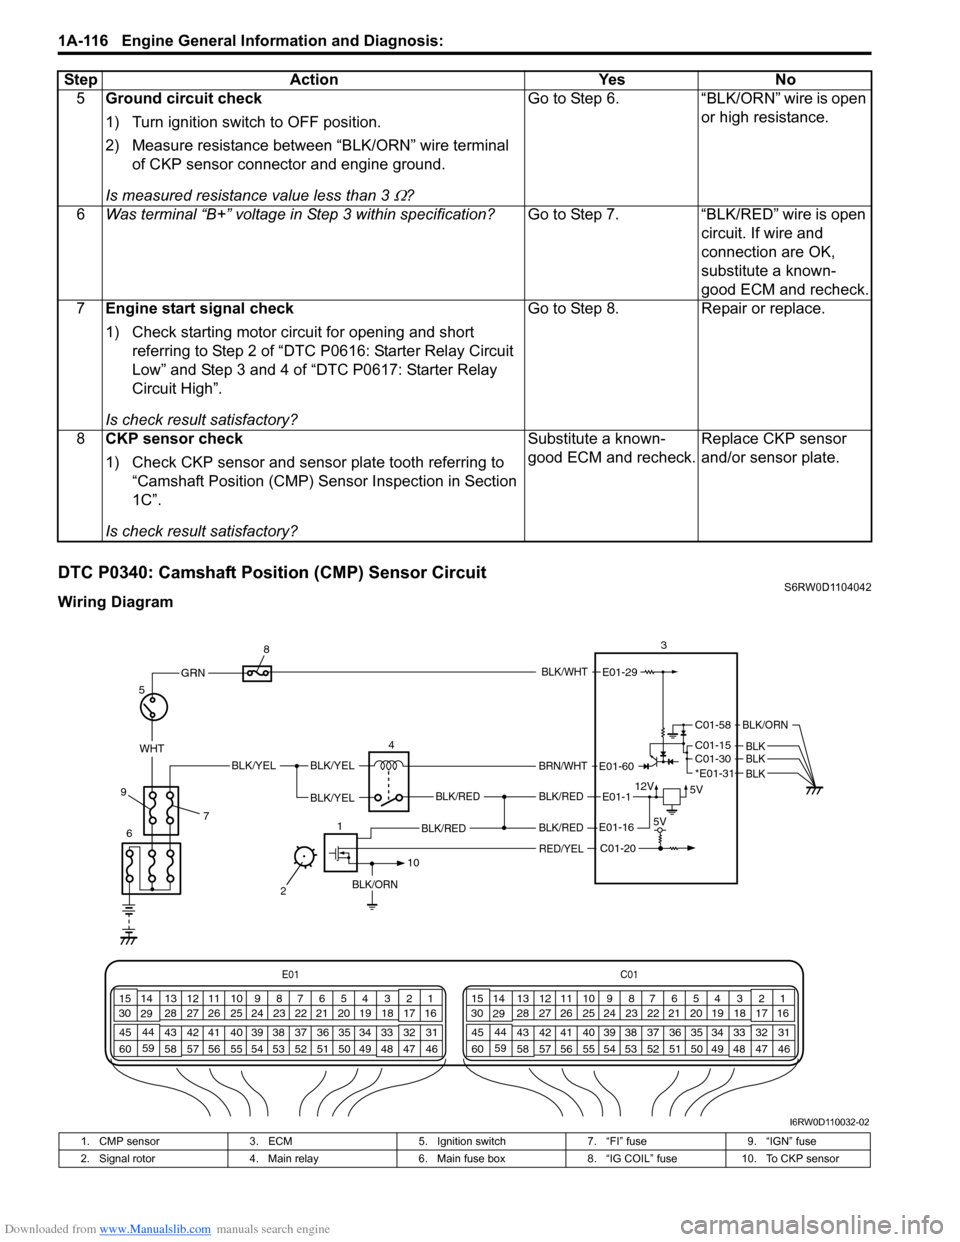
DTC P0340: Camshaft Position (CMP) Sensor CircuitS6RW0D1104042
Wiring Diagram5Ground circuit check
1) Turn ignition switch to OFF position.
2) Measure resistance between “BLK/ORN” wire terminal
of CKP sensor connector and engine ground.
Is measured resistance value less than 3
Ω?Go to Step 6. “BLK/ORN” wire is open
or high resistance.
6Was terminal “B+” voltage in Step 3 within specification?Go to Step 7. “BLK/RED” wire is open
circuit. If wire and
connection are OK,
substitute a known-
good ECM and recheck.
7Engine start signal check
1) Check starting motor circuit for opening and short
referring to Step 2 of “DTC P0616: Starter Relay Circuit
Low” and Step 3 and 4 of “DTC P0617: Starter Relay
Circuit High”.
Is check result satisfactory?Go to Step 8. Repair or replace.
8CKP sensor check
1) Check CKP sensor and sensor plate tooth referring to
“Camshaft Position (CMP) Sensor Inspection in Section
1C”.
Is check result satisfactory?Substitute a known-
good ECM and recheck.Replace CKP sensor
and/or sensor plate. Step Action Yes No
E01C01
3 4
18 19 5 6 7 10 11
17 20
47 46 49 50 51 21 22
5216 259
24 14
29
55 57 54 53 59
60 582
26 27 28 15
30
56 4832 31 34 35 36 37 40 42 39 38 44
45 43 41 331 12 13
238 3 4
18 19 5 6 7 10 11
17 20
47 46 49 50 51 21 22
5216 259
24 14
29
55 57 54 53 59
60 582
26 27 28 15
30
56 4832 31 34 35 36 37 40 42 39 38 44
45 43 41 331 12 13
238
12V
5VBLK/REDBLK/RED
BLK/RED
BLK/YELBLK/YEL
BLK/YEL
BRN/WHT
5
64 83
E01-29
E01-1
E01-60
C01-58
C01-15 C01-30
BLK/ORN
BLKBLK
7BLK/REDE01-16
BLK/ORN
1
10
C01-20 5V
GRNBLK/WHT
9
WHT
*E01-31 BLK
2
RED/YEL
I6RW0D110032-02
1. CMP sensor 3. ECM 5. Ignition switch 7. “FI” fuse 9. “IGN” fuse
2. Signal rotor 4. Main relay 6. Main fuse box 8. “IG COIL” fuse 10. To CKP sensor
Page 169 of 1556

Downloaded from www.Manualslib.com manuals search engine Engine General Information and Diagnosis: 1A-119
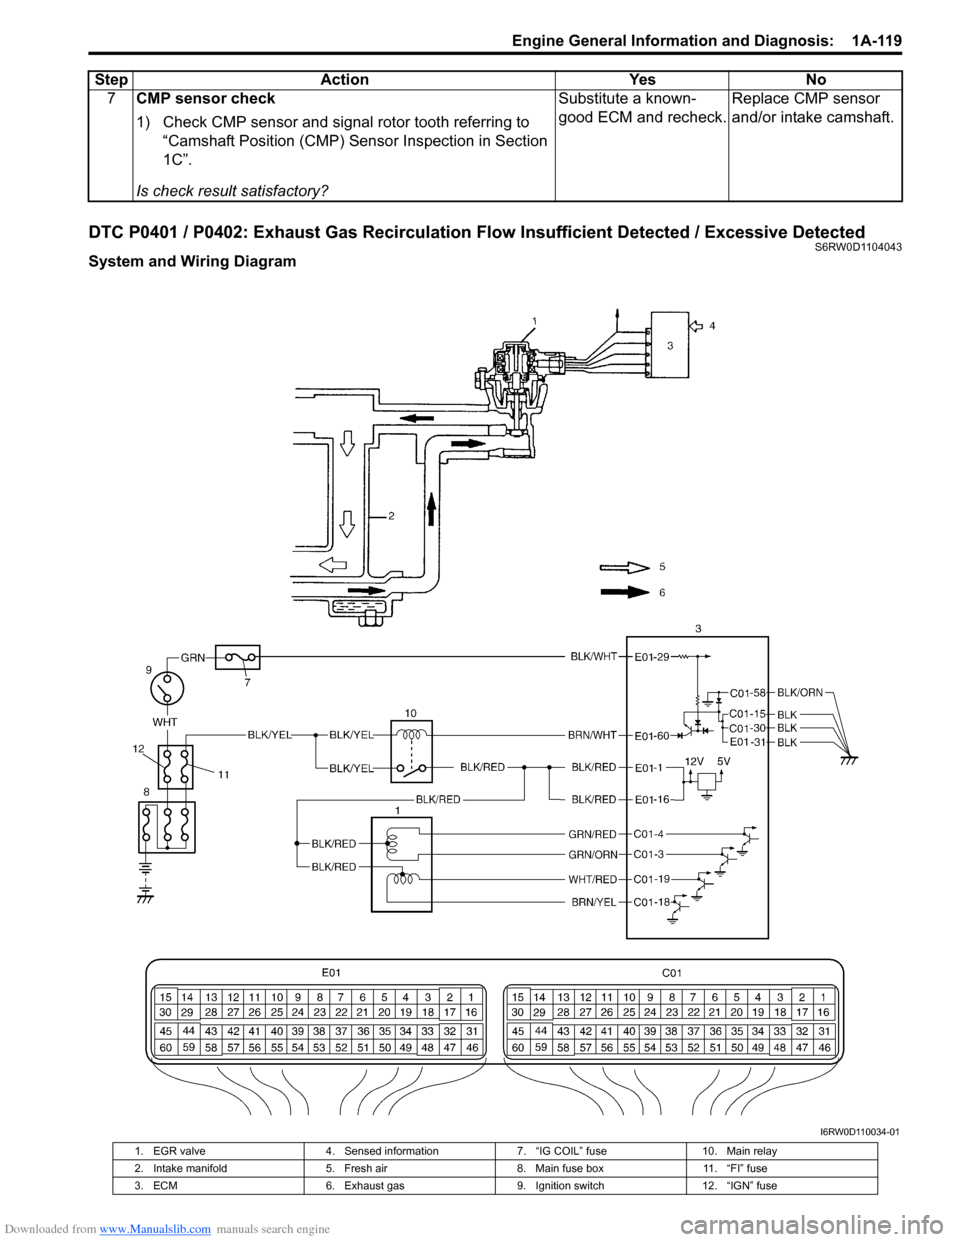
DTC P0401 / P0402: Exhaust Gas Recirculation Flow Insufficient Detected / Excessive DetectedS6RW0D1104043
System and Wiring Diagram7CMP sensor check
1) Check CMP sensor and signal rotor tooth referring to
“Camshaft Position (CMP) Sensor Inspection in Section
1C”.
Is check result satisfactory?Substitute a known-
good ECM and recheck.Replace CMP sensor
and/or intake camshaft. Step Action Yes No
I6RW0D110034-01
1. EGR valve 4. Sensed information 7. “IG COIL” fuse 10. Main relay
2. Intake manifold 5. Fresh air 8. Main fuse box 11. “FI” fuse
3. ECM 6. Exhaust gas 9. Ignition switch 12. “IGN” fuse
Page 171 of 1556

Downloaded from www.Manualslib.com manuals search engine Engine General Information and Diagnosis: 1A-121
DTC Troubleshooting
NOTE
Before this troubleshooting is performed, read the precautions for DTC troubleshooting referring to
“Precautions for DTC Troubleshooting”.
Step Action Yes No
1Was “Engine and Emission Control System Check”
performed?Go to Step 2. Go to “Engine and
Emission Control
System Check”.
2Do you have SUZUKI scan tool?Go to Step 3. Go to Step 5.
3EGR valve operation check
1) With ignition switch turned OFF, install SUZUKI scan tool
to DTC.
2) Check EGR system referring to “EGR System Inspection
(If Equipped) in Section 1B”.
Is it in good condition?Go to Step 4. Go to Step 5.
4MAP sensor check
1) Check MAP sensor for performance referring to
“Manifold Absolute Pressure (MAP) Sensor Inspection
(If Equipped) in Section 1C”.
Is check result satisfactory?Intermittent trouble or
faulty ECM.
Check for intermittent
referring to “Intermittent
and Poor Connection
Inspection in Section
00”.Replace MAP sensor.
5EGR valve control circuit check
1) Check that EGR valve control circuits are in good
condition referring to Step 2 to 5 of “DTC P0403:
Exhaust Gas Recirculation Control Circuit”
Are circuits in good condition?Go to Step 6. Repair or replace EGR
valve control circuit(s).
6EGR valve check
1) Check EGR valve referring to “EGR Valve Inspection (If
Equipped) in Section 1B”.
Is check result satisfactory?Go to Step 7. Faulty EGR valve.
7MAP sensor check
1) Check MAP sensor for performance referring to
“Manifold Absolute Pressure (MAP) Sensor Inspection
(If Equipped) in Section 1C”.
Is check result satisfactory?EGR passage clogged.
If OK, substitute a
known-good ECM and
recheck.Replace MAP sensor.
Page 173 of 1556

Downloaded from www.Manualslib.com manuals search engine Engine General Information and Diagnosis: 1A-123
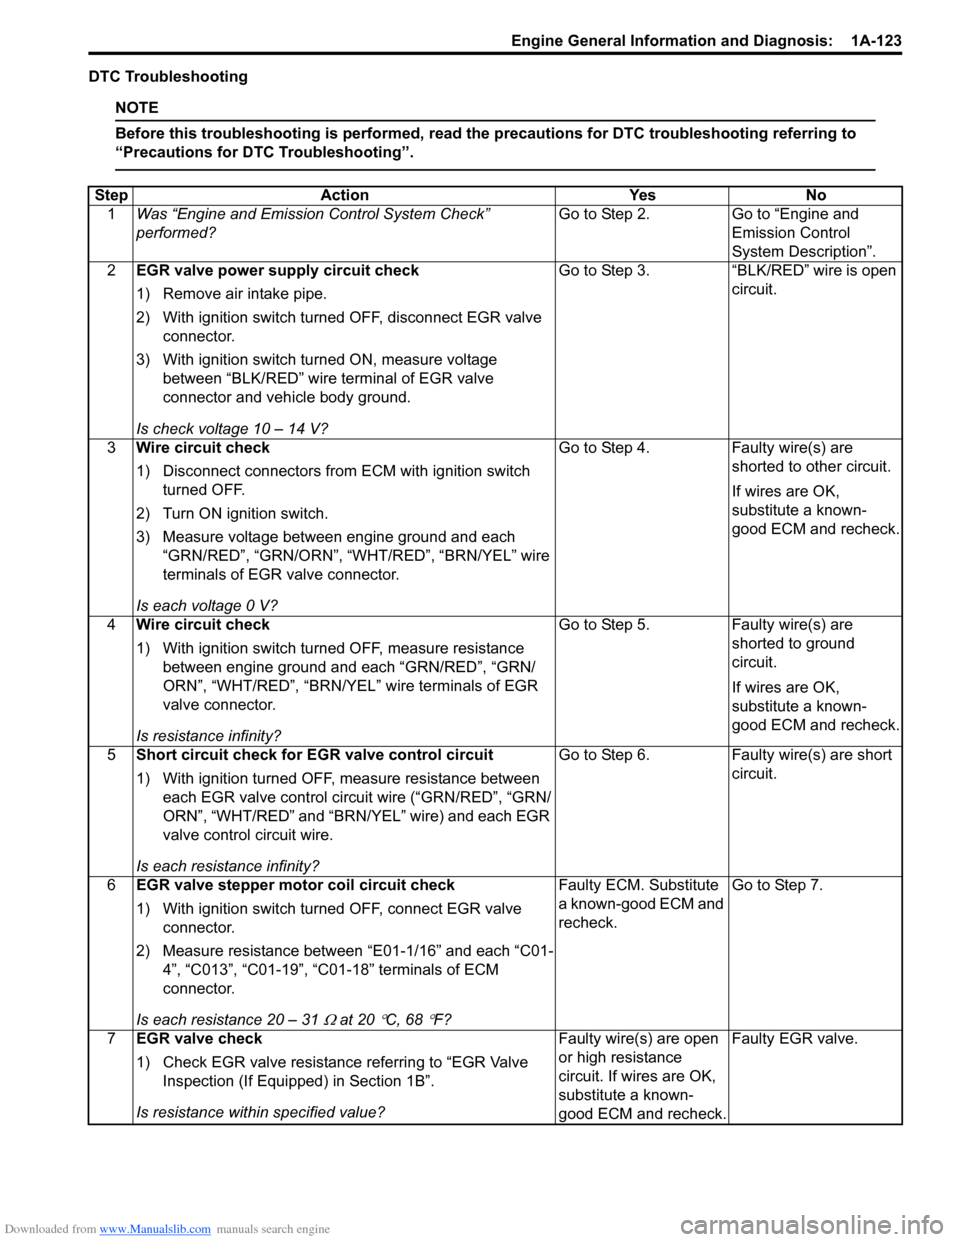
DTC Troubleshooting
NOTE
Before this troubleshooting is performed, read the precautions for DTC troubleshooting referring to
“Precautions for DTC Troubleshooting”.
Step Action Yes No
1Was “Engine and Emission Control System Check”
performed?Go to Step 2. Go to “Engine and
Emission Control
System Description”.
2EGR valve power supply circuit check
1) Remove air intake pipe.
2) With ignition switch turned OFF, disconnect EGR valve
connector.
3) With ignition switch turned ON, measure voltage
between “BLK/RED” wire terminal of EGR valve
connector and vehicle body ground.
Is check voltage 10 – 14 V?Go to Step 3. “BLK/RED” wire is open
circuit.
3Wire circuit check
1) Disconnect connectors from ECM with ignition switch
turned OFF.
2) Turn ON ignition switch.
3) Measure voltage between engine ground and each
“GRN/RED”, “GRN/ORN”, “WHT/RED”, “BRN/YEL” wire
terminals of EGR valve connector.
Is each voltage 0 V?Go to Step 4. Faulty wire(s) are
shorted to other circuit.
If wires are OK,
substitute a known-
good ECM and recheck.
4Wire circuit check
1) With ignition switch turned OFF, measure resistance
between engine ground and each “GRN/RED”, “GRN/
ORN”, “WHT/RED”, “BRN/YEL” wire terminals of EGR
valve connector.
Is resistance infinity?Go to Step 5. Faulty wire(s) are
shorted to ground
circuit.
If wires are OK,
substitute a known-
good ECM and recheck.
5Short circuit check for EGR valve control circuit
1) With ignition turned OFF, measure resistance between
each EGR valve control circuit wire (“GRN/RED”, “GRN/
ORN”, “WHT/RED” and “BRN/YEL” wire) and each EGR
valve control circuit wire.
Is each resistance infinity?Go to Step 6. Faulty wire(s) are short
circuit.
6EGR valve stepper motor coil circuit check
1) With ignition switch turned OFF, connect EGR valve
connector.
2) Measure resistance between “E01-1/16” and each “C01-
4”, “C013”, “C01-19”, “C01-18” terminals of ECM
connector.
Is each resistance 20 – 31
Ω at 20 °C, 68 °F?Faulty ECM. Substitute
a known-good ECM and
recheck.Go to Step 7.
7EGR valve check
1) Check EGR valve resistance referring to “EGR Valve
Inspection (If Equipped) in Section 1B”.
Is resistance within specified value?Faulty wire(s) are open
or high resistance
circuit. If wires are OK,
substitute a known-
good ECM and recheck.Faulty EGR valve.
Page 177 of 1556

Downloaded from www.Manualslib.com manuals search engine Engine General Information and Diagnosis: 1A-127
DTC Troubleshooting
WARNING!
In order to reduce risk of fire and personal injury, this work must be performed in a well ventilated area
and away from any open flames such as gas water heater.
NOTE
Before this troubleshooting is performed, read the precautions for DTC troubleshooting referring to
“Precautions for DTC Troubleshooting”.
Step Action Yes No
1Was “Engine and Emission Control System Check”
performed?Go to Step 2. Go to “Engine and
Emission Control
System Check”.
2EVAP canister purge power supply circuit check
1) Turn OFF ignition switch and disconnect connector from
EVAP canister purge valve.
2) Measure voltage between engine ground and “BLK/
RED” wire terminal of EVAP canister purge valve
connector with ignition switch turned ON.
Is it voltage 10 – 14 V?Go to Step 3. “BLK/RED” wire is open
circuit.
3Wire circuit check
1) Disconnect connectors from ECM with ignition switch
turned OFF.
2) Measure resistance between “C01-29” terminal of ECM
connector and vehicle body ground.
Is resistance infinity?Go to Step 4. “BLU/BLK” wire is
shorted to ground
circuit.
4Wire circuit check
1) Measure voltage between “C01-29” terminal of ECM
connector and vehicle body ground with ignition switch
turned ON.
Is voltage 0 V?Go to Step 5. “BLU/BLK” wire is
shorted to other circuit.
5Wire circuit check
1) Connect connector to purge control valve with ignition
switch turned OFF.
2) Turn ON ignition switch and measure voltage between
“C01-29” terminal of ECM connector and vehicle body
ground.
Is it voltage 10 – 14 V?Go to Step 6. “BLU/BLK” wire is open
circuit.
6EVAP canister purge control valve check
1) Check EVAP canister purge control valve referring to
“EVAP Canister Purge Valve Inspection in Section 1B”.
Is it in good condition?Go to Step 7. Faulty EVAP canister
purge control valve.
7EVAP canister purge control circuit check
1) With ignition switch turn OFF, measure resistance
between “E01-1/16” terminal and “C01-29” terminal of
ECM connector.
Is resistance below 34
Ω at 20 °C, 68 °F?Faulty ECM. Substitute
a known-good ECM and
recheck.“BLK/RED” and/or
“BLU/BLK” wire are high
resistance circuit.
Page 178 of 1556

Downloaded from www.Manualslib.com manuals search engine 1A-128 Engine General Information and Diagnosis:
DTC P0462 / P0463: Fuel Level Sensor Circuit Low / HighS6RW0D1104047
Wiring Diagram
DTC Detecting Condition and Trouble Area
DTC Confirmation Procedure
1) With ignition switch turned OFF, connect scan tool.
2) Turn ON ignition switch and clear DTC using scan tool.
3) Start engine and run it for 30 sec. or more.
4) Check DTC and pending DTC.
DTC Troubleshooting
NOTE
Before this troubleshooting is performed, read the precautions for DTC troubleshooting referring to
“Precautions for DTC Troubleshooting”.
E01C01
3 4
18 19 5 6 7 10 11
17 20
47 46 49 50 51 21 22
5216 259
24 14
29
55 57 54 53 59
60 582
26 27 28 15
30
56 4832 31 34 35 36 37 40 42 39 38 44
45 43 41 331 12 13
238 3 4
18 19 5 6 7 10 11
17 20
47 46 49 50 51 21 22
5216 259
24 14
29
55 57 54 53 59
60 582
26 27 28 15
30
56 4832 31 34 35 36 37 40 42 39 38 44
45 43 41 331 12 13
238
12 V
13
2
E01-24
BLK/ORN
YEL/REDYEL/RED
12 V
YEL/RED
I6RW0D110040-01
1. Fuel level sensor (gauge) 2. ECM 3. Combination meter
DTC detecting condition Trouble area
P0462:
Fuel level sensor voltage is lower than specified value for 3 sec.
(1 driving cycle detection logic but MIL does not light up)
P0463:
Fuel level sensor voltage is higher than specified value for 30 sec.
(1 driving cycle detection logic but MIL does not light up)• “YEL/RED” circuit malfunction
• ECM power and/or ground circuit malfunction
• ECM malfunction
Step Action Yes No
1Was “Engine and Emission Control System Check”
performed?Go to Step 2. Go to “Engine and
Emission Control
System Check”.
2DTC check
1) Connect scan tool to DLC with ignition switch turned
OFF.
2) Turn ON ignition switch.
3) Clear DTC and recheck DTC with scan tool.
Is there P0463?Go to Step 3. Intermittent trouble.
Check for intermittent
referring to “Intermittent
and Poor Connection
Inspection in Section
00”.