Page 372 of 425

Maintenance and service 11 - 3 9
– CONTINUED –
Aluminum wheels
Aluminum wheels can be scratched and
damaged easily. Handle them carefully to
maintain their appearance, performance,
and safety. �yWhen any of the wheels is removed and
replaced for tire rotation or to change a
flat, always check the tightness of the
wheel nuts after driving approximately 600
miles (1,000 km). If any nut is loose, tight-
en it to the specified torque.�y Never apply oil to the threaded parts,
wheel nuts, or tapered surface of the
wheel.�y Never let the wheel rub against sharp
protrusions or curbs.�y Be sure to fit tire chains on uniformly
and completely around the tire, otherwise
the chains may scratch the wheel. �y When wheel nuts, balance weights, or
the center cap is replaced, be sure to re-
place them with genuine SUBARU parts
designed for aluminum wheels.Windshield washer fluid
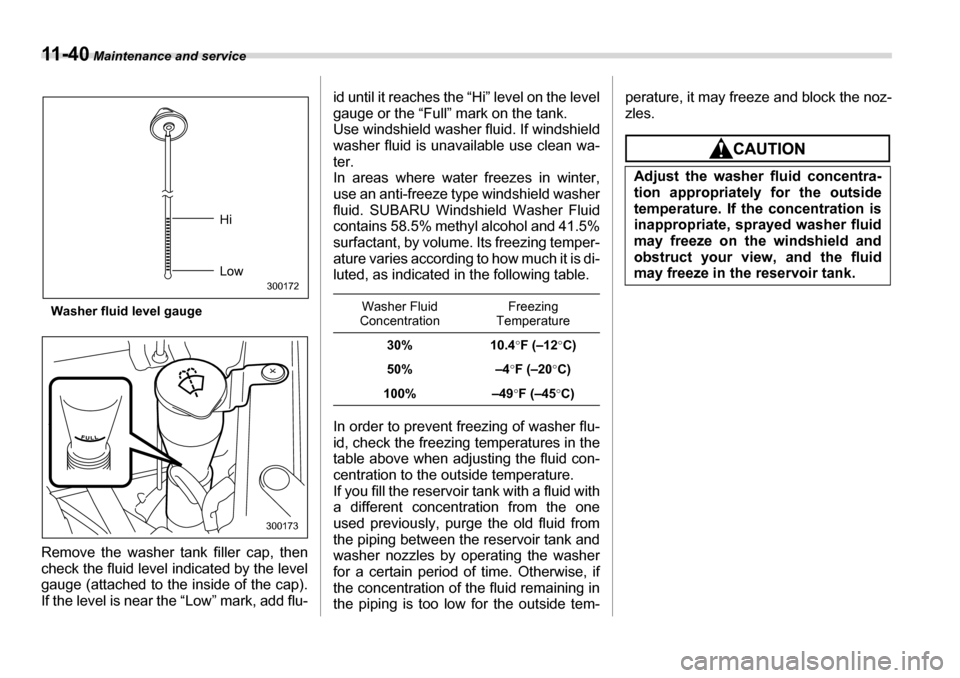
If you spray washer fluid on the windshield
but the supply of washer fluid appears to
diminish, check the level of washer fluid in the tank.
Use only those wheels that are
specified for your vehicle. Wheels
not meeting specifications could in-
terfere with brake caliper operation
and may cause the tires to rub
against the wheel well housing dur-
ing turns. The resulting loss of vehi-
cle control could lead to an acci-
dent.
Never use engine coolant as washer
fluid because it could cause paint
damage.
B00199
Page 373 of 425

11 - 4 0 Maintenance and service
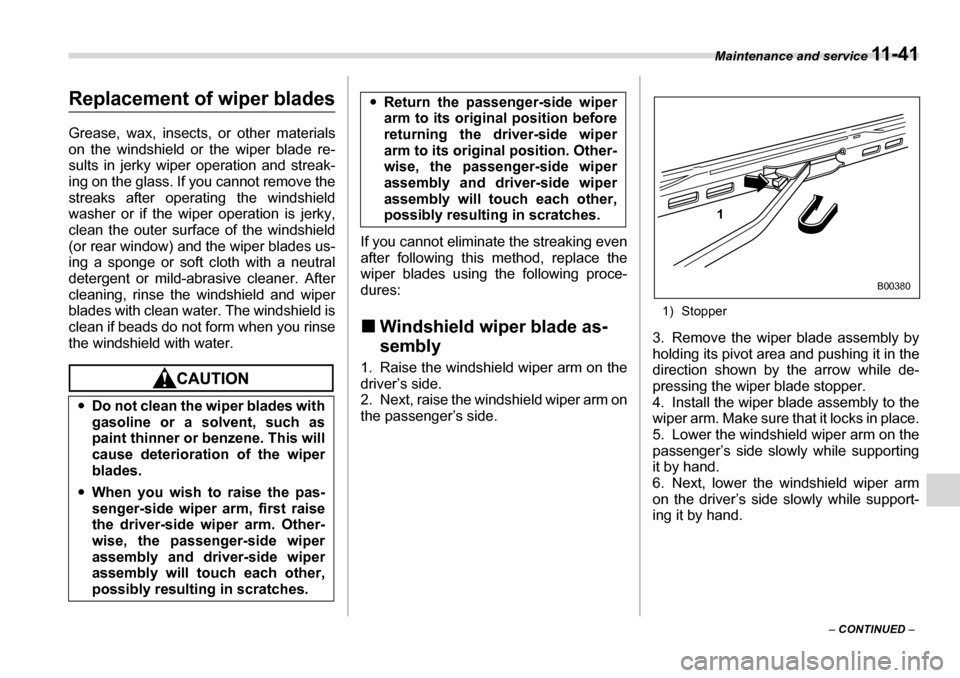
Washer fluid level gauge
Remove the washer tank filler cap, then
check the fluid level indicated by the level
gauge (attached to the inside of the cap).
If the level is near the “Low” mark, add flu- id until it reaches the “Hi” level on the level
gauge or the “Full” mark on the tank.
Use windshield washer fluid. If windshield
washer fluid is unavailable use clean wa-
ter.
In areas where water freezes in winter,
use an anti-freeze type windshield washer
fluid. SUBARU Windshield Washer Fluid
contains 58.5% methyl alcohol and 41.5%
surfactant, by volume. Its freezing temper-
ature varies according to how much it is di-
luted, as indicated in the following table.
In order to prevent freezing of washer flu-
id, check the freezing temperatures in the
table above when adjusting the fluid con-
centration to the outside temperature.
If you fill the reservoir tank with a fluid with
a different concentration from the one
used previously, purge the old fluid from
the piping between the reservoir tank and
washer nozzles by operating the washer
for a certain period of time. Otherwise, if
the concentration of the fluid remaining in
the piping is too low for the outside tem- perature, it may freeze and block the noz-zles.
Hi Low
300172
300173
Washer Fluid
Concentration Freezing
Temperature
30% 10.4 °F (–12 °C)
50% –4 °F (–20 °C)
100% –49 °F (–45 °C)
Adjust the washer fluid concentra-
tion appropriatel y for the outside
temperature. If the concentration is
inappropriate, sprayed washer fluid
may freeze on the windshield and
obstruct your view, and the fluid
may freeze in the reservoir tank.
Page 374 of 425

Maintenance and service 11 - 4 1
– CONTINUED –
Replacement of wiper blades Grease, wax, insects, or other materials
on the windshield or the wiper blade re-
sults in jerky wiper operation and streak-
ing on the glass. If you cannot remove the
streaks after operating the windshield
washer or if the wiper operation is jerky,
clean the outer surface of the windshield
(or rear window) and the wiper blades us-
ing a sponge or soft cloth with a neutral
detergent or mild-abrasive cleaner. After
cleaning, rinse the windshield and wiper
blades with clean water. The windshield is
clean if beads do not form when you rinse
the windshield with water.
If you cannot eliminate the streaking even
after following this method, replace the
wiper blades using the following proce-
dures: �„ Windshield wiper blade as- sembly
1. Raise the windshield wiper arm on the
driver’s side.
2. Next, raise the windshield wiper arm on
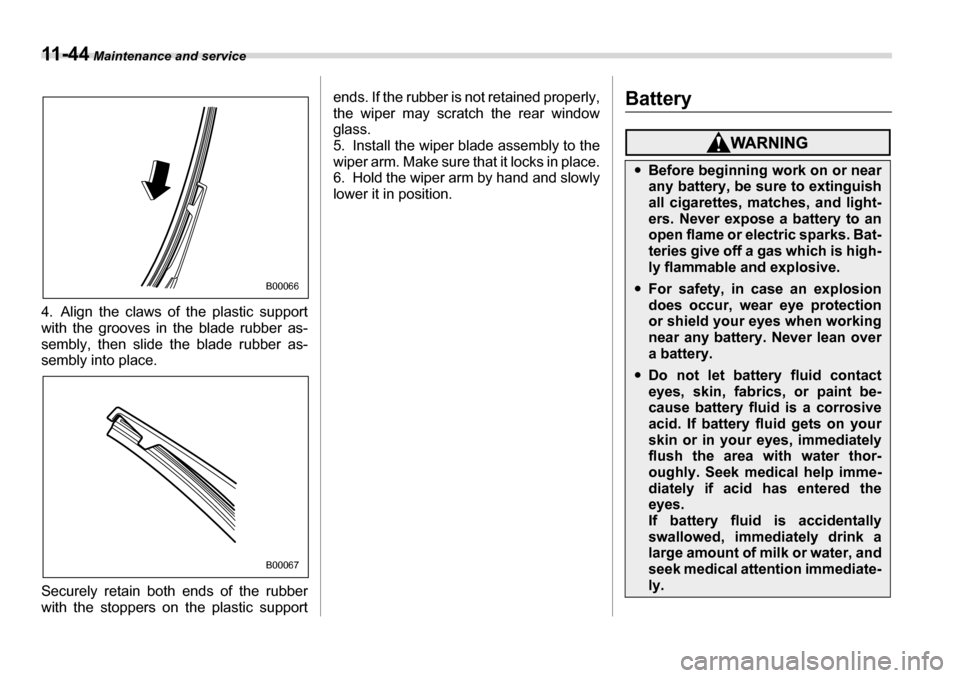
the passenger’s side. 1) Stopper
3. Remove the wiper blade assembly by
holding its pivot area and pushing it in the
direction shown by the arrow while de-
pressing the wiper blade stopper.
4. Install the wiper blade assembly to the
wiper arm. Make sure that it locks in place.
5. Lower the windshield wiper arm on the
passenger’s side slowly while supporting
it by hand.
6. Next, lower the windshield wiper arm
on the driver’s side slowly while support-
ing it by hand.
�y
Do not clean the wiper blades with
gasoline or a solvent, such as
paint thinner or benzene. This will
cause deterioration of the wiper
blades.
�y When you wish to raise the pas-
senger-side wiper arm, first raise
the driver-side wiper arm. Other-
wise, the passenger-side wiper
assembly and driver-side wiper
assembly will touch each other,
possibly resulting in scratches.
�yReturn the passenger-side wiper
arm to its original position before
returning the driver-side wiper
arm to its original position. Other-
wise, the passenger-side wiper
assembly and driver-side wiper
assembly will touch each other,
possibly resulting in scratches.
1
B00380
Page 375 of 425
11 - 4 2 Maintenance and service
�„Windshield wiper blade rub- ber
1) Metal support
1. Grasp the locked end of the blade rub-
ber assembly and pull it firmly until the
stoppers on the rubber are free of the met-
al support. 1) Metal spines
2. If the new blade rubber is not provided
with two metal spines, remove the metal
spines from the old blade rubber and in-
stall them in the new blade rubber. 3. Align the claws of the metal support
with the grooves in the rubber and slide
the blade rubber assembly into the metal
support until it locks.
1) Stopper
4. Be sure to position the claws at the end
of the metal support between the stoppers
on the rubber as shown. If the rubber is
not retained properly, the wiper blade may
scratch the windshield. �„ Rear window wiper blade as-
sembly
1. Raise the wiper arm off the rear win- dow.
1
B00330
B00504
1
B00059
1
B00332
Page 376 of 425
Maintenance and service 11 - 4 3
– CONTINUED –
2. Turn the wiper blade assembly coun-
terclockwise.
3. Pull the wiper blade assembly toward
you to remove it from the wiper arm. �„
Rear window wiper blade rub- ber
1. Pull out the end of the blade rubber as-
sembly to unlock it from the plastic sup-
port. 2. Pull the blade rubber assembly out of
the plastic support.
1) Metal spines
3. If the new blade rubber is not provided
with two metal spines, remove the metal
spines from the old blade rubber and in-
stall them in the new blade rubber.
700063
700064
700017
B00064
B00505
1
Page 377 of 425

11 - 4 4 Maintenance and service
4. Align the claws of the plastic support
with the grooves in the blade rubber as-
sembly, then slide the blade rubber as-
sembly into place.
Securely retain both ends of the rubber
with the stoppers on the plastic support ends. If the rubber is not retained properly,
the wiper may scratch the rear window
glass.
5. Install the wiper blade assembly to the
wiper arm. Make sure that it locks in place.
6. Hold the wiper arm by hand and slowly
lower it in position.
Battery
B00066
B00067
�y
Before beginning work on or near
any battery, be su re to extinguish
all cigarettes, matches, and light-
ers. Never expose a battery to an
open flame or electric sparks. Bat-
teries give off a gas which is high-
ly flammable and explosive.
�y For safety, in case an explosion
does occur, wear eye protection
or shield your eyes when working
near any battery. Never lean over a battery.
�yDo not let battery fluid contact
eyes, skin, fabrics, or paint be-
cause battery fluid is a corrosive
acid. If battery fluid gets on your
skin or in your eyes, immediately
flush the area wi th water thor-
oughly. Seek medical help imme-
diately if acid has entered the
eyes. If battery fluid is accidentally
swallowed, immediately drink a
large amount of milk or water, and
seek medical attention immediate-ly.
Page 378 of 425

Maintenance and service 11 - 4 5
– CONTINUED –
It is unnecessary to periodically check the battery fluid level or periodically refill with
distilled water.
Fuses
The fuses are designed to melt during an
overload to prevent damage to the wiring
harness and electrical equipment. The
fuses are located in two fuse boxes. One
is located under the instrument panel be-
hind the fuse box cover on the driver’s seat side.
�y
To lessen the risk of sparks, re-
move rings, metal watchbands,
and other metal jewelry. Never al-
low metal tools to contact the pos-
itive battery terminal and anything
connected to it WHILE you are at
the same time in contact with any
other metallic portion of the vehi-
cle because a short circuit will re-
sult.
�yKeep everyone including children
away from the battery.
�yCharge the battery in a well-venti-
lated area.
�yBattery posts, terminals, and re-
lated accessories contain lead
and lead compounds, chemicals
known to the State of California to
cause cancer and reproductive
harm. Batteries also contain other
chemicals known to the State of
California to cause cancer. Wash
hands after handling.
Never use more than 10 amperes
when charging the battery because
it will shorten battery life.
Never replace a fuse with one hav-
ing a higher rating or with material
other than a fuse because serious
damage or a fire could result.
B00130
Page 379 of 425
11 - 4 6 Maintenance and service
Open the lid that is located above the
hood release knob and pull it toward you
to remove it.
The other one is housed in the engine
compartment. The spare fuses are stored in the main
fuse box cover in
the engine compart-
ment.
The fuse puller is stored in the main fuse
box in the engine compartment. 1) Good
2) Blown
If any lights, accessori es or other electri-
cal controls do not operate, inspect the
corresponding fuse. If a fuse has blown,
replace it.
1. Turn the ignition switch to the “LOCK”
position and turn off all electrical accesso- ries.
2. Remove the cover.
3. Determine which fuse may be blown.
The back side of each fuse box cover and
the “Fuses and circuits” section in chapter
12 in this manual show the circuit for each fuse.
B00131
600120
B00198
600159
12
B00338