Page 275 of 365

10-2 Appearance care
Appearance careExterior care
Washing
NOTE
When having your vehicle washed in
an automatic car wash, make sure be-
forehand that the car wash is of suit-
able type.
The best way to preserve your vehicle s
beauty is frequent washing. Wash the ve-
hicle at least once a month to avoid con-
tamination by road grime.
Wash dirt off with a wet sponge and plenty
of lukewarm or cold water. Do not wash
the vehicle with hot water and in direct
sunlight.
Salt, chemicals, insects, tar, soot, tree
sap, and bird droppings should be washed
off by using a light detergent, as required.
If you use a light detergent, make certain
that it is a neutral detergent. Do not use
strong soap or chemical detergents. All
cleaning agents should be promptly
flushed from the surface and not allowed
to dry there. Rinse the vehicle thoroughly
When washing the vehicle, the
brakes may get wet. As a result,
the brake stopping distance will
be longer. To dry the brakes, drive
the vehicle at a safe speed while
lightly pressing the brake pedal to
heat up the brakes.
Do not wash the engine compart-
ment and area adjacent to it. If wa-
ter enters the engine air intake,
electrical parts or the power steer-
ing fluid reservoir, it will cause en-
gine trouble or faulty power steer-
ing respectively.
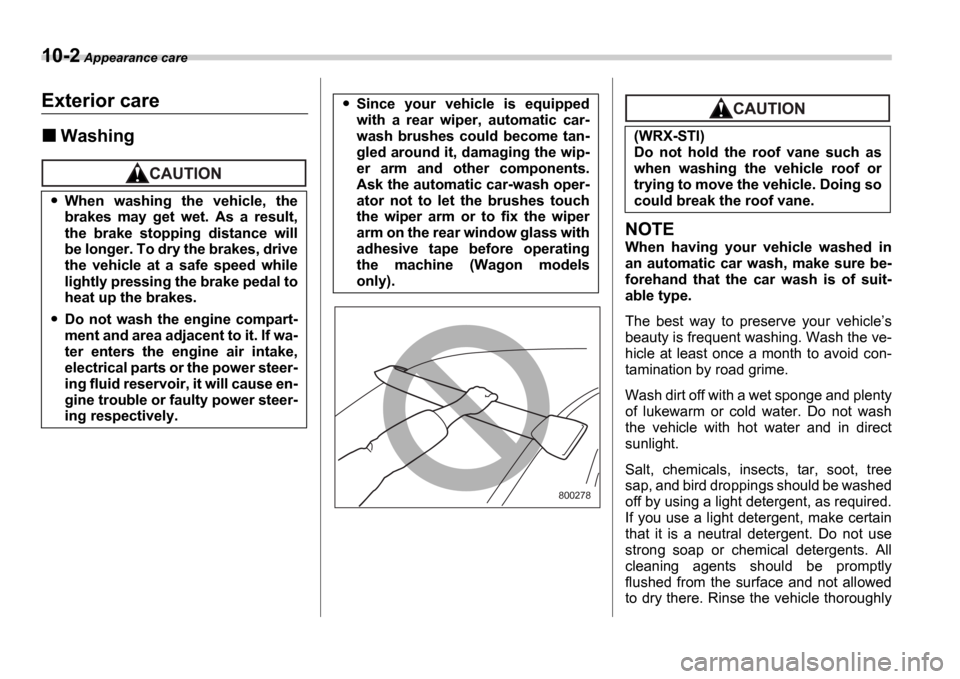
Since your vehicle is equipped
with a rear wiper, automatic car-
wash brushes could become tan-
gled around it, damaging the wip-
er arm and other components.
Ask the automatic car-wash oper-
ator not to let the brushes touch
the wiper arm or to fix the wiper
arm on the rear window glass with
adhesive tape before operating
the machine (Wagon models
only).
800278
(WRX-STI)
Do not hold the roof vane such as
when washing the vehicle roof or
trying to move the vehicle. Doing so
could break the roof vane.
Page 276 of 365

Appearance care 10-3
CONTINUED
with plenty of lukewarm water. Wipe the
remaining water off with a chamois or soft
cloth.
Washing the underbody
Chemicals, salts and gravel used for deic-
ing road surfaces are extremely corrosive,
accelerating the corrosion of underbody
components, such as the exhaust system,
fuel and brake lines, brake cables, floor
pan and fenders, and suspension.
Thoroughly flush the underbody and in-
side of the fenders with lukewarm or cold
water at frequent intervals to reduce the
harmful effects of such agents.
Mud and sand adhering to the underbody
components may accelerate their corro-
sion.
After driving off-road or on muddy or
sandy roads, wash the mud and sand off
the underbody. Carefully flush the sus-
pension and axle parts, as they are partic-
ularly prone to mud and sand buildup. Do
not use a sharp-edged tool to remove
caked mud.
NOTE
Be careful not to damage brake hoses,
sensor harnesses, and other parts
when washing suspension compo-
nents.
Using a warm water washer
Keep a good distance of 12 in (30 cm)
or more between the washer nozzle and
the vehicle.
Do not wash the same area continuous-
ly.
If a stain will not come out easily, wash
by hand. Some warm water washers are
of the high temperature, high pressure
type, and they can damage or deform the
resin parts such as mouldings, or cause
water to leak into the vehicle.
Waxing and polishing
Always wash and dry the vehicle before
waxing and polishing.
Use a good quality polish and wax and ap-
ply them according to the manufacturer s
instructions. Wax or polish when the paint-
ed surface is cool.
Be sure to polish and wax the chrome trim,
as well as the painted surfaces. Loss of
wax on a painted surface leads to loss of
the original luster and also quickens the
deterioration of the surface. It is recom-
mended that a coat of wax be applied at
least once a month, or whenever the sur-
face no longer repels water.
If the appearance of the paint has dimin-
ished to the point where the luster or tone cannot be restored, lightly polish the sur-
face with a fine-grained compound. Never
polish just the affected area, but include
the surrounding area as well. Always pol-
ish in only one direction. A No. 2000 grain
compound is recommended. Never use a
coarse-grained compound. Coarser
grained compounds have a smaller grain-
size number and could damage the paint.
After polishing with a compound, coat with
wax to restore the original luster. Frequent
polishing with a compound or an incorrect
polishing technique will result in removing
the paint layer and exposing the under-
coat. When in doubt, it is always best to
contact your SUBARU dealer or an auto
paint specialist.
NOTE
Be careful not to block the windshield
washer nozzles with wax when waxing
the vehicle.
Cleaning aluminum wheels
Promptly wipe the aluminum wheels
clean of any kind of grime or agent. If dirt
is left on too long, it may be difficult to
clean off.
Do not use soap containing grit to clean
the wheels. Be sure to use a neutral clean-
ing agent, and later rinse thoroughly with
water. Do not clean the wheels with a stiff
Page 316 of 365

Maintenance and service 11-37
CONTINUED
used previously, purge the old fluid from
the piping between the reservoir tank and
washer nozzles by operating the washer
for a certain period of time. Otherwise, if
the concentration of the fluid remaining in
the piping is too low for the outside tem-
perature, it may freeze and block the noz-
zles.
Replacement of wiper blades
Grease, wax, insects, or other material on
the windshield or the wiper blade results in
jerky wiper operation and streaking on the
glass. If you cannot remove the streaks af-
ter operating the windshield washer or if
the wiper operation is jerky, clean the out-
er surface of the windshield (or rear win-
dow) and the wiper blades using a sponge
or soft cloth with a neutral detergent or
mild-abrasive cleaner. After cleaning,
rinse the windshield and wiper blades with
clean water. The windshield is clean if
beads do not form when you rinse the
windshield with water.
If you cannot eliminate the streaking even
after following this method, replace the
wiper blades using the following proce-
dures:
Windshield wiper blades as-
sembly
1. Raise the wiper arm off the windshield.
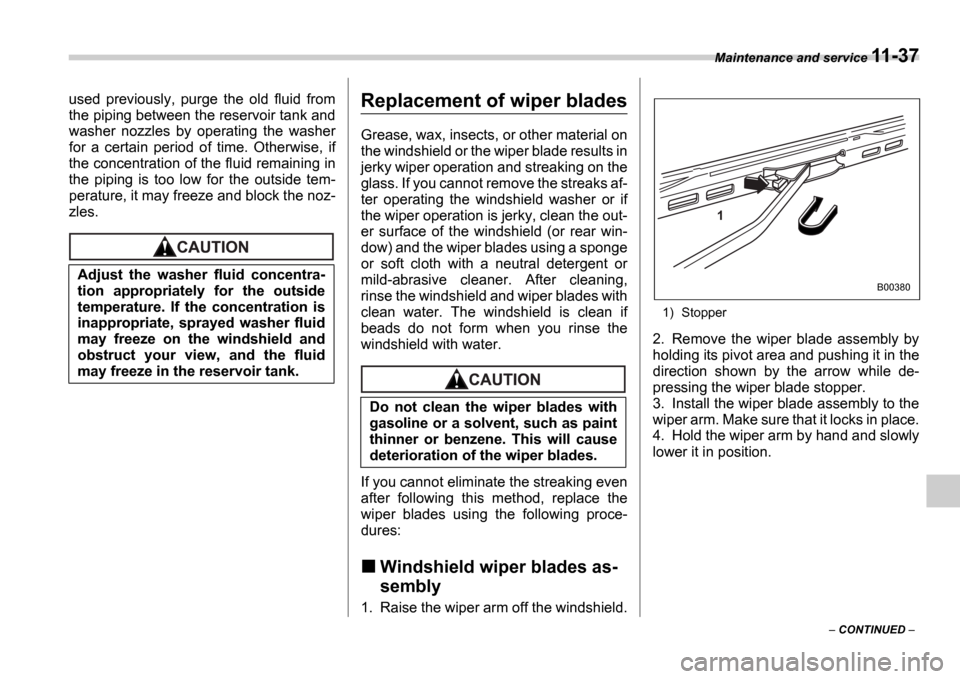
1) Stopper
2. Remove the wiper blade assembly by
holding its pivot area and pushing it in the
direction shown by the arrow while de-
pressing the wiper blade stopper.
3. Install the wiper blade assembly to the
wiper arm. Make sure that it locks in place.
4. Hold the wiper arm by hand and slowly
lower it in position.
Adjust the washer fluid concentra-
tion appropriately for the outside
temperature. If the concentration is
inappropriate, sprayed washer fluid
may freeze on the windshield and
obstruct your view, and the fluid
may freeze in the reservoir tank.
Do not clean the wiper blades with
gasoline or a solvent, such as paint
thinner or benzene. This will cause
deterioration of the wiper blades.
1
B00380