2006 SUBARU IMPREZA WRX start stop button
[x] Cancel search: start stop buttonPage 101 of 365

2-14 Keys and doors
cating that the system is now deactivated.
If the system was previously deactivated:
The odometer/trip meter screen displays AL on and the horn sounds once, indi-
cating that the system is now activated.
NOTE
You may have the above setting
change done by your SUBARU dealer.
If you have accidentally trig-
gered the alarm system
To stop the alarm
Do any of the following operations:
Press any button on the remote trans-
mitter.
Cycle the ignition switch from the
LOCK to ON position three times within
5 seconds.
Arming the system
To arm the system using remote
transmitter
1. Close all windows and the moonroof (if
so equipped).
2. Remove the key from the ignition
switch.
3. Open the doors and get out of the vehi-
cle. 4. Make sure that the engine hood (and
the trunk lid) are locked.
5. Close all doors (and the rear gate on
the Wagon).
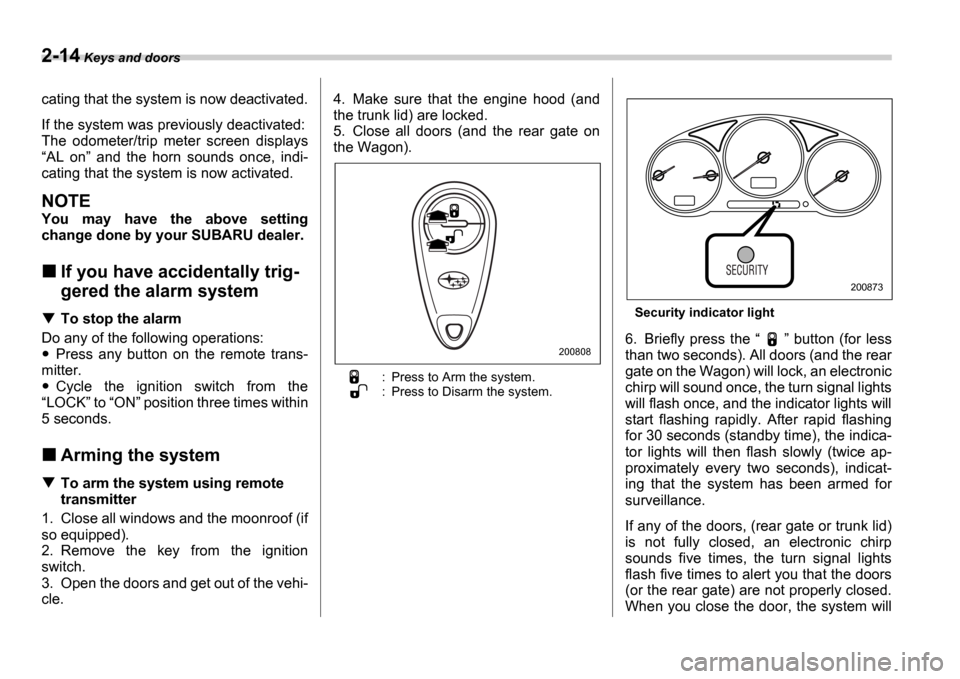
: Press to Arm the system.
: Press to Disarm the system.
Security indicator light
6. Briefly press the
button (for less
than two seconds). All doors (and the rear
gate on the Wagon) will lock, an electronic
chirp will sound once, the turn signal lights
will flash once, and the indicator lights will
start flashing rapidly. After rapid flashing
for 30 seconds (standby time), the indica-
tor lights will then flash slowly (twice ap-
proximately every two seconds), indicat-
ing that the system has been armed for
surveillance.
If any of the doors, (rear gate or trunk lid)
is not fully closed, an electronic chirp
sounds five times, the turn signal lights
flash five times to alert you that the doors
(or the rear gate) are not properly closed.
When you close the door, the system will200808
200873
Page 173 of 365

5-10 Audio
lected in a similar way.
NOTE
No disc change takes place if the
button corresponding to the storage
tray in which no disc is loaded is
pressed.
If the disc select button correspond-
ing to the disc now in playback is
pressed again, the disc will be replayed
from its beginning.
To select a song from its beginning
Forward direction
Briefly press the side of the button
(12) to skip to the beginning of the next
track. Each time this side of the button is
pressed, the indicated track number will
increase.
Backward direction
Briefly press the side of the button
(12) to skip to the beginning of the current
track. Each time this side of the button is
pressed, the indicated track number will
decrease.
Fast-forwarding and fast-reversing
Fast-forwarding
Press the side of the button (12)
continuously to fast-forward the disc.
Release the button to stop fast-forward- ing.
If you continue fast-forwarding to the end
of the disc, the CD changer will automati-
cally stop fast-forwarding and start play-
back beginning with the first track on the
current disc.
Fast-reversing
Press the side of the button (12)
continuously to fast-reverse the disc.
Release the button to stop fast-reversing.
If you continue fast-reverse to the begin-
ning of the disc, the CD changer will auto-
matically stop fast-reverse and start play-
back beginning with the first track on the
current disc.
Repeat playback
Use this to play a certain track repeatedly.
During playback, press the RPT/RDM
button (14) and release it in less than 2
seconds. The RPT indicator will come on
and the song will be played continuously.
To cancel the repeat mode, press the but-
ton again. Then the RPT indicator goes
out, and normal playback mode is re-
stored.
Random playback
Use this to play the tracks on the disc in
random order. During playback, press the RPT/RDM button (14) and hold it in for
more than 2 seconds. The RDM indica- tor will come on and all songs on the disc
will be played in a random order.
To cancel the random mode, press the
button again. Then the
RDM indicator
goes out, and normal playback mode is
restored.
Page 179 of 365

5-16 Audio
begin to play back the first track of the
disc.
To insert more discs in succession, re-
peat Steps 1 and 2. The magazine will be
loaded with discs in the ascending order
of position number.
If you do not insert any disc in 15 seconds
after you have pressed the LOAD but-
ton, the player will begin to play back the
first track of the last disc you have insert-
ed.
The disc indicator steadily lights up if a
disc is already inserted in the correspond-
ing position of the magazine.
While the player is in the loading mode,
if you press any of the other mode buttons FM (1), AM (2), the player will enter the
standby mode. Press the CD button (14)
to start playback.
Inserting a disc in a desired position
1. Press the LOAD button (9). If the
magazine in the player has an idle posi-
tion where you can insert a disc, the DISC indicator associated with the idle
position will blink.
The positions in the magazine the indica-
tor of which steadily lights up are already
loaded with discs.
2. Press the Disc select button (17) at
the position where you want to insert a
disc. The associated DISC indicator will blink, and the
LOAD will be displayed.
3. If you insert a disc during the 15-sec-
ond period while the LOAD is on display,
the disc will be automatically drawn in,
and the player will start playback of the
disc, beginning with the first track.
To insert more discs in succession, re-
peat Steps 1 and 2.
While the player is in the loading mode,
if you press any of the other mode buttons FM (1), AM (2), the player will enter
standby mode. Press the CD button (14)
to start playback.
Loading all the magazine (Full disc
loading mode)
1. If you continue to press the LOAD
button (9) for more than 1.5 seconds, the
player will produce beep sound and will
enter the full disc loading mode.
2. A DISC indicator will blink, and the
ALL LOAD will be on display for a period
of 15 seconds. If a disc is successfully
loaded during this period, the DISC indi-
cator will stop blinking and will steadily
light.
3. When the loading of a disc is complete,
the next DISC indicator will blink. Then
repeat Step 2.
4. When the magazine is filled with discs
by repeating Steps 2 and 3, the player will
start playback of the discs, beginning with the one inserted first.
If you fail to insert any disc during each 15
seconds interval, the full disc loading
mode will be canceled, and the player will
start playback of the disc inserted first.
How to play back a CD or make a
pause
When there is no CD inserted:
Insert a CD by referring to How to Insert
a CD(s) .
When a CD is loaded, the player will start
playback of the CD, beginning with the
first track.
When there are CDs loaded:
Press a desired one of the Disc select
buttons (17) the DISC indicator of which
steadily lights up. The player will then start
playback of the selected CD, beginning
with the first track.
Page 359 of 365

14-4 Index
Tired or sleepy .................................... ............................... 7
E
EBD (Electronic brake force distribution) system ........ ..... 7-24
Electrical system ..................................... ......................... 12-3
Electronic Brake Force Distribution (EBD) system ......... .. 7-24
Emergency Locking Retractor (ELR) .................... ............ 1-11
Engine Compartment overview ................................ ................ 11-6
Coolant ........................................... ........................... 11-12
Exhaust gas (Carbon monoxide) ....................... ........ 6, 8-2
Hood .............................................. .............................. 11-4
Oil ............................................... ................................. 11-8
Overheating ........................................ ......................... 9-11
Starting .......................................... ................................ 7-7
Stopping .......................................... .............................. 7-8
Exterior care ....................................... .............................. 10-2
F
Flat tires ......................................... .................................... 9-4
Floor mat ......................................... ................................... 6-9
Fluid level
Automatic transmission ............................... .............. 11-20
Brake .............................................. ........................... 11-25
Clutch ............................................. ........................... 11-26
Power steering ..................................... ...................... 11-24
Folding down the rear seat ......................... ........................ 1-8
Front
Differential gear oil ............................. ........................ 11-21
Fog light ......................................... ............................ 11-48
Fog light button .................................. .......................... 3-26Seatbelt pretensioners ..............................
................... 1-20
Seats .............................................. ................................ 1-2
Turn signal light .................................. ....................... 11-48
Fuel .............................................. ....................................... 7-2
Economy hints ........................................ ....................... 8-2
Filler lid and cap ................................. ............................ 7-4
Gauge ............................................. ...................... 3-8, 3-12
Requirements ...................................... .......................... 7-2
Fuses .............................................. ................................ 11-41
Fuses and circuits ..................................... ........................ 12-6
G
GAWR (Gross Axle Weight Rating) ..................... ............. 8-14
Glove box ........................................... ................................ 6-4
GVWR (Gross Vehicle Weight Rating) ................... .......... 8-14
H
Hazard warning flasher ............................. .......................... 3-6
Head restraint adjustment (Front) ................... .................... 1-4
Head restraint adjustment (Wagon) .................. .................. 1-7
Headlight beam leveler ............................ ......................... 3-25
Headlight flasher .................................. ............................. 3-23
Headlight indicator light .......................... .......................... 3-21
Headlights ......................................... ..................... 3-22, 11-45
Heater operation .................................. ............................... 4-5
High beam indicator light .......................... ........................ 3-20
High mount stop light .............................. ........................ 11-51
Horn .............................................. .................................... 3-35
Hose and connections .................................. .................. 11-12