2006 SUBARU BAJA ECO mode
[x] Cancel search: ECO modePage 293 of 487

7-40
Starting and operating
depressing the accelerator pedal.
NOTE
If the difference between the actual vehicle speed
when the control lever is pushed downward and
the speed last time you set is less than 4 mph (6.8
km/h), the vehicle speed will be lowered by 1 mph
(1.6 km/h). This occurs because the cruise control
system unit regards this lever operation as that in-
tended to decrease the vehicle speed. �T
To decrease the speed (by control lever)
Push the control lever downward in the “SET, COAST”
direction and hold it until the vehicle reaches the de-
sired speed. Then, release the control lever. The vehi-
cle speed at that moment will be memorized and treat-
ed as the new set speed.
When the difference between the actual vehicle speed
and the set speed is less than 4 mph (6.8 km/h), the
set speed can be lowered 1 mph (1.6 km/h) each time
by pressing the control lever downward in the “SET,
COAST” direction quickly. �T To decrease the speed (by brake pedal)
1. Depress the brake pedal to release cruise control
temporarily.
2. When the speed decreases to the desired speed, press the control lever downward in the “SET,
COAST” direction once. Now the desired speed is set
and the vehicle will keep running at that speed without
depressing the accelerator pedal. �„
Cruise control set indicator light
�T Non-turbo models
The light comes on when vehicle speed has been set. �T Turbo models
The Cruise set indicator light comes on when the igni-
tion switch is turned to the “ON” position and goes out
after approximately three seconds.
The light comes on when vehicle speed has been set.
NOTE �y If you move the cruise control lever while turn-
ing the ignition switch “ON”, the cruise control
function is deactivated and the cruise control set
indicator light flashes. To reactivate the cruise
control function, turn the ignition switch back to
the “ACC” or “LOCK” posi tion, and then turn it
again to the “ON” position.�y If this indicator light and the “ ” indicator
light flash simultaneously during driving, have the
vehicle checked by your nearest SUBARU dealer.
Page 366 of 487

11 - 1
11
Maintenance and service
Maintenance schedule ................................. 11-3
Maintenance precautions ............................ 11-3 Before checking or servicing in the engine compartment .................................................. 11-4
When you do checking or servicing in the engine compartment while the engine is
running ............................................................ 11-5
Engine hood .................................................. 11-5
Engine compartment overview ................... 11-8 Non-turbo models ............................................. 11-8
Turbo models .................................................... 11-9
Engine oil ...................................................... 11-10 Checking the oil level ....................................... 11-10
Changing the oil and oil filter .......................... 11-12
Recommended grade and viscosity ................ 11-15
Recommended grade and viscosity under severe driving conditions .............................. 11-16
Cooling system .... ....................................... .. 11-17
Hose and connections ...................................... 11-18
Engine coolant .................................................. 11-18
Air cleaner element ...................................... 11-23 Replacing the air cleaner element ................... 11-23
Spark plugs ................................................... 11-25 Recommended spark plugs ............................. 11-26
Drive belts ..................................................... 11-26
Manual transmission oil ............................... 11-27 Checking the oil level ....................................... 11-27
Recommended grade and viscosity ................ 11-29
Automatic transmission fluid ...................... 11-29 Checking the fluid level .................................... 11-29
Recommended fluid ......................................... 11-31
Front differential gear oil (AT vehicles) ...... 11-32
Checking the oil level ....................................... 11-32
Recommended grade and viscosity ............... 11-33
Rear differential gear oil . .............................. 11-33
Checking the gear oil level .............................. 11-33
Recommended grade and viscosity ............... 11-35
Power steering fluid ...................................... 11-36 Checking the fluid level .................................... 11-36
Recommended fluid ......................................... 11-38
Brake fluid ..................................................... 11-38 Checking the fluid level .................................... 11-38
Recommended brake fluid ............................... 11-39
Clutch fluid (MT vehicles) ............................ 11-40 Checking the fluid level .................................... 11-40
Recommended clutch fluid .............................. 11-41
Brake booster ................................................ 11-42
Brake pedal .................................................... 11-42 Checking the brake pedal free play ................ 11-42
Checking the brake pedal reserve distance ... 11-43
Clutch pedal (Manual transmission vehicles) ..................................................... 11-43Checking the clutch function .......................... 11-43
Checking the clutch pedal free play ............... 11-44
Replacement of brake pad and lining ......... 11-44 Breaking-in of new brake pads and linings .... 11-45
Parking brake stroke ......... ........................... 11-46
Tires and wheels ............. .............................. 11-46
Page 376 of 487

11-11
Maintenance and service
– CONTINUED –
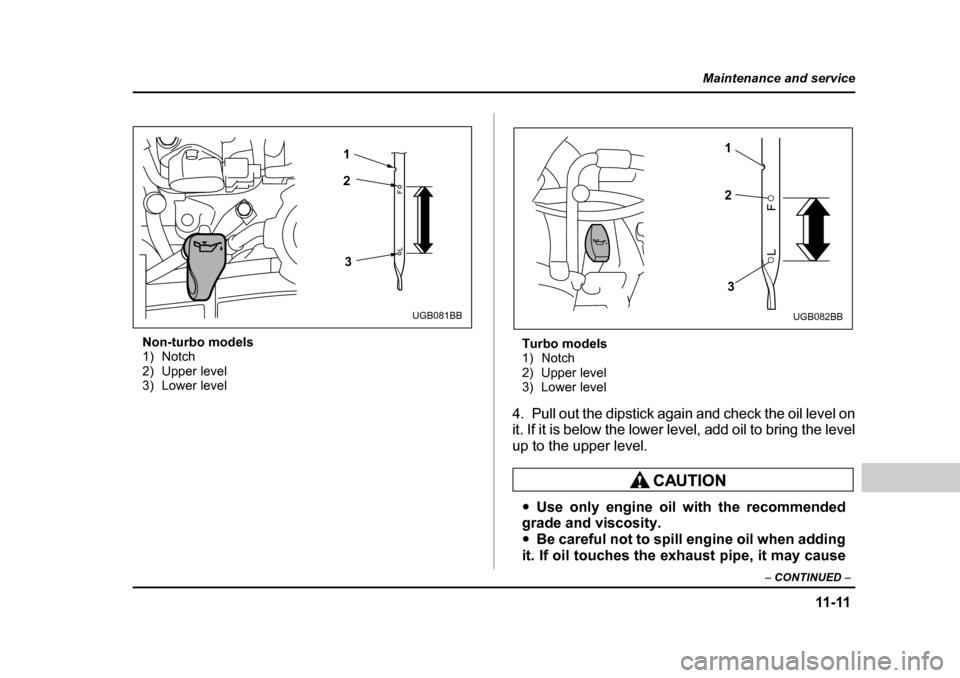
Non-turbo models
1) Notch
2) Upper level
3) Lower level Turbo models
1) Notch
2) Upper level
3) Lower level
4. Pull out the dipstick again and check the oil level on
it. If it is below the lower level, add oil to bring the level
up to the upper level.
�y Use only engine oil with the recommended
grade and viscosity. �y Be careful not to spill engine oil when adding
it. If oil touches the exhaust pipe, it may cause
1 2
3
UGB081BB
1 2
3
UGB082BB
Page 388 of 487

11 -2 3
Maintenance and service
– CONTINUED –
Air cleaner elementAir cleaner element
Do not operate the engine with the air cleaner
element removed. The air cleaner element not
only filters intake air but also stops flames if the
engine backfires. If the air cleaner element is
not installed when the engine backfires, you
could be burned.
The air cleaner element func tions as a filter screen.
When the element is perforated or removed, engine
wear will be excessive and engine life shortened.
The air cleaner element is a viscous type. It is unnec-
essary to clean or wash the element. �„ Replacing the air cleaner element
�„Replacing
�„ Air cleaner element
�TNon-turbo models
Replace the air cleaner element according to the
maintenance schedule in the “Warranty and Mainte-
nance Booklet”. Under extremely dusty conditions, re-
place it more frequently. It is recommended that you
always use genuine SUBARU parts.
0
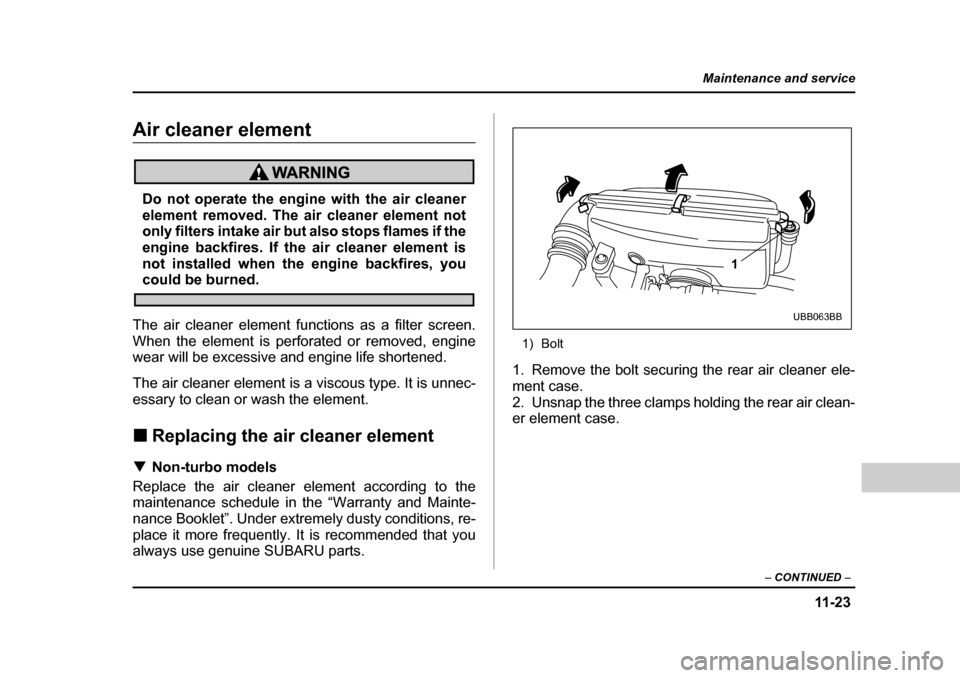
1) Bolt
1. Remove the bolt securing the rear air cleaner ele- ment case.
2. Unsnap the three clamps holding the rear air clean-
er element case.
1
UBB063BB
Page 391 of 487

11 - 2 6
Maintenance and service
The spark plugs should be replaced according to the
maintenance schedule in the “Warranty and Mainte-
nance Booklet”. �„
Recommended spark plugs
�„Recommended
�„ Spark plugs
Non-turbo models:
RC10YC4 (Champion)
BKR6E-11 (NGK)
BKR5E-11 (NGK)
Turbo models:
ILFR6B (NGK)
Drive beltsDrive belts
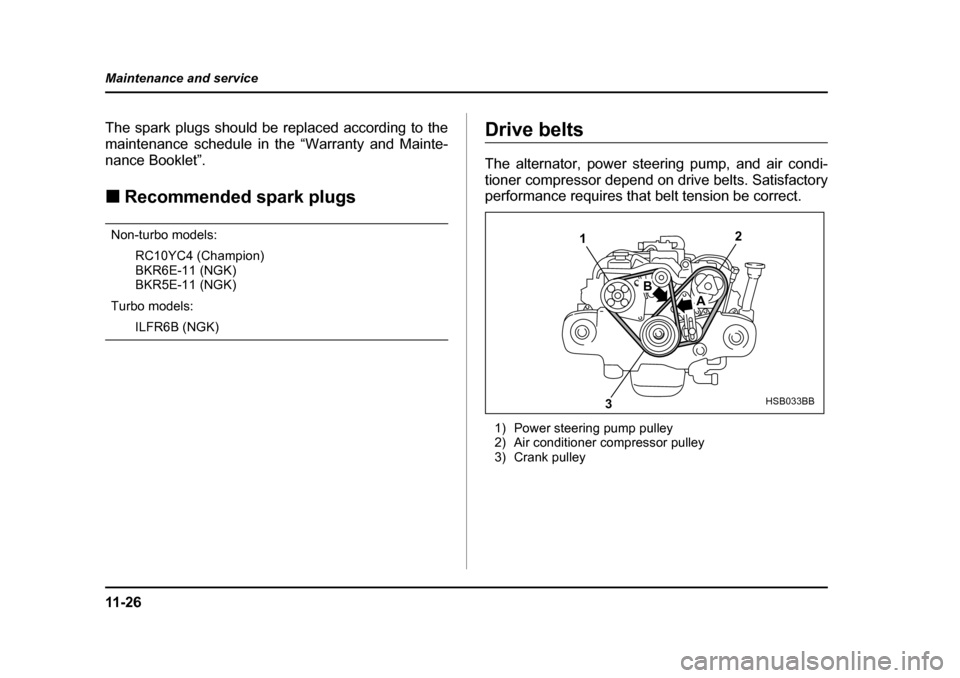
The alternator, power steering pump, and air condi-
tioner compressor depend on drive belts. Satisfactory
performance requires that belt tension be correct.
1) Power steering pump pulley
2) Air conditioner compressor pulley
3) Crank pulley
2
3 A
B
1
HSB033BB
Page 464 of 487

13-7
Consumer information and Reporting safety defects
– CONTINUED –
The maximum cold inflation pressure to which a
tire may be inflated. �yRecommended inflation pressure
The cold inflation pressure recommended by a
vehicle manufacturer. �y Intended outboard sidewall
1)The sidewall that contai ns a whitewall, bears
white lettering or bears manufacturer, brand,
and/or model name molding that is higher or
deeper than the same molding on the other
sidewall of the tire, or
2)The outward facing sidewall of an asymmet-
rical tire that has a particular side that must al-
ways face outward when mounting on a vehi-
cle.
�y Accessory weight
The combined weight (in excess of those stan-
dard items which may be replaced) of floor mats,
leather seats, cross bars and cargo bed extender
to the extent that these items are available as
factory-installed equipment (whether installed or
not). �y Curb weight
The weight of a motor vehicle with standard
equipment including the ma ximum capacity of fu-el, oil, and coolant and air conditioning. �y
Maximum loaded vehicle weight
The sum of curb weight, accessory weight, vehi-
cle capacity weight and production options weight. �y Normal occupant weight
150 lbs (68 kg) times the number of occupants (2
occupants). �y Occupant distribution
Distribution of occupants in a vehicle, 2 in front. �y Production options weight
The combined weight of those installed regular
production options weighing over 5.1 lbs (2.3 kg)
in excess of those standards items which they
replace, not previously considered in curb weight
or accessory weight. �y Vehicle capacity weight
The total weight of cargo, luggage and occu-
pants that can be added to the vehicle. �y Vehicle maximum load on a tire
Load on an individual tire that is determined by
distributing to each axle its share of the maxi-
mum loaded vehicle weight and dividing by two.
�y Vehicle normal load on a tire
Load on an individual tire that is determined by