2006 SKODA ROOMSTER warning light
[x] Cancel search: warning lightPage 89 of 274
Seats and Stowage
88
Removing ashtray
– Remove the ashtray ⇒page 87, fig. 76 upwards. When
removing do not hold the ashtray at the cover - risk of
breakage.
Replacing ashtray
– Insert the ashtray vertically.
WARNING
Never lay flammable objects in the ashtray basin - risk of fire!
Cigarette lighter* and power sockets*
Cigarette lighter
You can also use the socket on the cigarette lighter for
other electrical appliances.
Using the cigarette lighter
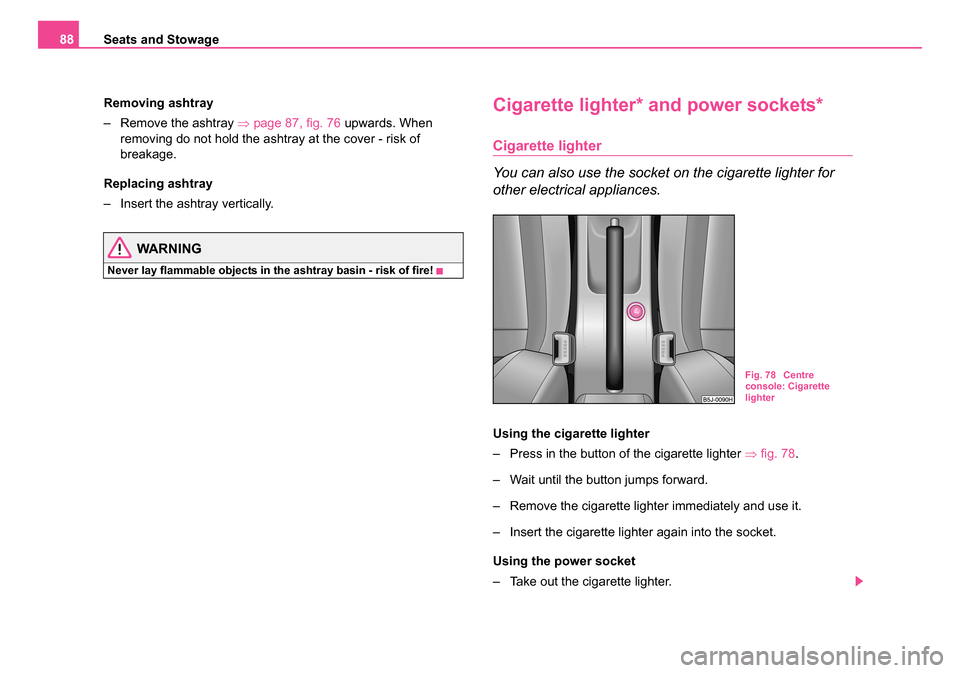
– Press in the button of the cigarette lighter ⇒fig. 78 .
– Wait until the button jumps forward.
– Remove the cigarette lighter immediately and use it.
– Insert the cigarette lighter again into the socket.
Using the power socket
– Take out the cigarette lighter.
Fig. 78 Centre
console: Cigarette
lighter
NKO 20 A05.book Page 88 Wednesday, June 21, 2006 1:42 PM
Page 90 of 274

Seats and Stowage89
Using the systemSafetyDriving TipsGeneral MaintenanceBreakdown assistanceTechnical Data
– Insert the plug of the electrical appliance into the socket of the
cigarette lighter.
The 12 volt power socket can also be used to supply power to electrical
accessories with a power uptake up to 180 watts.
WARNING
•Take care when using the cigarette lighter! Not paying proper
attention or incorrect use the cigarette lighter in an uncontrolled
manner may result in burns.
•The cigarette lighter and the power socket also operates when
the ignition is switched off or th e ignition key withdrawn. This is
why you should never leave children unattended in the vehicle!
Caution
Only use matching plugs, which fulfils the DIN - ISO Standard 4165, to
avoid damaging the power sockets.
Note
Connecting electrical components when the engine is not running
will drain the battery of the vehicle - risk of battery draining!
Power socket in the luggage compartment
– Open the cover of the power socket ⇒fig. 79 .
– Connect the plug of the electrical appliance to the socket.
It fulfils the requirements of DIN standard ISO 4165 and must only be used
for connecting approved electrical accessories with a power uptake of up
to 240 watts. The vehicle battery will be discharged in the process if the
engine is stationary.
The same remarks apply here as for ⇒page 88, “Cigarette lighter”.
Further information ⇒page 232, “Accessories, changes and replacement
of parts”.
Fig. 79 Luggage
compartment: Power
socket
NKO 20 A05.book Page 89 Wednesday, June 21, 2006 1:42 PM
Page 96 of 274

Seats and Stowage95
Using the systemSafetyDriving TipsGeneral MaintenanceBreakdown assistanceTechnical Data
Flexible storage compartment
A flexible storage compartment is located on the right side of the
luggage compartment. The flexible storage compartment is fore-
seen for storing small objects of up to 8 kg. in weight.
Removing
– Grasp the flexible storage compartment with both hands,
unlock it by pushing upwards and pull it towards you, in order
to remove the storage compartment.
Installing
– Insert both ends of the flexible storage compartment into the openings of the right side trim panel of the luggage compart-
ment and push it downwards until it locks.
Clothes hooks*
A clothes hook is located above the rear doors ⇒fig. 91 .
WARNING
•Ensure that any clothes hanging from the hooks do not impair
your vision to the rear.
•Use the hooks for hanging only light items of clothing and
ensure that there are no heavy or sharp-edged objects in the
pockets.
Fig. 90 Flexible
storage compartmentFig. 91 Area above
rear doors: Clothes
hooks
NKO 20 A05.book Page 95 Wednesday, June 21, 2006 1:42 PM
Page 99 of 274
Heating and air conditioning system
98
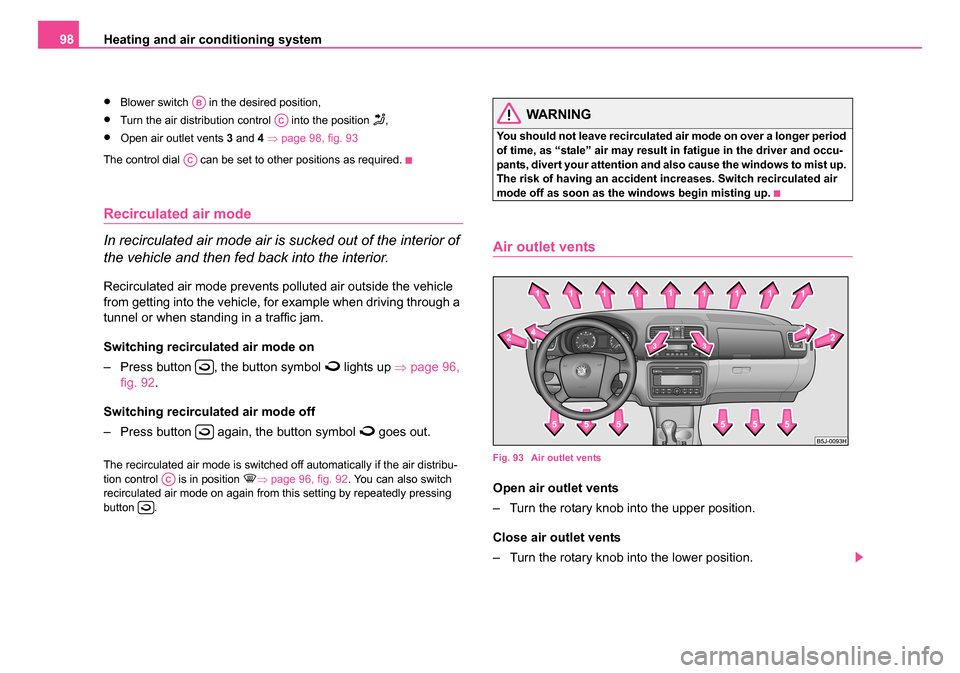
•Blower switch in the desired position,
•Turn the air distribution control into the position ,
•Open air outlet vents 3 and 4 ⇒ page 98, fig. 93
The control dial can be set to other positions as required.
Recirculated air mode
In recirculated air mode air is sucked out of the interior of
the vehicle and then fed back into the interior.
Recirculated air mode prevents polluted air outside the vehicle
from getting into the vehicle, for example when driving through a
tunnel or when standing in a traffic jam.
Switching recircul ated air mode on
– Press button , the button symbol
lights up ⇒page 96,
fig. 92 .
Switching recirculat ed air mode off
– Press button again, the button symbol
goes out.
The recirculated air mode is switched off automatically if the air distribu-
tion control is in position ⇒ page 96, fig. 92 . You can also switch
recirculated air mode on again from this setting by repeatedly pressing
button .
WARNING
You should not leave recirculated air mode on over a longer period
of time, as “stale” air may result in fatigue in the driver and occu-
pants, divert your attention and al so cause the windows to mist up.
The risk of having an accident increases. Switch recirculated air
mode off as soon as the windows begin misting up.
Air outlet vents
Fig. 93 Air outlet vents
Open air outlet vents
– Turn the rotary knob into the upper position.
Close air outlet vents
– Turn the rotary knob into the lower position.
AB
AC
AC
AC
NKO 20 A05.book Page 98 Wednesday, June 21, 2006 1:42 PM
Page 103 of 274
Heating and air conditioning system
102
Cooling down the inside of the vehicle as rapidly as possible
•Close all windows
•Control dial at the desired heat temperature
•Blower switch in position 4
•Turn the air distribution control into the position
•Open the air outlet vents 3 and 4
•Switch on the cooling system by pressing button
•We recommend that you briefly switch on the recirculated air mode
with the pushbutton .
Optimum cooling
•Control dial at the desired heat temperature. This temperature will
be maintained automatically
•Blower switch in position 1, 2 or 3
•Turn the air distribution control into the position
•Open the air outlet vents 3 and 4
•Switch on the cooling system by pressing button
•We recommend setting the air outlet vents 3 and 4 in such a way that
the air flows to the rear over the heads of the occupants. Do not switch to
recirculated air mode.
Recirculated air mode
In recirculated air mode air is sucked out of the interior of
the vehicle and then fed back into the interior.
Recirculated air mode prevents polluted air outside the vehicle
from getting into the vehicle, for example when driving through a
tunnel or when standing in a traffic jam. Switching recirculated air mode on
– Press switch
⇒page 100, fig. 94 the switch symbol
lights up.
Switching recirculated air mode off
– Press button again, the button symbol
goes out.
Recirculated air mode is switched off automatically if the air distribution
control is in position ⇒ page 100, fig. 94 . You can also switch recir-
culated air mode on again from this setting by repeatedly pressing button .
WARNING
You should not leave recirculated air mode on over a longer period
of time, as “stale” air may result in fatigue in the driver and occu-
pants, divert your attention and al so cause the windows to mist up.
The risk of having an accident increases. Switch recirculated air
mode off as soon as the windows begin misting up.
AA
AB
AC
AC
AA
AB
AC
AC
AC
NKO 20 A05.book Page 102 Wednesday, June 21, 2006 1:42 PM
Page 105 of 274
Heating and air conditioning system
104
Climatronic (automatic air conditioning)*
Description
The Climatronic system is a combination of an automatic
heating, fresh air and cooling system which provides
optimal comfort for the occupants of the car.
The Climatronic maintains a constant temperature fully automatically,
once it has been set. This is achieved by automatically varying the
temperature of the outflowing air, the blower stages and the air distribu-
tion. The system also takes into account sunlight which eliminates the
need to alter the settings manually. The automatic mode ⇒ page 106
ensures maximum wellbeing of the occupants at all times of the year.
Description of Climatronic system
The cooling operates only if the following conditions are met:
•engine running,
•outside temperature above +2 °C,
•the button is not pressed.
If the cooling system is switched on, the temperature and air humidity
drops in the vehicle. The wellbeing of the occupants of the car is enhanced
as a result of this particularly at high outside temperatures and a high air
humidity. The system prevents the windows misting up during the cold
season of the year.
The heating effect is dependent upon the coolant temperature, thus full
heat output only occurs when the engine has reached its operating
temperature.
It is possible to briefly activate recirculated air mode in order to enhance
the cooling effect ⇒. The air inlet in front of the windscreen must be free of ice, snow or leaves
in order to ensure that the heating and cooling systems operate properly.
The AC compressor is switched off at a high coolant temperature in order
to provide cooling at a high load of the engine.
After switching on the cooling
Condensation from the evaporator of the
air conditioning may drip down and form a puddle below the vehicle. This
is quite normal and not an indication of a leak!
Recommended setting for all periods of the year:
•Set the temperature to 22 °C.
•Press the button ⇒page 105, fig. 96 .
•Move the air outlet vents 3 and 4 so that the air flow is directed slightly
upwards ⇒page 108, fig. 97 .
Switching over between degrees Celsius and degrees Fahrenheit
Press and hold the buttons and ⇒page 105, fig. 96 . The
information in the desired temperature measuring unit appears in the
display.
WARNING
•For your own safety and that of other road users, ensure that all
the windows are free of ice, snow and misting. Please familiarize
yourself about how to correctly operate the heating and ventilation
systems, how to demist and defrost the windows, as well as with
the cooling mode.
•You should not leave recirculated air mode on over a longer
period of time, as “stale” air may result in fatigue in the driver and
occupants, divert your attention and also cause the windows to
mist up. The risk of having an accident increases. Switch recircu-
lated air mode off as soon as the windows begin misting up.
ECON
AUTO
ECONAUTO
NKO 20 A05.book Page 104 Wednesday, June 21, 2006 1:42 PM
Page 109 of 274
Heating and air conditioning system
108
Switch off the blowers, the Climatronic is switched off and in the display
shows OFF.
The set blower speed is displayed next to the control dial when the
respective number of warning lights come on.
WARNING
•“Stale air” may result in fatigue in the driver and occupants,
reduce attention levels and also cause the windows to mist up. The
risk of having an accident increases.
•Do not switch the Climatronic system off for longer than neces-
sary.
•Switch the Climatronic system on as soon as the windows mist
up.
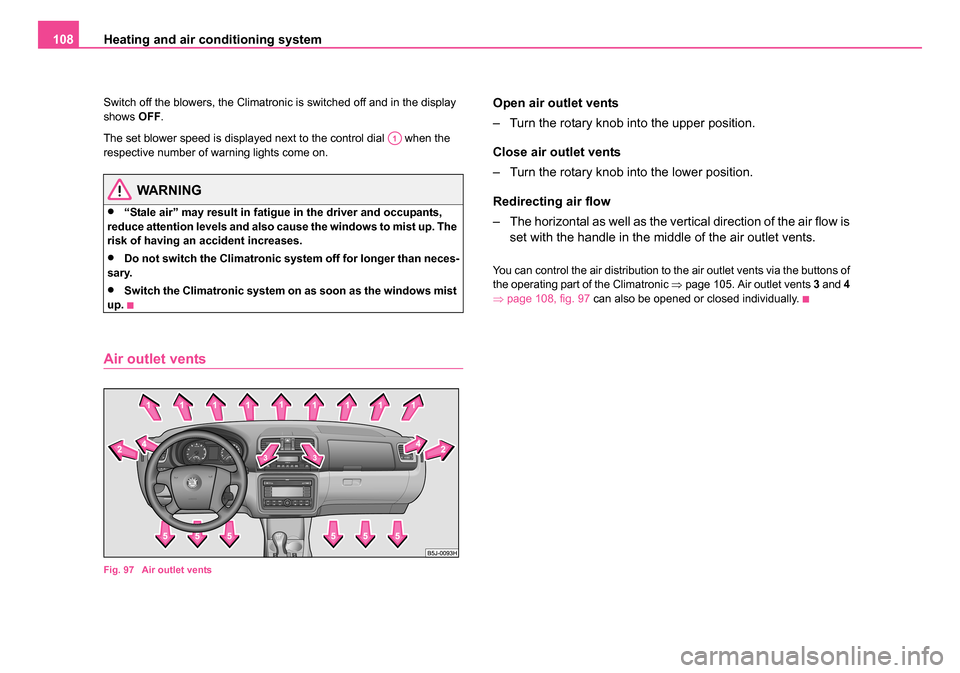
Air outlet vents
Fig. 97 Air outlet vents
Open air outlet vents
– Turn the rotary knob into the upper position.
Close air outlet vents
– Turn the rotary knob into the lower position.
Redirecting air flow
– The horizontal as well as the vertical direction of the air flow is set with the handle in the middle of the air outlet vents.
You can control the air distribution to the air outlet vents via the buttons of
the operating part of the Climatronic ⇒page 105. Air outlet vents 3 and 4
⇒ page 108, fig. 97 can also be opened or closed individually.
A1
NKO 20 A05.book Page 108 Wednesday, June 21, 2006 1:42 PM
Page 112 of 274

Starting-off and Driving111
Using the systemSafetyDriving TipsGeneral MaintenanceBreakdown assistanceTechnical Data
WARNING
•When driving, the ignition key must always be in the position
(ignition switched on) without the en gine running. This position is
indicated by the warning lights coming on. If this is not the case, it
could result in unexpected locking of the steering wheel - risk of
accident!
•Do not withdraw the ignition key from the lock until the car has
come to a stop. The steering lock can engage immediately - risk of
accident!
•Always withdraw the ignition key if you are going to leave the
vehicle, even for a short time. This is particularly important if chil-
dren are left in the vehicle. The children might otherwise start the
engine or operate electrical equi pment (e.g. power windows) - risk
of injury!
Starting the engine
General
You can only start the engine only using an original ignition
key.
•Place the gearshift lever into neutral and put on the handbrake firmly
before starting the engine.
•The clutch pedal should be fully depressed when starting the engine
which means that the starter only has to crank the engine.
•Let go of the key as soon as the engine starts otherwise there may be
damage to the starter. The engine running noises may louder at first be louder for a short time
after starting the cold engine until oil pressure can be built up in the
hydraulic valve clearance compensation. This is quite normal and is not
an operating problem.
If the engine does not start ...
You can use the battery of another vehicle as a jump-start aid
⇒
page 243.
It is only possible to tow-start vehicles fitted with a manual gearbox. The
tow-starting distance must not be more than 50 metres ⇒page 247.
WARNING
•Never run the engine in non ventilated or enclosed areas. The
exhaust gases of the engine contain besides the odorless and
colourless carbon monoxide a poisonous gas - hazard! Carbon
monoxide can cause unconsciousness and death.
•Never leave your vehicle unattended with the engine running.
Caution
•The starter may only be operated (ignition key position ), if the
engine is not running. If the starter is immediately operated after switching
off the engine, the starter or the engine can be damaged.
•Avoid high engine revolutions, full throttle and high engine loads as
long as the engine has not yet reached its normal operating temperature
- risk of damaging the engine!
•Vehicles which are fitted with an exhaust gas catalytic converter
should not be tow-started over a distance of more than 50 metres.
A2
A3
NKO 20 A05.book Page 111 Wednesday, June 21, 2006 1:42 PM