2006 PONTIAC GRAND PRIX headlamp
[x] Cancel search: headlampPage 1 of 472

Seats and Restraint Systems........................... 1-1
Front Seats
............................................... 1-2
Rear Seats
............................................... 1-9
Safety Belts
.............................................1-10
Child Restraints
.......................................1-30
Airbag System
.........................................1-52
Restraint System Check
............................1-67
Features and Controls..................................... 2-1
Keys
........................................................ 2-2
Doors and Locks
......................................2-10
Windows
.................................................2-15
Theft-Deterrent Systems
............................2-17
Starting and Operating Your Vehicle
...........2-21
Mirrors
....................................................2-35
OnStar
®System
......................................2-38
Storage Areas
.........................................2-40
Sunroof
..................................................2-43
Instrument Panel............................................. 3-1
Instrument Panel Overview
.......................... 3-4
Climate Controls
......................................3-26
Warning Lights, Gages, and Indicators
........3-35
Driver Information Center (DIC)
..................3-52
Audio System(s)
.......................................3-94Driving Your Vehicle....................................... 4-1
Your Driving, the Road, and Your Vehicle
..... 4-2
Towing
...................................................4-38
Service and Appearance Care.......................... 5-1
Service
..................................................... 5-3
Fuel
......................................................... 5-5
Checking Things Under the Hood
...............5-10
Headlamp Aiming
.....................................5-50
Bulb Replacement
....................................5-53
Windshield Replacement
...........................5-60
Windshield Wiper Blade Replacement
.........5-60
Tires
......................................................5-60
Appearance Care
.....................................5-99
Vehicle Identi�cation
...............................5-110
Electrical System
....................................5-111
Capacities and Speci�cations
...................5-118
Maintenance Schedule..................................... 6-1
Maintenance Schedule
................................ 6-2
Customer Assistance and Information.............. 7-1
Customer Assistance and Information
........... 7-2
Reporting Safety Defects
...........................7-13
Index................................................................ 1
2006 Pontiac Grand Prix Owner ManualM
Page 79 of 472

The following functions may be available with your
vehicle’s remote keyless entry system:
/(Remote Vehicle Start):If your vehicle has this
feature, the engine may be started from outside
the vehicle using the remote keyless entry transmitter.
See “Remote Vehicle Start” later in this section for more
detailed information.
Q(Lock):Press the lock button to lock all the doors.
If enabled through the Driver Information Center
(DIC), the parking lamps may �ash once and the horn
may chirp once to indicate locking has occurred.
See “REMOTE LOCKS FEEDBACK” underDIC Controls
and Displays (Base Level DIC) on page 3-52orDIC
Controls and Displays (Uplevel DIC with Trip Computer)
on page 3-60for programming information. Pressing
the lock button will arm the content theft-deterrent
system. SeeContent Theft-Deterrent on page 2-17for
more information.
"(Unlock):Press the unlock button one time to unlock
the driver’s door. Press the unlock button again within
�ve seconds to unlock the other doors. The interior
lamps will come on and stay on for 20 seconds or until
the ignition is turned on. If enabled through the DIC,
the parking lamps may �ash once and the horn
may chirp once to indicate unlocking has occurred. See
“REMOTE LOCKS FEEDBACK” underDIC Controls
and Displays (Base Level DIC) on page 3-52or
DIC Controls and Displays (Uplevel DIC with Trip
Computer) on page 3-60. Pressing the unlock button on
the remote keyless entry transmitter will disarm the
content theft-deterrent system. SeeContent
Theft-Deterrent on page 2-17for more details.
V(Trunk Release):Press this button to release the
trunk lid. The transaxle must be in PARK (P) for this
feature to operate.
L(Panic Alarm):Press this button to activate the
alarm. The ignition must be in OFF for the remote alarm
to work. When the remote alarm button is pressed
the headlamps will �ash and the horn will sound
repeatedly for two minutes. The alarm will turn off when
the ignition is moved to RUN or the remote alarm
button is pressed again.
2-5
Page 91 of 472

Sun Visors
To help block out glare, pull the sun visors down. Pull
on the inside edges of the sun visors to swing them from
the front windshield to the side window.
Visor Vanity Mirror
Raise the cover on the top of the sun visor to expose
the vanity mirror. If the vehicle has lighted vanity mirrors,
the lamps come on when the cover is opened.
Theft-Deterrent Systems
Vehicle theft is big business, especially in some cities.
Although your vehicle has a number of theft-deterrent
features, we know that nothing we put on it can make it
impossible to steal.
Content Theft-Deterrent
The vehicle has a content theft-deterrent alarm system.
A red light located on top
of the instrument panel,
toward the center of
the vehicle and near
the windshield, will �ash
slowly when the system
is armed.
The theft-deterrent alarm system needs to be activated
through the Driver’s Information Center (DIC). See “Theft
Deterrent” under the Personal Programming Mode
Screens inDIC Controls and Displays (Base Level DIC)
on page 3-52orDIC Controls and Displays (Uplevel DIC
with Trip Computer) on page 3-60. While armed, the
doors will not unlock with the power door lock switch. The
remote alarm will sound if someone tampers with the
trunk or enters the vehicle without using the remote
keyless entry transmitter or key to unlock the doors. The
horn will sound and the headlamps will �ash for up to
two minutes. The system will also cut off the fuel supply,
preventing the vehicle from being driven.
2-17
Page 109 of 472

Mirrors
Manual Rearview Mirror
with OnStar
®
Your vehicle has this feature located at the bottom of
the mirror, to change the mirror from the day to the night
position. To reduce the glare of headlamps from
behind, turn the control counterclockwise. To return the
mirror to the day position, turn the control clockwise.
There are also three OnStar
®buttons located at
the bottom of the mirror face. See your dealer for more
information on the system and how to subscribe to
OnStar
®. SeeOnStar®System on page 2-38for more
information about the services OnStar®provides.
Automatic Dimming Rearview
Mirror with Compass and
Temperature Display
If the vehicle has this feature, the automatic dimming
mirror automatically dims to the proper level to minimize
glare at night from lights behind your vehicle.The mirror also has a dual display in the upper right
corner of the mirror that shows the compass reading and
the outside temperature.
YOn/Off:Press this button to operate the automatic
dimming, compass and temperature features.
Automatic Dimming Mirror Operation
The automatic dimming mirror function is turned on each
time the ignition is started. A light near the on/off button
will come on to indicate the automatic dimming is on.
If the automatic dimming function is off, press and hold
the on/off button for four seconds to manually turn
the system back on.
Temperature and Compass Display
Press the on/off button, located in the center, to cycle
between °F, °C and off. If the display reads CAL,
the compass needs to be calibrated. For more
information, see “Compass Calibration” later in
this section.
If an abnormal temperature reading is displayed for an
extended period of time, please consult your dealer.
Under certain circumstances, a delay in updating
the temperature is normal.
2-35
Page 119 of 472

Instrument Panel Overview...............................3-4
Hazard Warning Flashers................................3-6
Other Warning Devices...................................3-6
Horn.............................................................3-6
Tilt Wheel.....................................................3-6
Turn Signal/Multifunction Lever.........................3-7
Turn and Lane-Change Signals........................3-7
Headlamp High/Low-Beam Changer..................3-8
Flash-to-Pass.................................................3-9
Windshield Wiper Lever...................................3-9
Cruise Control..............................................3-11
Exterior Lamps.............................................3-15
Headlamps on Reminder................................3-15
Daytime Running Lamps (DRL).......................3-16
Fog Lamps..................................................3-17
Exterior Lighting Battery Saver........................3-17
Interior Lamps..............................................3-17
Instrument Panel Brightness...........................3-18
Courtesy Lamps...........................................3-18
Entry Lighting...............................................3-18
Delayed Entry Lighting...................................3-19
Delayed Exit Lighting.....................................3-19
Front Reading Lamps....................................3-20
Overhead Console Reading Lamps.................3-20Rear Assist Handle Reading Lamps................3-20
Battery Run-Down Protection..........................3-20
Head-Up Display (HUD).................................3-21
Accessory Power Outlet(s).............................3-24
Ashtray(s) and Cigarette Lighter......................3-25
Climate Controls............................................3-26
Climate Control System.................................3-26
Dual Automatic Climate Control System...........3-29
Outlet Adjustment.........................................3-33
Passenger Compartment Air Filter...................3-33
Warning Lights, Gages, and Indicators............3-35
Instrument Panel Cluster................................3-36
Speedometer and Odometer...........................3-37
Tachometer.................................................3-37
Safety Belt Reminder Light.............................3-38
Passenger Safety Belt Reminder Light.............3-38
Airbag Readiness Light..................................3-39
Passenger Airbag Status Indicator...................3-40
Up-Shift Light...............................................3-42
Brake System Warning Light..........................3-42
Anti-Lock Brake System Warning Light.............3-44
Traction Control System (TCS) Warning Light. . . .3-45
Enhanced Traction System Warning Light.........3-45
Section 3 Instrument Panel
3-1
Page 125 of 472

Turn Signal/Multifunction Lever
The lever on the left side of the steering column
includes the following:
GTurn and Lane-Change Signals. SeeTurn and
Lane-Change Signals on page 3-7.
3Headlamp High/Low-Beam Changer. See
Headlamp High/Low-Beam Changer on page 3-8.
-Fog Lamps. SeeFog Lamps on page 3-17.
Flash-to-Pass Feature. SeeFlash-to-Pass on
page 3-9.
ICruise Control. SeeCruise Control on
page 3-11.
PExterior Lamps Control. SeeExterior Lamps on
page 3-15.
Turn and Lane-Change Signals
To signal a turn, move the turn signal lever located on
the left side of the steering column all the way up
or down. The lever returns automatically when the turn
is complete.
An arrow on the instrument
panel cluster will �ash in
the direction of the
turn or lane change.
If the vehicle is equipped with the Head-Up-Display
(HUD), a right or left turn signal will appear in the HUD
area when making turns or lane changes. See
Head-Up Display (HUD) on page 3-21for more
information.
Raise or lower the lever until the arrow starts to �ash to
signal a lane change. Hold it there until the lane
change is complete. The lever returns to its original
position when it is released.
3-7
Page 126 of 472

Arrows that �ash rapidly when signaling for a turn or
lane change may be caused by a burned-out signal bulb.
Other drivers will not see the signal.
Replace burned-out bulbs to help avoid possible
accidents. SeeReplacement Bulbs on page 5-59,Front
Turn Signal, Parking and Fog Lamps on page 5-56,
andTaillamps, Turn Signal, and Stoplamps on
page 5-57. Also, check the fuse for burned-out bulbs if a
turn signal arrow fails to work when signaling a turn.
SeeFuses and Circuit Breakers on page 5-112for
location information.
Turn Signal On Chime
If the turn signal is left on for more than 0.75 of a mile
(1.21 km), a warning chime will sound and the TURN
SIGNAL ON warning message will appear on the Driver
Information Center (DIC) display. See “Turn Signal
On” underDIC Warnings and Messages on page 3-72.
Headlamp High/Low-Beam Changer
Push forward on the exterior lamps control lever to
change the headlamps from low to high-beam. Pull the
lever back and then release it to change from high
to low-beam.
This symbol appears on
the instrument panel cluster
when the high-beam
headlamps are on.
When the high-beam headlamps are on, the fog lamps
will not be on. If the vehicle is equipped with the
Head-Up-Display (HUD) an arrow will appear in the
HUD area indicating that the high-beams are on. See
Head-Up Display (HUD) on page 3-21for more
information.
3-8
Page 127 of 472

Flash-to-Pass
This feature allows the use of the high-beam headlamps
to signal the driver in front of you that you want to pass.
Pull and hold the exterior lamps control lever to use this
feature. When this is done, the following will occur:
The high-beam headlamps will turn on, while
the headlamps are off, in low-beam, or in Daytime
Running Lamps (DRL) mode. They will stay on
as long as the lever is held in this position. Release
the lever to turn them off.
The headlamps will switch to low beam if the
headlamps had been in the high-beam mode.
To return to high-beam, push the lever.
If the vehicle is equipped with the Head-Up
Display (HUD), an arrow will appear on the display to
indicate that the high beams are on.
Windshield Wiper Lever
Be sure to clear ice and snow from the wiper blades
before using them. If they are frozen to the windshield,
gently loosen or thaw them. Damaged wiper blades may
not clear the windshield well, making it harder to see and
drive safely. If the blades do become damaged, install
new blades or blade inserts. For more information, see
Windshield Wiper Blade Replacement on page 5-60.Heavy snow or ice can overload the wiper motor. A
circuit breaker will stop the motor until it cools down.
Clear away snow or ice to prevent an overload.
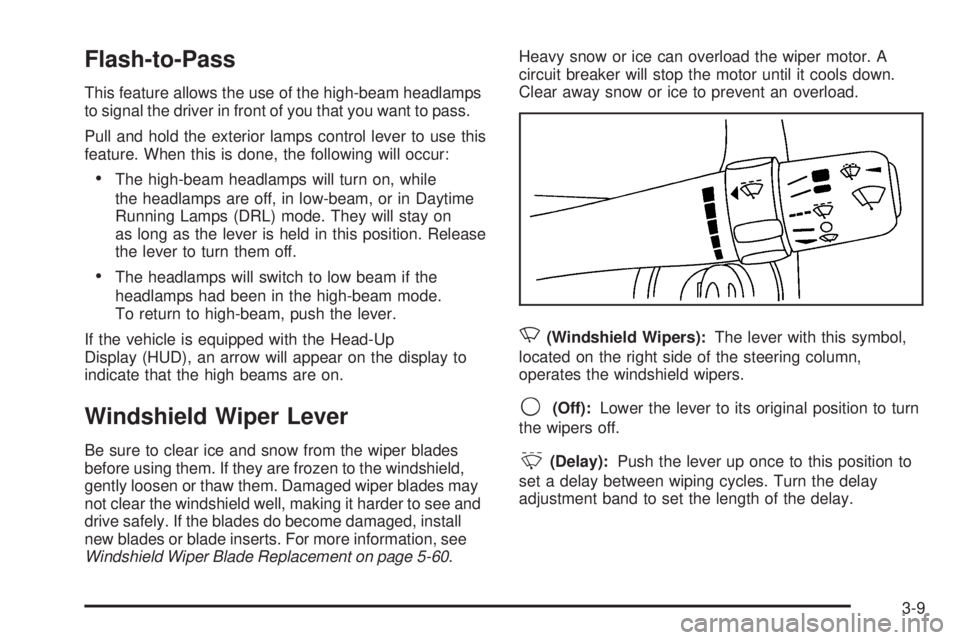
N(Windshield Wipers):The lever with this symbol,
located on the right side of the steering column,
operates the windshield wipers.
9(Off):Lower the lever to its original position to turn
the wipers off.
&(Delay):Push the lever up once to this position to
set a delay between wiping cycles. Turn the delay
adjustment band to set the length of the delay.
3-9