Page 358 of 472
4. Turn on the low-beam headlamps and place a
piece of cardboard or equivalent in front of the
headlamp not being aimed. This should allow only
the beam of light from the headlamp being
aimed to be seen on the �at surface.
Notice:Do not cover a headlamp to improve beam
cut-off when aiming. Covering a headlamp may
cause excessive heat build-up which may cause
damage to the headlamp.5. Locate the vertical headlamp aiming screws, which
are under the hood, near the headlamps. Turn the
vertical aiming screw until the headlamp beam
is aimed to the horizontal tape line.
The adjustment screws can be turned witha6mm
hex key bit socket ora6mmhexkey.Driver’s Side shown
5-52
Page 359 of 472
6. Ensure the top edge of the cut-off is positioned at
the bottom edge of the horizontal tape line.
7. Repeat Steps 4 through 6 for the opposite
headlamp.
Bulb Replacement
For the proper type of replacement bulbs, see
Replacement Bulbs on page 5-59.
For any bulb changing procedure not listed in this
section, contact your dealer.
Halogen Bulbs
{CAUTION:
Halogen bulbs have pressurized gas inside
and can burst if you drop or scratch the
bulb. You or others could be injured. Be
sure to read and follow the instructions on
the bulb package.
5-53
Page 360 of 472
Headlamps and Sidemarker Lamps
To replace a headlamp or sidemarker bulb, do the
following:
1. Open the hood. SeeHood Release on page 5-11
for more information.
A. High-Beam Headlamp
B. Low-Beam Headlamp
C. Sidemarker Lamp2. Locate the metal retaining clip. Remove the bolt.
3. Pull up half-way on the metal retaining clip
while pushing rearward on the headlamp.
Align the square cut-out on the retaining clip with
the notch on the headlamp.
5-54
Page 361 of 472
4. Pull the headlamp assembly straight out from the
vehicle. (Moving the headlamp up and down
slightly may help with its removal.)A. High-Beam Headlamp
B. Low-Beam Headlamp
C. Sidemarker Lamp
5. Turn the bulb socket ring one-quarter of a turn
counterclockwise to remove it from the headlamp
assembly.
6. Pull the old bulb from the socket.
7. Place the new bulb into the socket.
8. Turn the bulb socket ring one-quarter turn clockwise
to reinstall it back into the headlamp assembly.
5-55
Page 362 of 472

9. Carefully reinstall the headlamp assembly.
10. Push down on the metal retaining clip while pushing
rearward on the headlamp, making sure the
headlamp assembly is secure.
11. Reinstall the bolt and tighten to secure.
Front Turn Signal, Parking and
Fog Lamps
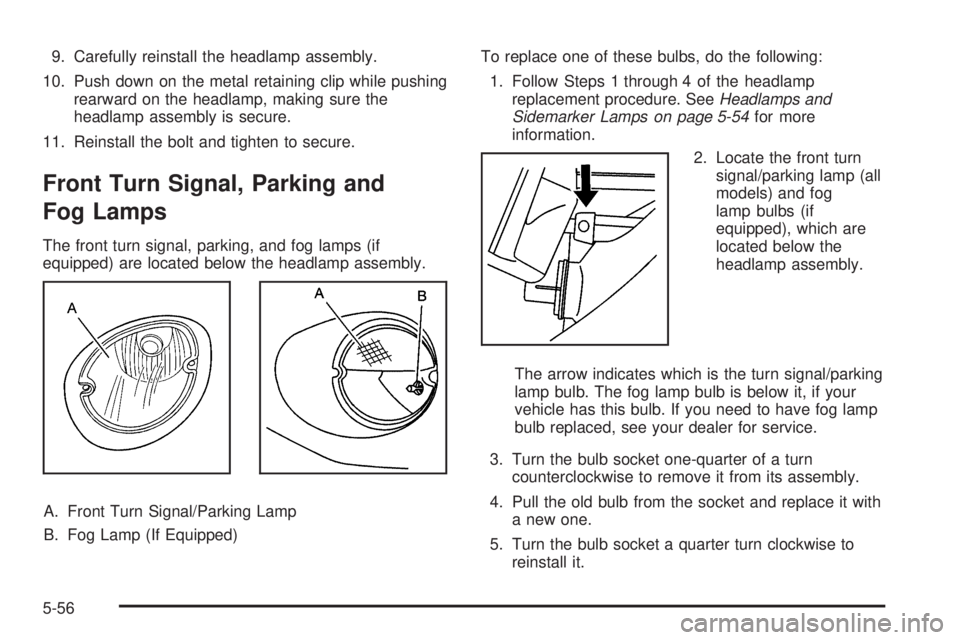
The front turn signal, parking, and fog lamps (if
equipped) are located below the headlamp assembly.
A. Front Turn Signal/Parking Lamp
B. Fog Lamp (If Equipped)To replace one of these bulbs, do the following:
1. Follow Steps 1 through 4 of the headlamp
replacement procedure. SeeHeadlamps and
Sidemarker Lamps on page 5-54for more
information.
2. Locate the front turn
signal/parking lamp (all
models) and fog
lamp bulbs (if
equipped), which are
located below the
headlamp assembly.
The arrow indicates which is the turn signal/parking
lamp bulb. The fog lamp bulb is below it, if your
vehicle has this bulb. If you need to have fog lamp
bulb replaced, see your dealer for service.
3. Turn the bulb socket one-quarter of a turn
counterclockwise to remove it from its assembly.
4. Pull the old bulb from the socket and replace it with
a new one.
5. Turn the bulb socket a quarter turn clockwise to
reinstall it.
5-56
Page 363 of 472
6. Reinstall the headlamp assembly.
7. Push down on the metal retaining clip while pushing
rearward on the headlamp, making sure the
headlamp assembly is secure.
8. Reinstall the bolt and tighten to secure.
Taillamps, Turn Signal, and
Stoplamps
A. Taillamp
B. Taillamps, Turn Signal
and Stoplamps
1. Open the trunk. SeeTrunk on page 2-13for more
information.2. Remove the convenience net, if equipped, by
removing the net hook attachments.
3. Remove the plastic cap from the trunk trim.
4. Pull the trunk trim and carpet away from the back of
the trunk.
5. Remove the bottom bolt and two nuts.
6. Remove the taillamp
assembly by pulling it
out from the vehicle.
5-57
Page 365 of 472
2. Turn the appropriate lamp socket a quarter turn
counterclockwise and remove it.
3. Remove the old bulb.
4. Put the new bulb into the lamp socket.
5. Turn the bulb a quarter turn clockwise to reinstall it.
Replacement Bulbs
Exterior Lamps Bulb Number
Back-Up Lamp 3157
Front Parking/Turn Signal Lamp3757 KA* or
5702 KA**
Front Sidemarker 194
Headlamps
High-Beam Halogen 9005
Low-Beam Halogen 9006
Stop/Taillamp/Turn Signal Lamps 3057
* GT and Base Models with the Optional Fog Lamps
* For Lamps Not Equipped with the Fog Function and
GXP Models
For replacement bulbs not listed here, contact
your dealer.
5-59
Page 382 of 472

Each new wheel should have the same load-carrying
capacity, diameter, width, offset and be mounted
the same way as the one it replaces.
If you need to replace any of your wheels, wheel bolts
or wheel nuts, replace them only with new GM
original equipment parts. This way, you will be sure to
have the right wheel, wheel bolts and wheel nuts
for your vehicle.
{CAUTION:
Using the wrong replacement wheels, wheel
bolts, or wheel nuts on your vehicle can be
dangerous. It could affect the braking and
handling of your vehicle, make your tires lose
air and make you lose control. You could have
a collision in which you or others could be
injured. Always use the correct wheel, wheel
bolts and wheel nuts for replacement.Notice:The wrong wheel can also cause problems
with bearing life, brake cooling, speedometer or
odometer calibration, headlamp aim, bumper height,
vehicle ground clearance, and tire or tire chain
clearance to the body and chassis.
SeeChanging a Flat Tire on page 5-88for more
information.
Used Replacement Wheels
{CAUTION:
Putting a used wheel on your vehicle is
dangerous. You cannot know how it has been
used or how far it has been driven. It could fail
suddenly and cause a crash. If you have to
replace a wheel, use a new GM original
equipment wheel.
5-76