2006 PONTIAC GRAND PRIX display
[x] Cancel search: displayPage 181 of 472

Time Elapsed:This screen can be used as a
stopwatch. The display can show the hours, minutes
and seconds. The elapsed time indicator will record up
to 99 hours, 59 minutes and 59 seconds, then it will
reset to zero and continue counting.
To set the time elapsed function, use the following
procedures:
1. Press the set/reset button for less than two seconds
to start or stop the timer.
2. Press and hold the set/reset button for more than
two seconds to reset the timer back to zero.
Set/Reset
r(Set/Reset):Press this button to set or reset a
mode item when using the trip odometer or option
buttons.
Options
4(Options):Press this button to access the Date,
Language, Display Units, Daytime Display
Enhancements, Engine Oil Monitor System, Tire
In�ation Monitor System, Compass Calibration, and the
Personal Programming modes.
Date:This menu sets the date.
The time is set through the radio. SeeSetting the Time
on page 3-96for more information.To set the date, use the following procedure:
1. Press the options button until the date is displayed
on the DIC.
2. Press the set/reset button to access the RESET
YEAR screen. The second position in the year
will be selected. Press and hold the set/reset button
to scroll through the available digits. Release the
button when the correct digit appears.
3. Press the options button to advance to the �rst
position in the year. Press and hold the set/reset
button to scroll through the available digits. Release
the button when the correct digit appears.
4. Press the options button to advance to the months
of the year.
5. Press the set/reset button to scroll through the
months of the year, releasing the button when
the correct month appears.
6. Press the options button to advance to the days of
the month.
7. Press the set/reset button to scroll through the days
of the month, releasing the button when the correct
day appears.
8. Press the options button again to advance to the
main date screen. The screen will now display the
new date.
3-63
Page 182 of 472
Language:This menu allows selection of the language
in which the DIC messages will appear. The DIC can
be programmed in one of three languages: English,
French, or Spanish. The message on the HUD, if
equipped, will also appear in the language selected.
SeeHead-Up Display (HUD) on page 3-21.
To change the language, use the following procedure:
1. Press the options button to enter the
language screen.
2. Press the set/reset button to scroll through and set
the language choice.
3. Press the options button again to advance to the
next screen.
Display Units:This menu allows selection of
measurements to be displayed in English or metric
units. The messages on the HUD, if equipped, and the
instrument panel cluster will also appear in the type
of measurement selected.
To set the display units function, use the following
procedure:
1. Press the set/reset button to select ENGLISH
or METRIC.
2. Press the options button to advance to the
next screen.DAYTIME DISPLAY ENHANCEMENTS:This menu
allows selection of the color of the display message.
When ON is selected for the daytime enhancement, the
messages will appear black on a red screen. This
combination makes it easier to see the DIC messages
during the daytime. When OFF is selected, or when
the headlamps are on, the messages will appear red on
a black background.
To set the daytime display enhancements function, use
the following procedure:
1. Press the set/reset button to select OFF or ON.
2. Press the options button to advance to the
next screen.
ENGINE OIL MONITOR SYSTEM:This menu allows
the engine oil monitor system to be reset. To reset
the engine oil monitor system, seeEngine Oil Life
System on page 5-19.
Tire In�ation Monitor System:If the vehicle has ABS,
this menu allows the tire in�ation monitor system to
be reset. See “Tire In�ation Monitor System” under
In�ation - Tire Pressure on page 5-67for more
information.
3-64
Page 184 of 472
To adjust for compass variance, use the following
procedure:
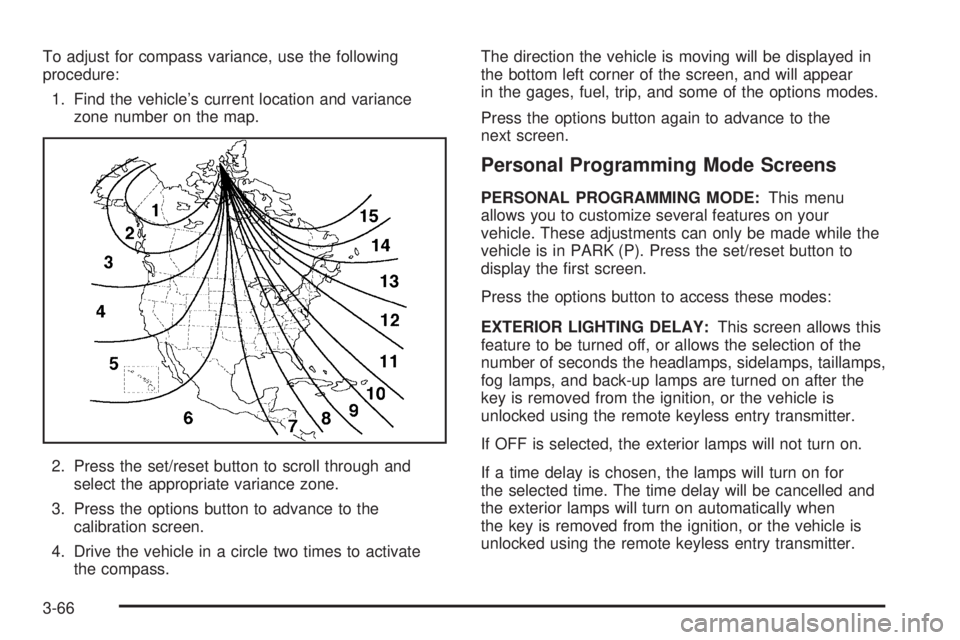
1. Find the vehicle’s current location and variance
zone number on the map.
2. Press the set/reset button to scroll through and
select the appropriate variance zone.
3. Press the options button to advance to the
calibration screen.
4. Drive the vehicle in a circle two times to activate
the compass.The direction the vehicle is moving will be displayed in
the bottom left corner of the screen, and will appear
in the gages, fuel, trip, and some of the options modes.
Press the options button again to advance to the
next screen.
Personal Programming Mode Screens
PERSONAL PROGRAMMING MODE:This menu
allows you to customize several features on your
vehicle. These adjustments can only be made while the
vehicle is in PARK (P). Press the set/reset button to
display the �rst screen.
Press the options button to access these modes:
EXTERIOR LIGHTING DELAY:This screen allows this
feature to be turned off, or allows the selection of the
number of seconds the headlamps, sidelamps, taillamps,
fog lamps, and back-up lamps are turned on after the
key is removed from the ignition, or the vehicle is
unlocked using the remote keyless entry transmitter.
If OFF is selected, the exterior lamps will not turn on.
If a time delay is chosen, the lamps will turn on for
the selected time. The time delay will be cancelled and
the exterior lamps will turn on automatically when
the key is removed from the ignition, or the vehicle is
unlocked using the remote keyless entry transmitter.
3-66
Page 187 of 472
REMOTE LOCKS FEEDBACK:This screen allows
this option to be turned OFF, or gives the choice of
two methods of veri�cation, LIGHTS or LIGHTS
and HORN, that indicate the vehicle’s doors are locked
when the LOCK button on the remote keyless entry
transmitter is pressed.
If OFF is selected, this feature will not be programmed.
If LIGHTS is selected, the exterior lamps will �ash
when the LOCK button on the remote keyless entry
transmitter is pressed.
If LIGHTS and HORN is selected, the exterior lamps will
�ash when the LOCK button on the remote keyless
entry transmitter is pressed, and the horn will sound
when the LOCK button on the remote keyless entry
transmitter is pressed again within �ve seconds of the
previous command.
To program this mode, use the following procedure:
1. Press the set/reset button to scroll to OFF, LIGHTS,
or LIGHTS and HORN.
2. Press the options button again to advance to the
next screen.
If the vehicle does not have a content theft-deterrent
system, the next screens with PROGRAMMING
FINISHED and DISPLAY OFF will appear.
If the vehicle does have a content theft-deterrent
system, the next screen will appear.THEFT DETERRENT:The vehicle may have a content
theft-deterrent system. Once it is turned on, the
system will activate if someone tries to enter the vehicle
without using the remote keyless entry transmitter or
the correct key. This screen allows this feature to
be turned OFF or ON.
If OFF is selected, the content theft-deterrent system
will not function.
If ON is selected, the content theft-deterrent system will
be activated.
To program this mode, use the following procedure:
1. Press the set/reset button to scroll to OFF or ON.
2. Press the options button again to advance to
the next screen.
KEY CYLINDER DISARM:This screen allows this
feature to be turned OFF or ON. This mode arms the
vehicle’s ignition so that if a key other than the one that
came with the vehicle is used to try to start it, the
horn will sound.
If OFF is selected, the content theft-deterrent system
will not disarm when the vehicle is unlocked using
the door lock, or if someone tampers with the door lock.
3-69
Page 188 of 472
If ON is selected, the content theft-deterrent system will
disarm when the vehicle is unlocked using the door
key. This makes the vehicle more resistant to key
lock tampering.
To program this mode, use the following procedure:
1. Press the set/reset button to scroll to OFF or ON.
2. Press the options button again to advance to
the next screen.
LOCK SWITCH ARM:If the vehicle has the content
theft-deterrent system and ON was selected on the
THEFT DETERRENT screen, this screen allows this
feature to be turned OFF or ON.
If OFF is selected, the content theft-deterrent system will
not activate this feature, which arms the system when the
doors are locked with the door lock switch.
If ON is selected, the content theft-deterrent system will
arm when the doors are locked with the door lock switch.
The key must be removed from the ignition when the
doors are locked or the content theft-deterrent system will
not arm.
To program this mode, use the following procedure:
1. Press the set/reset button to scroll to OFF or ON.
2. Press the options button again to advance to
the next screen.REMOTE START:If your vehicle has the remote start
feature, this screen allows it to be turned OFF or
ON. The remote start feature allows you to start the
engine from outside of the vehicle using your remote
keyless entry transmitter. See “Remote Vehicle
Start” underRemote Keyless Entry System Operation
on page 2-4for more information.
If OFF is selected, the remote start feature will
be disabled.
If ON is selected, the remote start feature will
be enabled.
To program this mode, use the following procedure:
1. Press the set/reset button to scroll to OFF or ON.
2. Press the options button again to advance to
the next screen.
PROGRAMMING FINISHED will appear on the next
screen. This con�rms that the personal options
programming is complete.
DISPLAY OFF will appear on the next screen. This
screen will count down and then go blank. Press
the options button to advance to a new screen.
3-70
Page 189 of 472

Fuel
.(Fuel):Press this button to access the Average
Fuel Economy, Instantaneous Fuel Economy, and Fuel
Range modes.
AVG ECONOMY (Average Fuel Economy):This
screen will display the approximate average miles per
gallon (mpg) or liters per 100 kilometers (L/100 km). This
number is calculated based on the number of mpg
(L/100 km) recorded since the last time this menu item
was reset.
To reset the average fuel economy for the vehicle,
follow this procedure:
1. Press the set/reset button to reset to zero.
2. Press the fuel button again to advance to the
next screen.
INST ECONOMY (Instantaneous Fuel
Economy):This screen displays the current fuel
economy at a particular moment and will change
frequently as driving conditions change. Unlike average
fuel economy, this screen cannot be reset.
Press the fuel button again to advance to the next
screen.RANGE:This screen displays the approximate number
of remaining miles or kilometers the vehicle can be
driven without refueling. This estimate is based on the
average fuel economy for the amount of fuel remaining
in the fuel tank and the current driving conditions.
This estimate will change if driving conditions change.
For example, if driving in traffic and making frequent
stops, the display may read one number, but if the
vehicle is driven on a freeway the number may change
even though the same amount of fuel is in the fuel
tank. This is because different driving conditions produce
different fuel economies. Generally, freeway driving
produces better fuel economy than city driving.
If the fuel tank contains less than 2 gallons (7.6 L), the
LOW FUEL message will appear on the DIC screen.
Fill the fuel tank as soon as possible to avoid running
out of fuel. See “Low Fuel” underDIC Warnings
and Messages on page 3-72.
3-71
Page 190 of 472

DIC Warnings and Messages
These messages will appear if there is a problem in
one of the vehicle’s systems. They will override
any other mode or screen the Driver Information
Center (DIC) may be in.
Some messages can be cleared from the DIC screen.
In order to do this the message must be acknowledged.
To acknowledge or clear the message from the
screen, press the set/reset button on the DIC. SeeDIC
Controls and Displays (Base Level DIC) on page 3-52
orDIC Controls and Displays (Uplevel DIC with
Trip Computer) on page 3-60for DIC button
descriptions.
Other warning messages are not allowed to be cleared
until the problem indicated by the warning message
is taken care of. When the problem indicated by
the message is resolved, it can be acknowledged and
the screen can be reset.
Be sure to take any message that appears on the DIC
screen seriously and remember that clearing the
messages that are able to be acknowledged, will only
make the message disappear, not the problem.
A/C OFF FOR ENGINE PROTECTION
This warning message comes on when the engine
coolant becomes hotter than the normal operating
temperature. To avoid added strain on a hot engine, the
air conditioning compressor is automatically turned
off. When the coolant temperature returns to normal, the
air conditioning compressor will turn back on. The
vehicle can then continue to be driven.
This message comes on while the ignition is in RUN. A
chime will sound for two seconds when this message
is displayed. Press the set/reset button to acknowledge
this warning message and to clear it from the screen.
This message will continue to display for three seconds
if it has not been acknowledged when the engine is
turned off. It will also re-display for three seconds if the
message has been acknowledged, but the condition
still exists when the engine is turned off.
If the condition still exists, the message will re-appear
when the engine is turned on.
3-72
Page 191 of 472
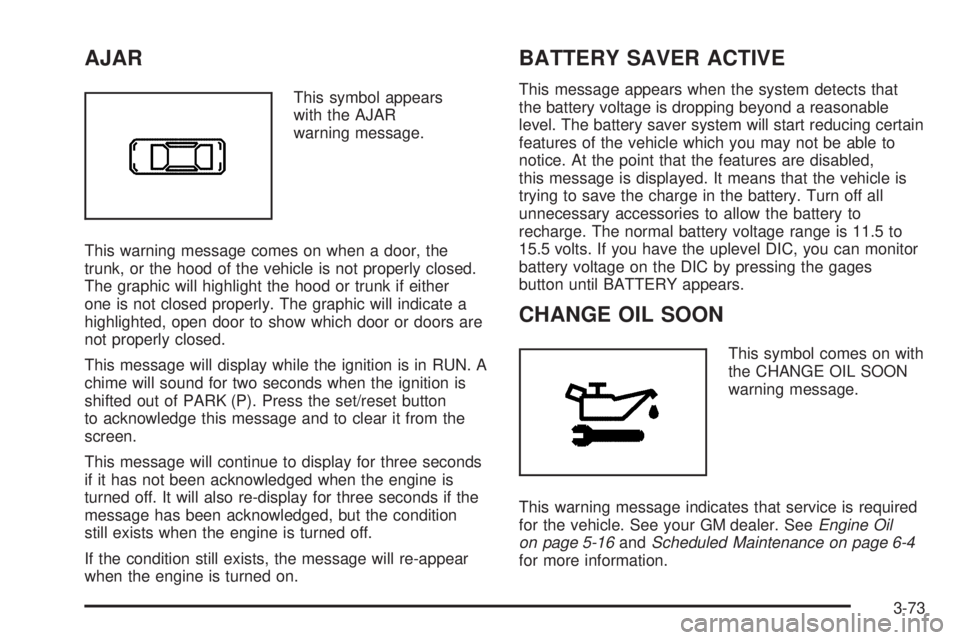
AJAR
This symbol appears
with the AJAR
warning message.
This warning message comes on when a door, the
trunk, or the hood of the vehicle is not properly closed.
The graphic will highlight the hood or trunk if either
one is not closed properly. The graphic will indicate a
highlighted, open door to show which door or doors are
not properly closed.
This message will display while the ignition is in RUN. A
chime will sound for two seconds when the ignition is
shifted out of PARK (P). Press the set/reset button
to acknowledge this message and to clear it from the
screen.
This message will continue to display for three seconds
if it has not been acknowledged when the engine is
turned off. It will also re-display for three seconds if the
message has been acknowledged, but the condition
still exists when the engine is turned off.
If the condition still exists, the message will re-appear
when the engine is turned on.
BATTERY SAVER ACTIVE
This message appears when the system detects that
the battery voltage is dropping beyond a reasonable
level. The battery saver system will start reducing certain
features of the vehicle which you may not be able to
notice. At the point that the features are disabled,
this message is displayed. It means that the vehicle is
trying to save the charge in the battery. Turn off all
unnecessary accessories to allow the battery to
recharge. The normal battery voltage range is 11.5 to
15.5 volts. If you have the uplevel DIC, you can monitor
battery voltage on the DIC by pressing the gages
button until BATTERY appears.
CHANGE OIL SOON
This symbol comes on with
the CHANGE OIL SOON
warning message.
This warning message indicates that service is required
for the vehicle. See your GM dealer. SeeEngine Oil
on page 5-16andScheduled Maintenance on page 6-4
for more information.
3-73