2006 PONTIAC GRAND PRIX instrument panel
[x] Cancel search: instrument panelPage 91 of 472

Sun Visors
To help block out glare, pull the sun visors down. Pull
on the inside edges of the sun visors to swing them from
the front windshield to the side window.
Visor Vanity Mirror
Raise the cover on the top of the sun visor to expose
the vanity mirror. If the vehicle has lighted vanity mirrors,
the lamps come on when the cover is opened.
Theft-Deterrent Systems
Vehicle theft is big business, especially in some cities.
Although your vehicle has a number of theft-deterrent
features, we know that nothing we put on it can make it
impossible to steal.
Content Theft-Deterrent
The vehicle has a content theft-deterrent alarm system.
A red light located on top
of the instrument panel,
toward the center of
the vehicle and near
the windshield, will �ash
slowly when the system
is armed.
The theft-deterrent alarm system needs to be activated
through the Driver’s Information Center (DIC). See “Theft
Deterrent” under the Personal Programming Mode
Screens inDIC Controls and Displays (Base Level DIC)
on page 3-52orDIC Controls and Displays (Uplevel DIC
with Trip Computer) on page 3-60. While armed, the
doors will not unlock with the power door lock switch. The
remote alarm will sound if someone tampers with the
trunk or enters the vehicle without using the remote
keyless entry transmitter or key to unlock the doors. The
horn will sound and the headlamps will �ash for up to
two minutes. The system will also cut off the fuel supply,
preventing the vehicle from being driven.
2-17
Page 92 of 472

Arming with the Power Lock Switch
The vehicle’s content theft-deterrent alarm system can
be activated when the key is removed from the ignition
and the power door lock switch of either the driver’s or
front passenger’s door is used to lock the vehicle. The
door needs to be in the open position when pressing the
power door lock switch. The alarm system will not
activate if the door is closed and the power door lock
switch is pressed. This system can be activated through
the Driver’s Information Center (DIC). See “Lock Switch
Arm” under the Personal Programming Mode Screens in
DIC Controls and Displays (Base Level DIC) on
page 3-52orDIC Controls and Displays (Uplevel DIC
with Trip Computer) on page 3-60.
When the doors are locked using the power door lock
switch of either front door, the red light, on top of the
instrument panel will start �ashing indicating that the
system is arming. After all the doors are closed there will
be a time delay and then the red light will begin to �ash at
a very slow rate indicating the system is armed.
Arming with the Remote Keyless
Entry Transmitter
The alarm system will arm when the remote keyless
entry transmitter is used to lock the doors after the key
is removed from the ignition. The red light will come
on to indicate that the system is arming. After all doors
are closed and locked, and after a time delay, the
red light will begin �ashing at a very slow rate to show
the system is armed.
Arming Con�rmation
A red light located on top of the instrument panel,
towards the center of the vehicle and near the
windshield, will �ash slowly to con�rm when the
system is armed.
2-18
Page 96 of 472

Ignition Positions
The ignition switch is located on the instrument panel, to
the right of the steering column.
There are four different
positions. Insert the
key in the ignition and
turn it to the right for
each position.
9(OFF):This position locks the ignition, steering
wheel and transaxle. It is a theft-deterrent feature. This is
the only position from which the key can be removed.
Notice:Using a tool to force the key from the
ignition switch could cause damage or break the
key. Use the correct key and turn the key only with
your hand. Make sure the key is all the way in. If
it is, turn the steering wheel left and right while you
turn the key hard. If none of this works, then
your vehicle needs service.ACC (ACCESSORY):This position allows things like
the radio and windshield wipers to operate while
the engine is off.
R(RUN):This position is where the key returns to
after the vehicle is started. With the engine off, the
RUN position displays some of the warning and
indicator lights.
/(START):This position starts the engine. Let go of
the key when the engine starts. The key will return
to the RUN for normal driving.
A continuous warning chime will sound and a KEY IN
IGNITION message will display on the Driver Information
Center (DIC) if the key is turned to OFF or ACC and
the driver’s door is opened.
Retained Accessory Power (RAP)
If the vehicle has Retained Accessory Power (RAP),
certain features will continue to operate for up to
10 minutes after the ignition key is turned to OFF unless
a door is opened.
2-22
Page 103 of 472

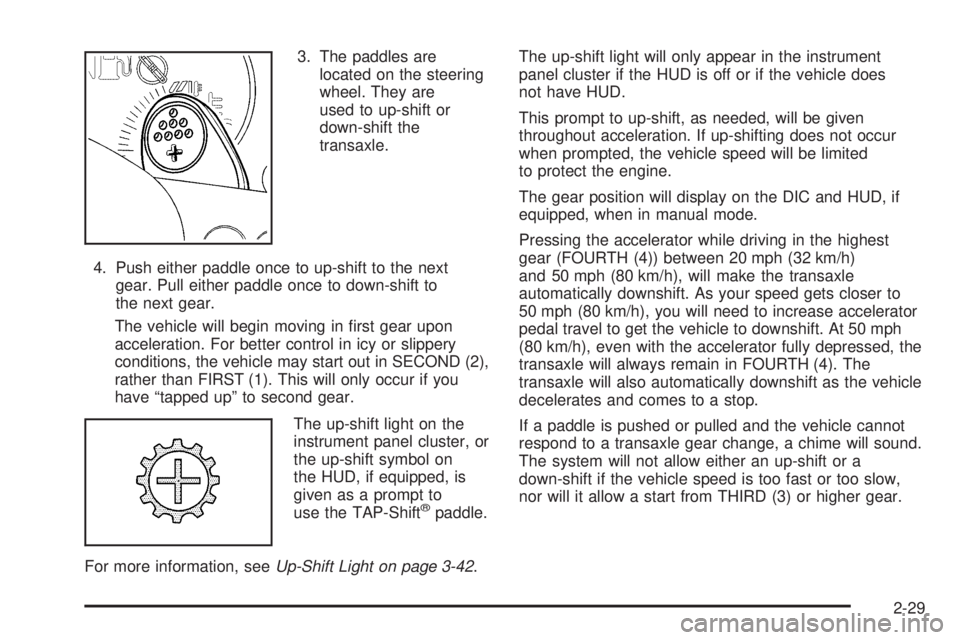
3. The paddles are
located on the steering
wheel. They are
used to up-shift or
down-shift the
transaxle.
4. Push either paddle once to up-shift to the next
gear. Pull either paddle once to down-shift to
the next gear.
The vehicle will begin moving in �rst gear upon
acceleration. For better control in icy or slippery
conditions, the vehicle may start out in SECOND (2),
rather than FIRST (1). This will only occur if you
have “tapped up” to second gear.
The up-shift light on the
instrument panel cluster, or
the up-shift symbol on
the HUD, if equipped, is
given as a prompt to
use the TAP-Shift
®paddle.
For more information, seeUp-Shift Light on page 3-42.The up-shift light will only appear in the instrument
panel cluster if the HUD is off or if the vehicle does
not have HUD.
This prompt to up-shift, as needed, will be given
throughout acceleration. If up-shifting does not occur
when prompted, the vehicle speed will be limited
to protect the engine.
The gear position will display on the DIC and HUD, if
equipped, when in manual mode.
Pressing the accelerator while driving in the highest
gear (FOURTH (4)) between 20 mph (32 km/h)
and 50 mph (80 km/h), will make the transaxle
automatically downshift. As your speed gets closer to
50 mph (80 km/h), you will need to increase accelerator
pedal travel to get the vehicle to downshift. At 50 mph
(80 km/h), even with the accelerator fully depressed, the
transaxle will always remain in FOURTH (4). The
transaxle will also automatically downshift as the vehicle
decelerates and comes to a stop.
If a paddle is pushed or pulled and the vehicle cannot
respond to a transaxle gear change, a chime will sound.
The system will not allow either an up-shift or a
down-shift if the vehicle speed is too fast or too slow,
nor will it allow a start from THIRD (3) or higher gear.
2-29
Page 104 of 472

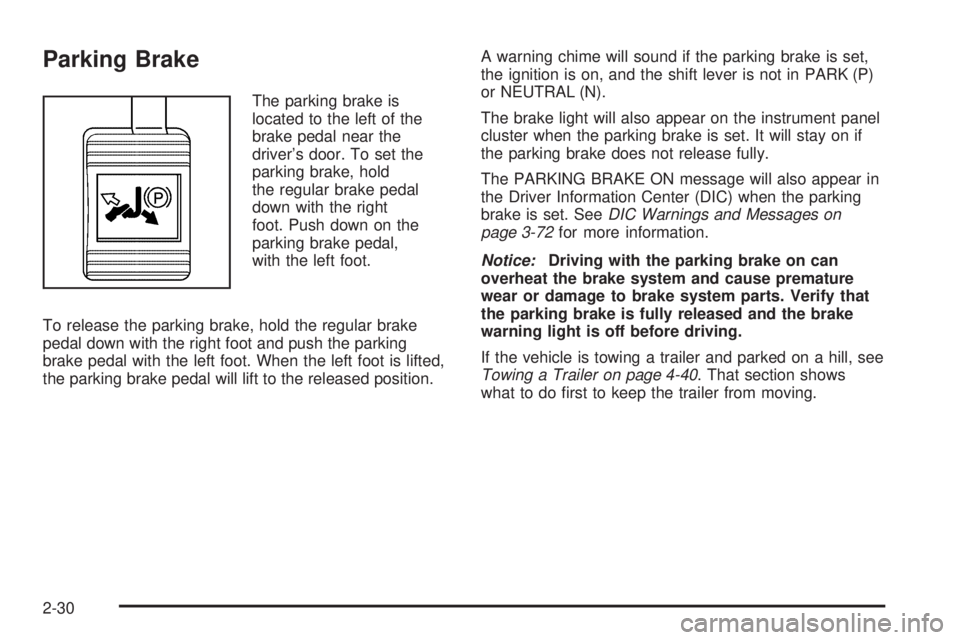
Parking Brake
The parking brake is
located to the left of the
brake pedal near the
driver’s door. To set the
parking brake, hold
the regular brake pedal
down with the right
foot. Push down on the
parking brake pedal,
with the left foot.
To release the parking brake, hold the regular brake
pedal down with the right foot and push the parking
brake pedal with the left foot. When the left foot is lifted,
the parking brake pedal will lift to the released position.A warning chime will sound if the parking brake is set,
the ignition is on, and the shift lever is not in PARK (P)
or NEUTRAL (N).
The brake light will also appear on the instrument panel
cluster when the parking brake is set. It will stay on if
the parking brake does not release fully.
The PARKING BRAKE ON message will also appear in
the Driver Information Center (DIC) when the parking
brake is set. SeeDIC Warnings and Messages on
page 3-72for more information.
Notice:Driving with the parking brake on can
overheat the brake system and cause premature
wear or damage to brake system parts. Verify that
the parking brake is fully released and the brake
warning light is off before driving.
If the vehicle is towing a trailer and parked on a hill, see
Towing a Trailer on page 4-40. That section shows
what to do �rst to keep the trailer from moving.
2-30
Page 119 of 472

Instrument Panel Overview...............................3-4
Hazard Warning Flashers................................3-6
Other Warning Devices...................................3-6
Horn.............................................................3-6
Tilt Wheel.....................................................3-6
Turn Signal/Multifunction Lever.........................3-7
Turn and Lane-Change Signals........................3-7
Headlamp High/Low-Beam Changer..................3-8
Flash-to-Pass.................................................3-9
Windshield Wiper Lever...................................3-9
Cruise Control..............................................3-11
Exterior Lamps.............................................3-15
Headlamps on Reminder................................3-15
Daytime Running Lamps (DRL).......................3-16
Fog Lamps..................................................3-17
Exterior Lighting Battery Saver........................3-17
Interior Lamps..............................................3-17
Instrument Panel Brightness...........................3-18
Courtesy Lamps...........................................3-18
Entry Lighting...............................................3-18
Delayed Entry Lighting...................................3-19
Delayed Exit Lighting.....................................3-19
Front Reading Lamps....................................3-20
Overhead Console Reading Lamps.................3-20Rear Assist Handle Reading Lamps................3-20
Battery Run-Down Protection..........................3-20
Head-Up Display (HUD).................................3-21
Accessory Power Outlet(s).............................3-24
Ashtray(s) and Cigarette Lighter......................3-25
Climate Controls............................................3-26
Climate Control System.................................3-26
Dual Automatic Climate Control System...........3-29
Outlet Adjustment.........................................3-33
Passenger Compartment Air Filter...................3-33
Warning Lights, Gages, and Indicators............3-35
Instrument Panel Cluster................................3-36
Speedometer and Odometer...........................3-37
Tachometer.................................................3-37
Safety Belt Reminder Light.............................3-38
Passenger Safety Belt Reminder Light.............3-38
Airbag Readiness Light..................................3-39
Passenger Airbag Status Indicator...................3-40
Up-Shift Light...............................................3-42
Brake System Warning Light..........................3-42
Anti-Lock Brake System Warning Light.............3-44
Traction Control System (TCS) Warning Light. . . .3-45
Enhanced Traction System Warning Light.........3-45
Section 3 Instrument Panel
3-1
Page 120 of 472

Engine Coolant Temperature Warning Light......3-46
Engine Coolant Temperature Gage..................3-46
Malfunction Indicator Lamp.............................3-47
Oil Pressure Light.........................................3-50
Fog Lamp Light............................................3-50
Cruise Control Light......................................3-51
Highbeam On Light.......................................3-51
Fuel Gage...................................................3-51
Driver Information Center (DIC).......................3-52
DIC Controls and Displays (Base Level DIC). . . .3-52
DIC Controls and Displays (Uplevel DIC
with Trip Computer)...................................3-60
DIC Warnings and Messages.........................3-72Audio System(s).............................................3-94
Setting the Time...........................................3-96
Radio with CD (Base Level)...........................3-96
Radio with CD (MP3)..................................3-107
Radio with Six-Disc CD................................3-123
Navigation/Radio System..............................3-139
Theft-Deterrent Feature................................3-139
Audio Steering Wheel Controls......................3-139
Radio Reception.........................................3-140
Care of Your CDs.......................................3-141
Care of the CD Player.................................3-141
Backglass Antenna......................................3-141
XM™ Satellite Radio Antenna System............3-142
Chime Level Adjustment...............................3-142
Section 3 Instrument Panel
3-2
Page 122 of 472

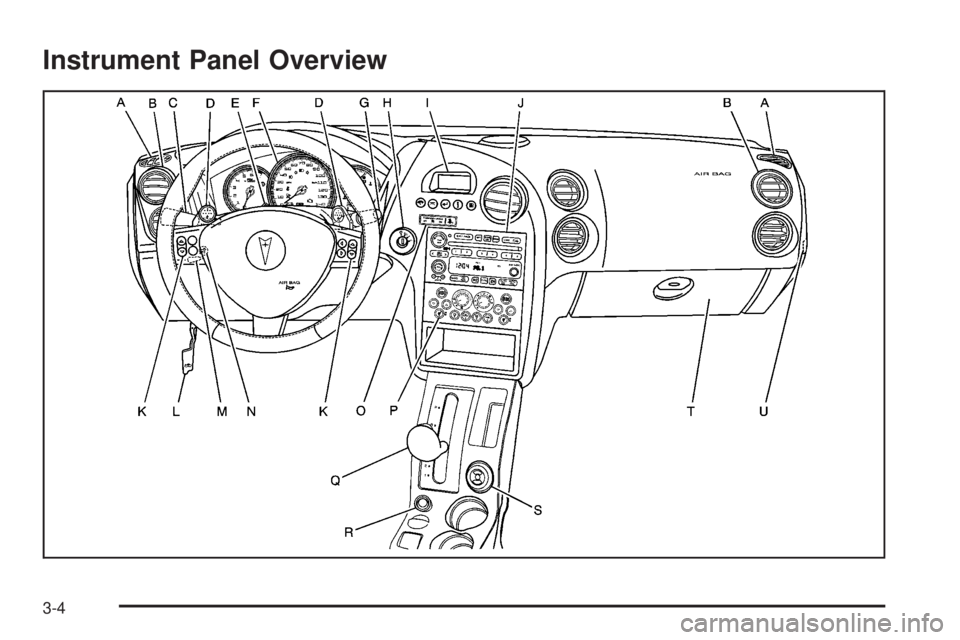
Instrument Panel Overview
3-4