Page 96 of 472

Ignition Positions
The ignition switch is located on the instrument panel, to
the right of the steering column.
There are four different
positions. Insert the
key in the ignition and
turn it to the right for
each position.
9(OFF):This position locks the ignition, steering
wheel and transaxle. It is a theft-deterrent feature. This is
the only position from which the key can be removed.
Notice:Using a tool to force the key from the
ignition switch could cause damage or break the
key. Use the correct key and turn the key only with
your hand. Make sure the key is all the way in. If
it is, turn the steering wheel left and right while you
turn the key hard. If none of this works, then
your vehicle needs service.ACC (ACCESSORY):This position allows things like
the radio and windshield wipers to operate while
the engine is off.
R(RUN):This position is where the key returns to
after the vehicle is started. With the engine off, the
RUN position displays some of the warning and
indicator lights.
/(START):This position starts the engine. Let go of
the key when the engine starts. The key will return
to the RUN for normal driving.
A continuous warning chime will sound and a KEY IN
IGNITION message will display on the Driver Information
Center (DIC) if the key is turned to OFF or ACC and
the driver’s door is opened.
Retained Accessory Power (RAP)
If the vehicle has Retained Accessory Power (RAP),
certain features will continue to operate for up to
10 minutes after the ignition key is turned to OFF unless
a door is opened.
2-22
Page 133 of 472
Exterior Lamps
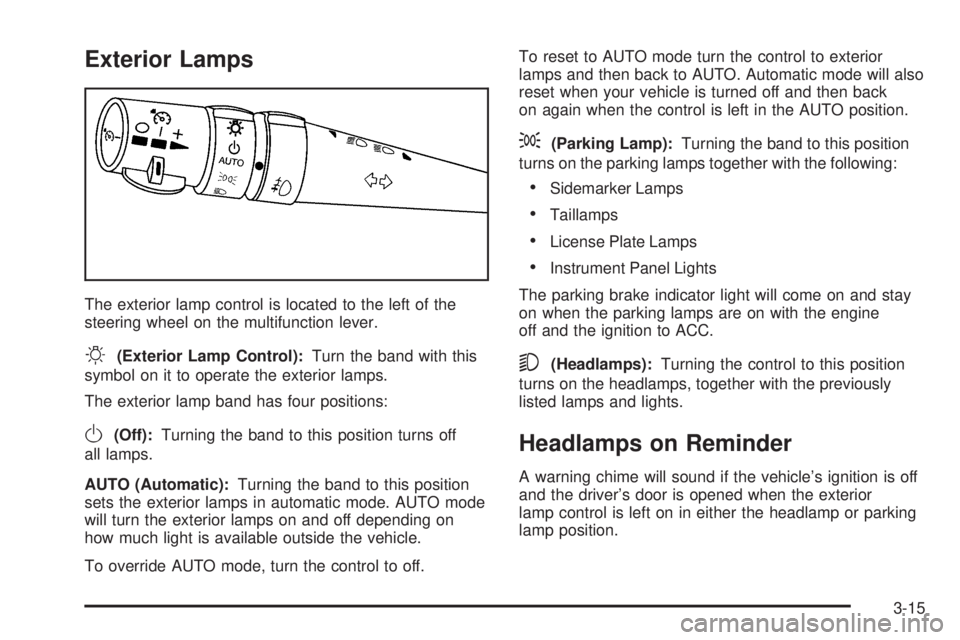
The exterior lamp control is located to the left of the
steering wheel on the multifunction lever.
O(Exterior Lamp Control):Turn the band with this
symbol on it to operate the exterior lamps.
The exterior lamp band has four positions:
O(Off):Turning the band to this position turns off
all lamps.
AUTO (Automatic):Turning the band to this position
sets the exterior lamps in automatic mode. AUTO mode
will turn the exterior lamps on and off depending on
how much light is available outside the vehicle.
To override AUTO mode, turn the control to off.To reset to AUTO mode turn the control to exterior
lamps and then back to AUTO. Automatic mode will also
reset when your vehicle is turned off and then back
on again when the control is left in the AUTO position.
;(Parking Lamp):Turning the band to this position
turns on the parking lamps together with the following:
Sidemarker Lamps
Taillamps
License Plate Lamps
Instrument Panel Lights
The parking brake indicator light will come on and stay
on when the parking lamps are on with the engine
off and the ignition to ACC.
5(Headlamps):Turning the control to this position
turns on the headlamps, together with the previously
listed lamps and lights.
Headlamps on Reminder
A warning chime will sound if the vehicle’s ignition is off
and the driver’s door is opened when the exterior
lamp control is left on in either the headlamp or parking
lamp position.
3-15
Page 274 of 472
The traction you can get in a curve depends on the
condition of your tires and the road surface, the angle at
which the curve is banked, and your speed. While
you are in a curve, speed is the one factor you
can control.
Suppose you are steering through a sharp curve.
Then you suddenly apply the brakes. Both control
systems — steering and braking — have to do their
work where the tires meet the road. Unless you
have four-wheel anti-lock brakes, adding the hard
braking can demand too much of those places. You
can lose control.
The same thing can happen if you are steering through
a sharp curve and you suddenly accelerate. Those
two control systems — steering and acceleration — can
overwhelm those places where the tires meet the
road and make you lose control. SeeTraction Control
System (TCS) on page 4-9orEnhanced Traction
System (ETS) on page 4-11.What should you do if this ever happens? Ease up on
the brake or accelerator pedal, steer the vehicle the way
you want it to go, and slow down.
Speed limit signs near curves warn that you should
adjust your speed. Of course, the posted speeds
are based on good weather and road conditions. Under
less favorable conditions you will want to go slower.
If you need to reduce your speed as you approach
a curve, do it before you enter the curve, while your front
wheels are straight ahead.
Try to adjust your speed so you can “drive” through the
curve. Maintain a reasonable, steady speed. Wait to
accelerate until you are out of the curve, and then
accelerate gently into the straightaway.
Adding non-GM accessories can affect your vehicle’s
performance. SeeAccessories and Modications
on page 5-3.
4-14
Page 299 of 472
Here are some important things to consider before you
do recreational vehicle towing:
What is the towing capacity of the towing vehicle?
Be sure to read the tow vehicle manufacturer’s
recommendations.
How far will the vehicle be towed? Some vehicles
have restrictions on how far and how long they
can tow.
Do you have the proper towing equipment? See
your dealer or trailering professional for additional
advice and equipment recommendations.
Is the vehicle ready to be towed? Just as you would
prepare your vehicle for a long trip, you will want to
make sure the vehicle is prepared to be towed.
SeeBefore Leaving on a Long Trip on page 4-24.
Dinghy Towing
Notice:If you tow your vehicle with all four wheels
on the ground, the drivetrain components could
be damaged. The repairs would not be covered by
your warranty. Do not tow your vehicle with all
four wheels on the ground.
The vehicle was not designed to be towed with all
four wheels on the ground. If the vehicle must be
towed, use a dolly. See “Dolly Towing” following for
more information.
Dolly Towing
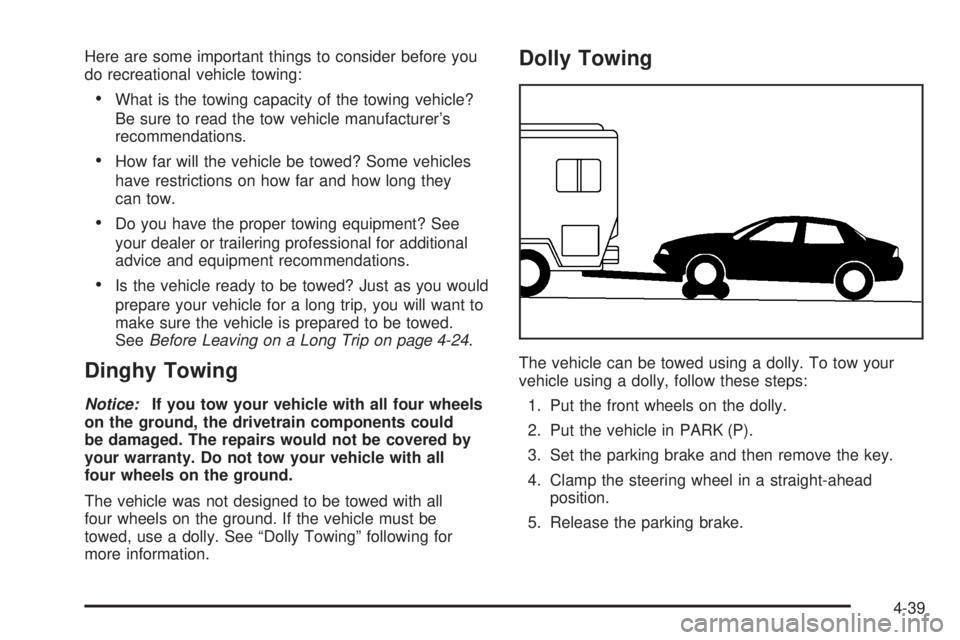
The vehicle can be towed using a dolly. To tow your
vehicle using a dolly, follow these steps:
1. Put the front wheels on the dolly.
2. Put the vehicle in PARK (P).
3. Set the parking brake and then remove the key.
4. Clamp the steering wheel in a straight-ahead
position.
5. Release the parking brake.
4-39
Page 350 of 472
Brake Wear
Your vehicle has four-wheel disc brakes.
Disc brake pads have built-in wear indicators that make
a high-pitched warning sound when the brake pads
are worn and new pads are needed. The sound
may come and go or be heard all the time your vehicle
is moving, except when you are pushing on the
brake pedal rmly.
{CAUTION:
The brake wear warning sound means
that soon your brakes will not work well.
That could lead to an accident. When you hear
the brake wear warning sound, have your
vehicle serviced.Notice:Continuing to drive with worn-out brake
pads could result in costly brake repair.
Some driving conditions or climates may cause a
brake squeal when the brakes are rst applied or lightly
applied. This does not mean something is wrong with
your brakes.
Properly torqued wheel nuts are necessary to help
prevent brake pulsation. When tires are rotated, inspect
brake pads for wear and evenly tighten wheel nuts in
the proper sequence to GM torque specications.
Brake linings should always be replaced as complete
axle sets.Brake Pedal Travel
See your dealer if the brake pedal does not return to
normal height, or if there is a rapid increase in
pedal travel. This could be a sign of brake trouble.
Brake Adjustment
Every time you apply the brakes, with or without the
vehicle moving, your brakes adjust for wear.
5-44