Page 246 of 272
NAI0447NAI0448
Use a suitable tool wrapped with a protective
cloth to open the cover: remove the cover.
DISC REPLACEMENT
CAUTION
.The included map DVD-ROM is de-
signed specifically for your navigation
system. Do not use it in another
system as it could cause a malfunc-
tion.
. Do not allow the system to get wet.
Excessive moisture, such as spilled
liquids, may cause the system to
malfunction.
NAI0449
1. To insert a disc:
Place the disc in the slot. It will be drawn in
automatically. You do not have to push it in
all the way.
9-18
General system information
Page 250 of 272
For assistance or inquiries about the NISSAN
Navigation System, please contact:
The NISSAN NA VIGA TION HELPDESK at 1-
8 00 -N I S S A N - 1 ( 1 -8 0 0- 64 7- 72 6 1) f o r U . S . ,
and at 1-800-777-0325 for CANADA or visit
the NISSAN web site at www.nissan-usa.com.CUSTOMER ASSISTANCE10-2
Troubleshooting guide
Page 251 of 272

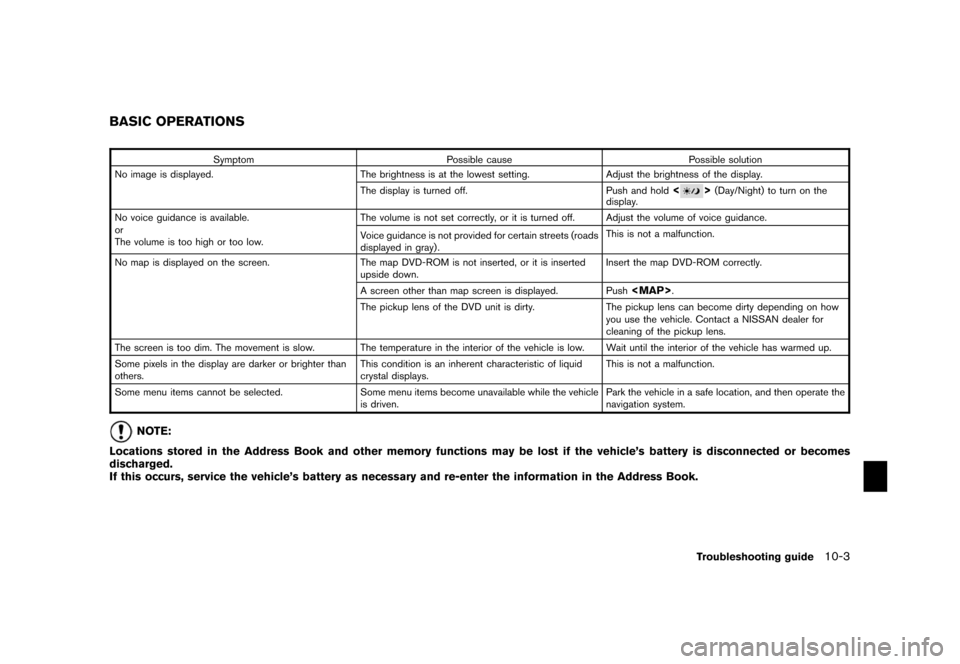
SymptomPossible cause Possible solution
No image is displayed. The brightness is at the lowest setting. Adjust the brightness of the display.
The display is turned off. Push and hold
<
>(Day/Night) to turn on the
display.
No voice guidance is available.
or
The volume is too high or too low. The volume is not set correctly, or it is turned off.
Adjust the volume of voice guidance.
Voice guidance is not provided for certain streets (roads
displayed in gray) . This is not a malfunction.
No map is displayed on the screen. The map DVD-ROM is not inserted, or it is inserted
upside down. Insert the map DVD-ROM correctly.
A screen other than map screen is displayed. Push
Page 252 of 272

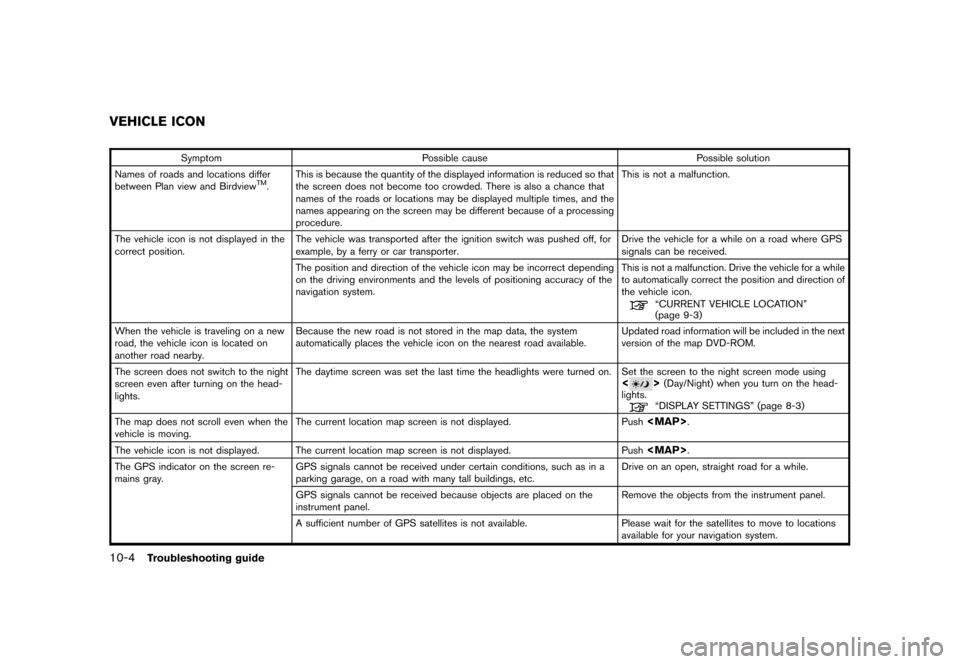
SymptomPossible cause Possible solution
Names of roads and locations differ
between Plan view and Birdview
TM. This is because the quantity of the displayed information
is reduced so that
the screen does not become too crowded. There is also a chance that
names of the roads or locations may be displayed multiple times, and the
names appearing on the screen may be different because of a processing
procedure. This is not a malfunction.
The vehicle icon is not displayed in the
correct position. The vehicle was transported after the ignition switch
was pushed off, for
example, by a ferry or car transporter. Drive the vehicle for a while on a road where
GPS
signals can be received.
The position and direction of the vehicle icon may be incorrect depending
on the driving environments and the levels of positioning accuracy of the
navigation system. This is not a malfunction. Drive the vehicle for a while
to automatically correct the position and direction of
the vehicle icon.
“CURRENT VEHICLE LOCATION”
(page 9-3)
When the vehicle is traveling on a new
road, the vehicle icon is located on
another road nearby. Because the new road is not stored in the map
data, the system
automatically places the vehicle icon on the nearest road available.Updated road information will be included in the next
version of the map DVD-ROM.
The screen does not switch to the night
screen even after turning on the head-
lights. The daytime screen was set the last time the headlights
were turned on. Set the screen to the night screen mode using
<
>(Day/Night) when you turn on the head-
lights.“DISPLAY SETTINGS” (page 8-3)
The map does not scroll even when the
vehicle is moving. The current location map screen is not displayed.
Push
Page 265 of 272
NavigationLandmark Icons
page 3-22
Map View page 3-4
Heading page 3-15
Guidance Settings page 5-29
Address Book Stored Location
page 6-16
Stored Routes page 6-25
Stored Tracking page 6-26
Avoid Area page 6-27
Delete Stored Items page 6-31
Page 266 of 272
Avoid Area Settingspage 6-7
Tracking Display Settings page 6-26
Nearby Places Custom Settings page 6-33
Map Scrolling Information page 3-10
Map Color Settings page 8-22
Adjust Current Location page 8-23
GPS Satellite Info page 7-4
Navigation Versions page 7-5
Reset ALL navigation settings to default page 8-25
Guidance Voice page 8-2
Guidance Volume page 8-2
Page 267 of 272
SETTING SCREEN (350Z)
DisplayDisplay
page 8-14
Brightness page 8-14
Contrast page 8-15
Background Color page 8-15
Navigation Landmark Icons
page 3-22
Map View page 3-4
Heading page 3-15
Guidance Settings page 5-29
Address Book Stored Location
page 6-16
Stored Routes page 6-25
Stored Tracking page 6-26
Avoid Area page 6-27
Delete Stored Items page 6-31
Page 268 of 272
Avoid Area Settingspage 6-7
Tracking Display Settings page 6-26
Nearby Places Custom Settings page 6-33
Map Scrolling Information page 3-10
Map Color Settings page 8-22
Adjust Current Location page 8-23
Reset ALL navigation settings to default page 8-25