Page 1251 of 2896
EC-82Revision: June 2006
BASIC SERVICE PROCEDURE
2007 Versa
�Do not twist or kink fuel hose because it is plastic hose.
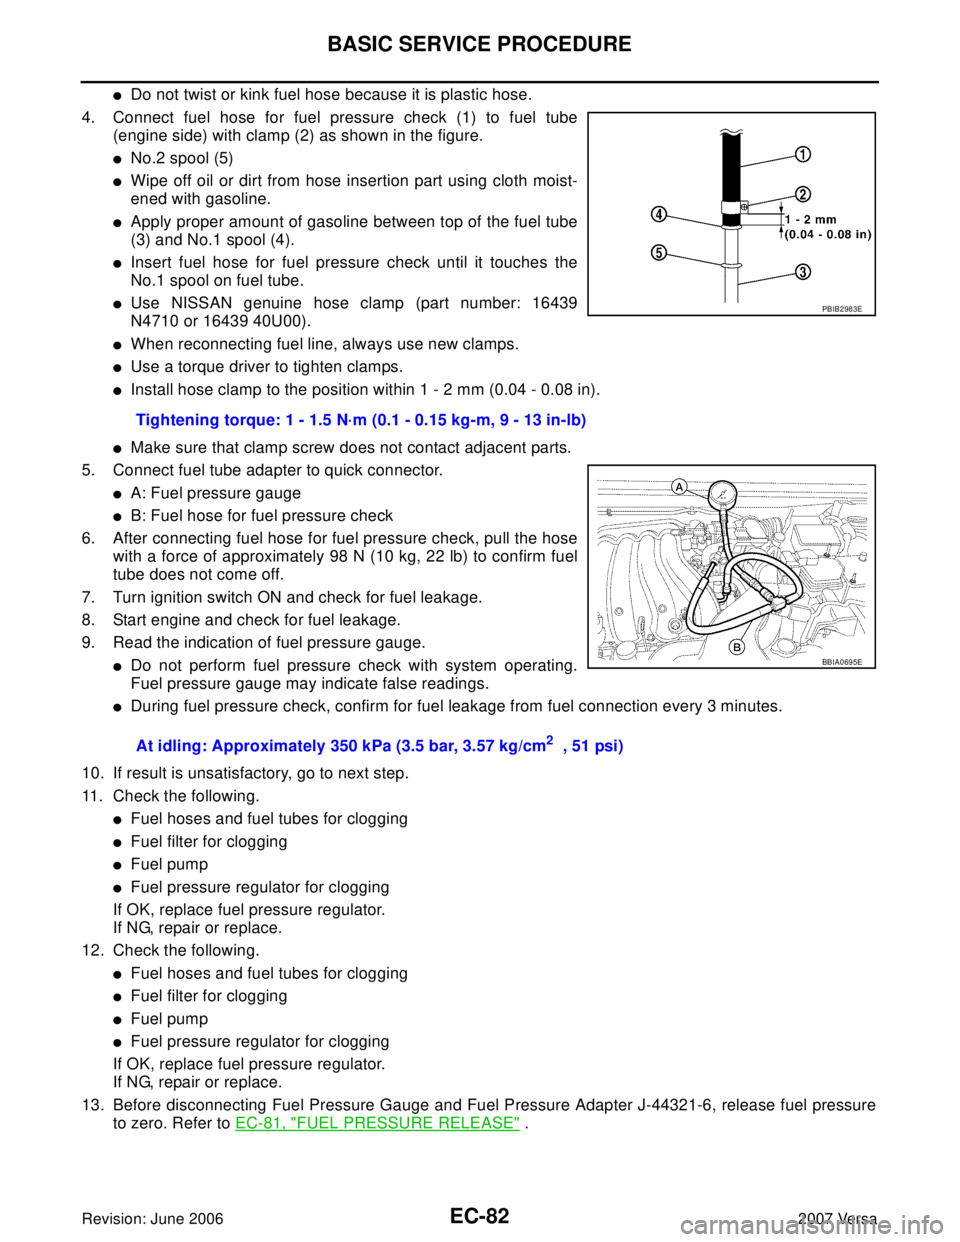
4. Connect fuel hose for fuel pressure check (1) to fuel tube
(engine side) with clamp (2) as shown in the figure.
�No.2 spool (5)
�Wipe off oil or dirt from hose insertion part using cloth moist-
ened with gasoline.
�Apply proper amount of gasoline between top of the fuel tube
(3) and No.1 spool (4).
�Insert fuel hose for fuel pressure check until it touches the
No.1 spool on fuel tube.
�Use NISSAN genuine hose clamp (part number: 16439
N4710 or 16439 40U00).
�When reconnecting fuel line, always use new clamps.
�Use a torque driver to tighten clamps.
�Install hose clamp to the position within 1 - 2 mm (0.04 - 0.08 in).
�Make sure that clamp screw does not contact adjacent parts.
5. Connect fuel tube adapter to quick connector.
�A: Fuel pressure gauge
�B: Fuel hose for fuel pressure check
6. After connecting fuel hose for fuel pressure check, pull the hose
with a force of approximately 98 N (10 kg, 22 lb) to confirm fuel
tube does not come off.
7. Turn ignition switch ON and check for fuel leakage.
8. Start engine and check for fuel leakage.
9. Read the indication of fuel pressure gauge.
�Do not perform fuel pressure check with system operating.
Fuel pressure gauge may indicate false readings.
�During fuel pressure check, confirm for fuel leakage from fuel connection every 3 minutes.
10. If result is unsatisfactory, go to next step.
11. Check the following.
�Fuel hoses and fuel tubes for clogging
�Fuel filter for clogging
�Fuel pump
�Fuel pressure regulator for clogging
If OK, replace fuel pressure regulator.
If NG, repair or replace.
12. Check the following.
�Fuel hoses and fuel tubes for clogging
�Fuel filter for clogging
�Fuel pump
�Fuel pressure regulator for clogging
If OK, replace fuel pressure regulator.
If NG, repair or replace.
13. Before disconnecting Fuel Pressure Gauge and Fuel Pressure Adapter J-44321-6, release fuel pressure
to zero. Refer to EC-81, "
FUEL PRESSURE RELEASE" . Tightening torque: 1 - 1.5 N·m (0.1 - 0.15 kg-m, 9 - 13 in-lb)
At idling: Approximately 350 kPa (3.5 bar, 3.57 kg/cm
2 , 51 psi)
PBIB2983E
BBIA0695E
Page 1261 of 2896

EC-92Revision: June 2006
TROUBLE DIAGNOSIS
2007 Versa
Symptom Matrix ChartUBS00PKH
SYSTEM — BASIC ENGINE CONTROL SYSTEM
SYMPTOM
Reference
page
HARD/NO START/RESTART (EXCP. HA)
ENGINE STALL
HESITATION/SURGING/FLAT SPOT
SPARK KNOCK/DETONATION
LACK OF POWER/POOR ACCELERATION
HIGH IDLE/LOW IDLE
ROUGH IDLE/HUNTING
IDLING VIBRATION
SLOW/NO RETURN TO IDLE
OVERHEATS/WATER TEMPERATURE HIGH
EXCESSIVE FUEL CONSUMPTION
EXCESSIVE OIL CONSUMPTION
BATTERY DEAD (UNDER CHARGE)
Warranty symptom code AA AB AC AD AE AF AG AH AJ AK AL AM HA
Fuel Fuel pump circuit 1 1 2 3 2 2 2 3 2EC-570
Fuel pressure regulator system 3 3 4 4 4 4 4 4 4 4EC-81
Fuel injector circuit 1 1 2 3 2 2 2 2EC-564
Evaporative emission system 3 3 4 4 4 4 4 4 4 4EC-31
Air Positive crankcase ventilation sys-
tem
334444444 41EC-44
Incorrect idle speed adjustment 1 1 1 1 1EC-70
Electric throttle control actuator 1 1 2 3 3 2 2 2 2 2 2EC-499,
EC-511
Ignition Incorrect ignition timing adjustment 3 3 1 1 1 1 1 1EC-70
Ignition circuit 1 1 2 2 2 2 2 2EC-576
Main power supply and ground circuit 2 2 3 3 3 3 3 2 3EC-144
Mass air flow sensor circuit
1
122
222 2EC-178,
EC-187
Engine coolant temperature sensor circuit
333EC-200,
EC-212
Air fuel ratio (A/F) sensor 1 circuitEC-220
,
EC-227
,
EC-233
,
EC-239
,
EC-540
Throttle position sensor circuit
22EC-206
,
EC-302
,
EC-460
,
EC-462
,
EC-526
Accelerator pedal position sensor circuit 3 2 1EC-430
,
EC-513
,
EC-519
,
EC-532
Knock sensor circuit 2 3EC-315
Crankshaft position sensor (POS) circuit 2 2EC-319
Camshaft position sensor (PHASE) circuit 3 2EC-327
Vehicle speed signal circuit 2 3 3 3EC-421
ECM 22333333333EC-427
Page 1262 of 2896
TROUBLE DIAGNOSIS
EC-93
C
D
E
F
G
H
I
J
K
L
MA
EC
Revision: June 20062007 Versa
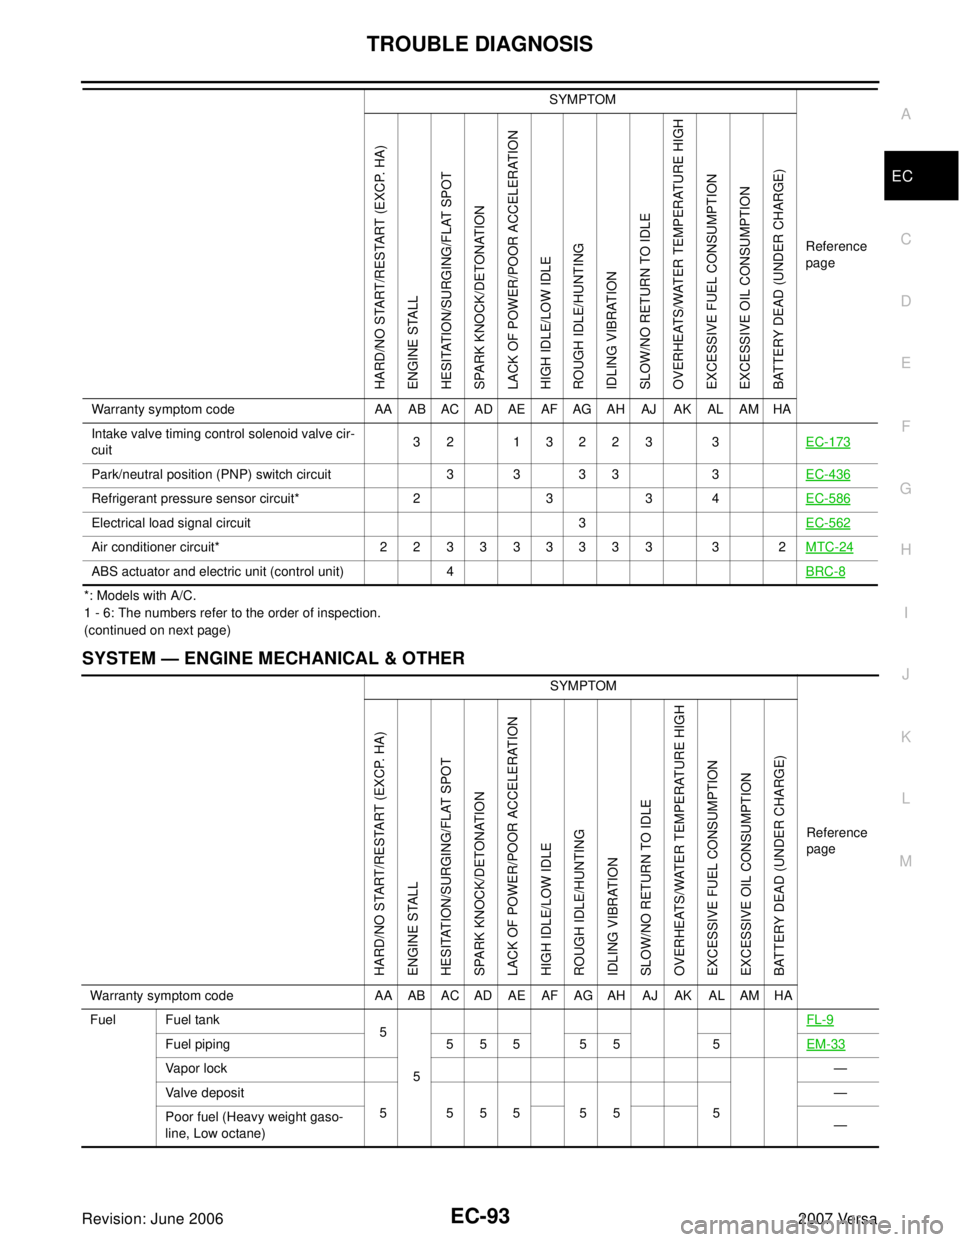
*: Models with A/C.
1 - 6: The numbers refer to the order of inspection.
(continued on next page)
SYSTEM — ENGINE MECHANICAL & OTHER
Intake valve timing control solenoid valve cir-
cuit32 13223 3EC-173
Park/neutral position (PNP) switch circuit 3 3 3 3 3EC-436
Refrigerant pressure sensor circuit* 2 3 3 4EC-586
Electrical load signal circuit 3EC-562
Air conditioner circuit* 2 2 3 3 3 3 3 3 3 3 2MTC-24
ABS actuator and electric unit (control unit) 4BRC-8
SYMPTOM
Reference
page
HARD/NO START/RESTART (EXCP. HA)
ENGINE STALL
HESITATION/SURGING/FLAT SPOT
SPARK KNOCK/DETONATION
LACK OF POWER/POOR ACCELERATION
HIGH IDLE/LOW IDLE
ROUGH IDLE/HUNTING
IDLING VIBRATION
SLOW/NO RETURN TO IDLE
OVERHEATS/WATER TEMPERATURE HIGH
EXCESSIVE FUEL CONSUMPTION
EXCESSIVE OIL CONSUMPTION
BATTERY DEAD (UNDER CHARGE)
Warranty symptom code AA AB AC AD AE AF AG AH AJ AK AL AM HA
Fuel Fuel tank
5
5FL-9
Fuel piping 5 5 5 5 5 5EM-33
Vapor lock—
Valve deposit
555555 5—
Poor fuel (Heavy weight gaso-
line, Low octane)—
Page 1265 of 2896
EC-96Revision: June 2006
TROUBLE DIAGNOSIS
2007 Versa
Engine Control Component Parts LocationUBS00PKI
1. Ignition coil (with power transistor)
and spark plug2. Intake valve timing control solenoid
valve3. Refrigerant pressure sensor
4. Knock sensor 5. Fuel injector 6. Cooling fan motor
7. Camshaft position sensor (PHASE) 8. IPDM E/R 9. ECM
10. Mass air flow sensor
(with intake air temperature sensor)11. Engine coolant temperature sensor 12. Electric throttle control actuator
(with built-in throttle position sensor,
throttle control motor)
13. EVAP canister purge volume control
solenoid valve
PBIB3261E
Page 1267 of 2896
EC-98Revision: June 2006
TROUBLE DIAGNOSIS
2007 Versa
: Vehicle front
1. Intake valve timing control solenoid
valve2. Knock sensor 3. IPDM E/R
4. Fuel pump fuse (15A) 5. Fuel level sensor unit and fuel pump
harness connector (view with
inspection hole cover removed)6. Fuel level sensor unit and fuel pump
7. Fuel pressure regulator 8. Fuel level sensor 9. Fuel tank temperature sensor
10. Ignition coil
(with power transistor) and spark plug11. Fuel injector
BBIA0725E
Page 1306 of 2896
TROUBLE DIAGNOSIS - SPECIFICATION VALUE
EC-137
C
D
E
F
G
H
I
J
K
L
MA
EC
Revision: June 20062007 Versa
5. CHANGE ENGINE OIL
1. Stop the engine.
2. Change engine oil. Refer to LU-6, "
Changing Engine Oil" .
NOTE:
This symptom may occur when a large amount of gasoline is mixed with engine oil because of driving
conditions (such as when engine oil temperature does not rise enough since a journey distance is too
short during winter). The symptom will not be detected after changing engine oil or changing driving con-
dition.
>>INSPECTION END
6. CHECK FUEL PRESSURE
Check fuel pressure. (Refer to EC-81, "
Fuel Pressure Check" .)
OK or NG
OK >> GO TO 9.
NG (Fuel pressure is too high)>>Replace fuel pressure regulator, refer to EC-81, "
Fuel Pressure Check" .
GO TO 8.
NG (Fuel pressure is too low)>>GO TO 7.
7. DETECT MALFUNCTIONING PART
1. Check the following.
–Clogged and bent fuel hose and fuel tube
–Clogged fuel filter
–Fuel pump and its circuit (Refer to EC-570, "FUEL PUMP" .)
2. If NG, repair or replace the malfunctioning part. (Refer to EC-81, "
Fuel Pressure Check" .)
If OK, replace fuel pressure regulator.
>> GO TO 8.
8. CHECK “A/F ALPHA-B1”
1. Start engine.
2. Select “A/F ALPHA-B1” in “DATA MONITOR (SPEC)” mode, and make sure that the indication is within
the SP value.
OK or NG
OK >>INSPECTION END
NG >> GO TO 9.
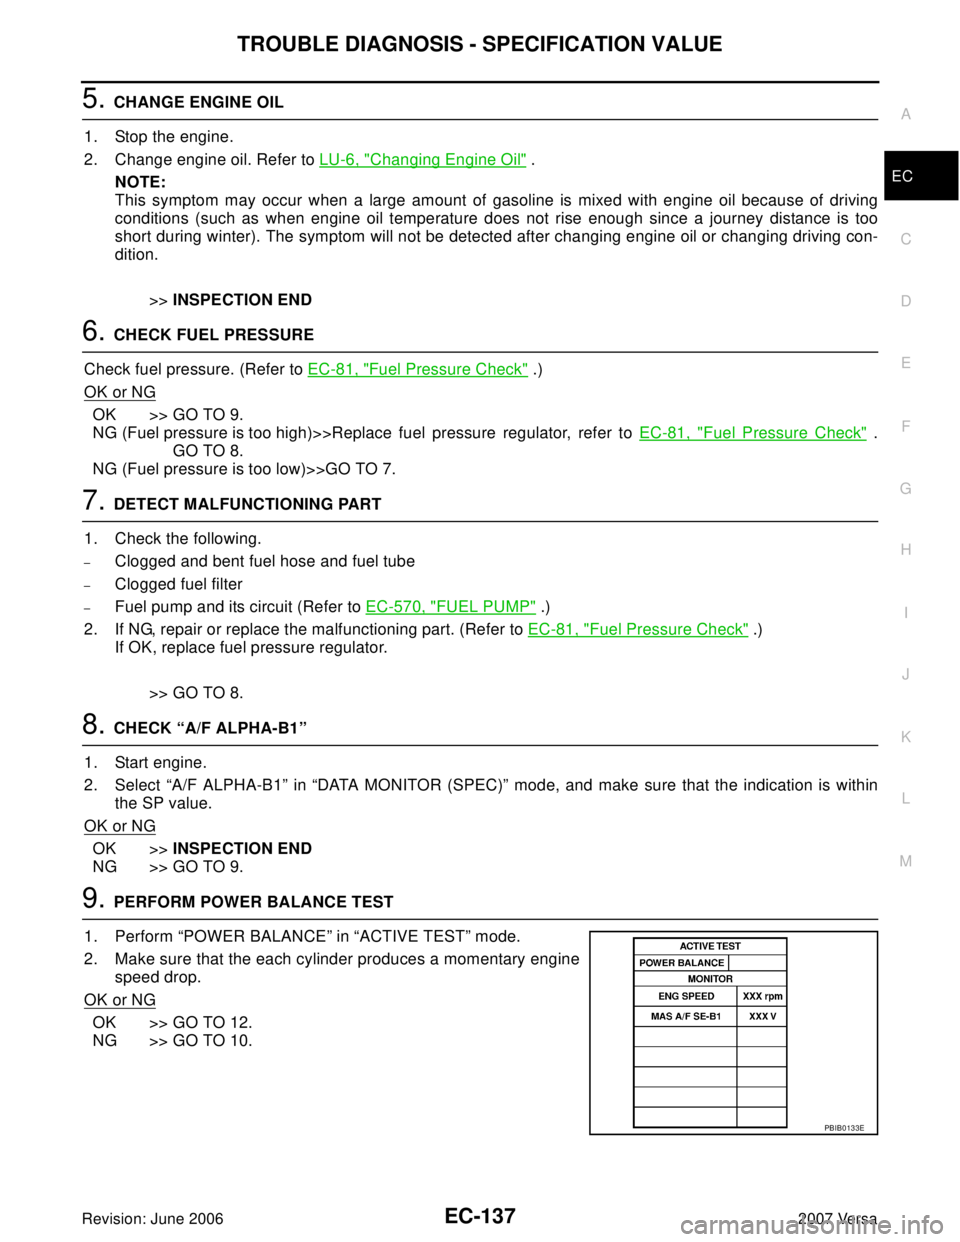
9. PERFORM POWER BALANCE TEST
1. Perform “POWER BALANCE” in “ACTIVE TEST” mode.
2. Make sure that the each cylinder produces a momentary engine
speed drop.
OK or NG
OK >> GO TO 12.
NG >> GO TO 10.
PBIB0133E
Page 1307 of 2896
EC-138Revision: June 2006
TROUBLE DIAGNOSIS - SPECIFICATION VALUE
2007 Versa
10. DETECT MALFUNCTIONING PART
1. Check the following.
–Ignition coil and its circuit (Refer to EC-576, "IGNITION SIGNAL" .)
–Fuel injector and its circuit (Refer to EC-564, "FUEL INJECTOR" .)
–Intake air leakage
–Low compression pressure (Refer to EM-62, "CHECKING COMPRESSION PRESSURE" .)
2. If NG, repair or replace the malfunctioning part.
If OK, replace fuel injector. (It may be caused by leakage from fuel injector or clogging.)
>> GO TO 11.
11 . CHECK “A/F ALPHA-B1”
1. Start engine.
2. Select “A/F ALPHA-B1” in “DATA MONITOR (SPEC)” mode, and make sure that the indication is within
the SP value.
OK or NG
OK >>INSPECTION END
NG >> GO TO 12.
12. CHECK A/F SENSOR 1 FUNCTION
Perform all DTC Confirmation Procedure related with A/F sensor 1.
�For DTC P0130, refer to EC-220, "DTC Confirmation Procedure" .
�For DTC P0131, refer to EC-228, "DTC Confirmation Procedure" .
�For DTC P0132, refer to EC-234, "DTC Confirmation Procedure" .
�For DTC P0133, refer to EC-240, "DTC Confirmation Procedure" .
�For DTC P2A00, refer to EC-541, "DTC Confirmation Procedure" .
OK or NG
OK >> GO TO 15.
NG >> GO TO 13.
13. CHECK A/F SENSOR 1 CIRCUIT
Perform Diagnostic Procedure according to corresponding DTC.
>> GO TO 14.
14. CHECK “A/F ALPHA-B1”
1. Start engine.
2. Select “A/F ALPHA-B1” in “DATA MONITOR (SPEC)” mode, and make sure that the indication is within
the SP value.
OK or NG
OK >>INSPECTION END
NG >> GO TO 15.
15. DISCONNECT AND RECONNECT ECM HARNESS CONNECTOR
1. Stop the engine.
2. Disconnect ECM harness connector. Check pin terminal and connector for damage, and then reconnect it.
>> GO TO 16.
Page 1327 of 2896
EC-158Revision: June 2006
DTC P0011 IVT CONTROL
2007 Versa
WITH GST
Follow the procedure “WITH CONSULT-II” above.
Diagnostic ProcedureUBS00QCA
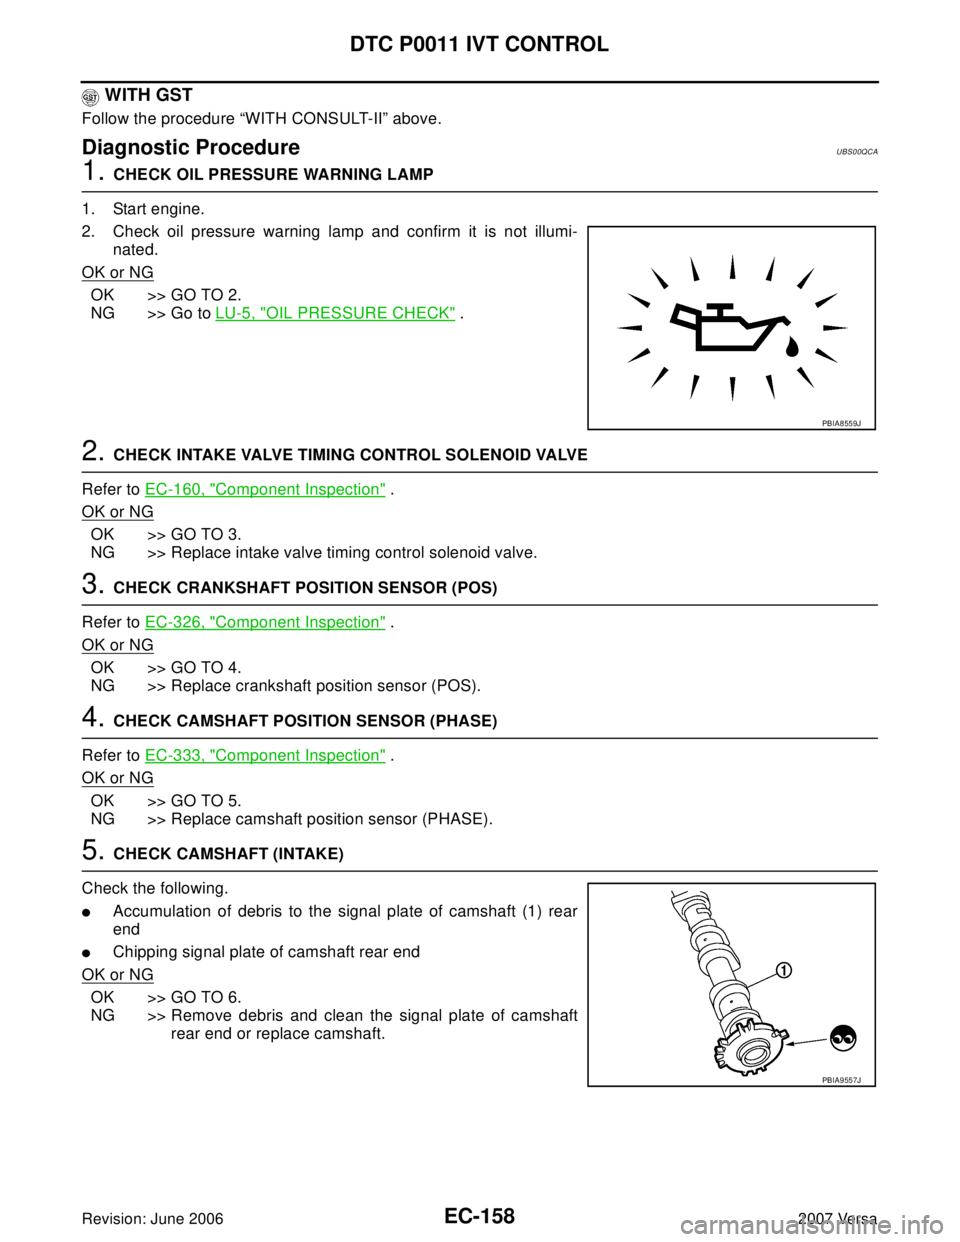
1. CHECK OIL PRESSURE WARNING LAMP
1. Start engine.
2. Check oil pressure warning lamp and confirm it is not illumi-
nated.
OK or NG
OK >> GO TO 2.
NG >> Go to LU-5, "
OIL PRESSURE CHECK" .
2. CHECK INTAKE VALVE TIMING CONTROL SOLENOID VALVE
Refer to EC-160, "
Component Inspection" .
OK or NG
OK >> GO TO 3.
NG >> Replace intake valve timing control solenoid valve.
3. CHECK CRANKSHAFT POSITION SENSOR (POS)
Refer to EC-326, "
Component Inspection" .
OK or NG
OK >> GO TO 4.
NG >> Replace crankshaft position sensor (POS).
4. CHECK CAMSHAFT POSITION SENSOR (PHASE)
Refer to EC-333, "
Component Inspection" .
OK or NG
OK >> GO TO 5.
NG >> Replace camshaft position sensor (PHASE).
5. CHECK CAMSHAFT (INTAKE)
Check the following.
�Accumulation of debris to the signal plate of camshaft (1) rear
end
�Chipping signal plate of camshaft rear end
OK or NG
OK >> GO TO 6.
NG >> Remove debris and clean the signal plate of camshaft
rear end or replace camshaft.
PBIA8559J
PBIA9557J