Page 2822 of 2896
 TROUBLESHOOTING
Revision: June 20062007 Versa
NOISE, VIBRATION AND HARSHNESS (NVH) TROUBLESHOOTINGPFP:00003
NVH Troubleshooting ChartEES002D6
Use the chart be")
WT-4
NOISE, VIBRATION AND HARSHNESS (NVH) TROUBLESHOOTING
Revision: June 20062007 Versa
NOISE, VIBRATION AND HARSHNESS (NVH) TROUBLESHOOTINGPFP:00003
NVH Troubleshooting ChartEES002D6
Use the chart below to help you find the cause of the symptom. If necessary, repair or replace these parts.
×: ApplicableReference page
FA X - 5WT-5
WT-6
WT-29—
—
—
—
FAX -4, "
NVH Troubleshooting Chart
",
FSU-5, "
NVH Troubleshooting Chart
"
RAX-3, "
NVH Troubleshooting Chart
",
RSU-4, "
NVH Troubleshooting Chart
"
Refer to TIRES in this chart
Refer to ROAD WHEEL in this chart
FAX -4, "
NVH Troubleshooting Chart
"
BR-5, "
NVH Troubleshooting Chart
"
PS-5, "
NVH Trouble Shooting Chart
"
Possible cause and SUSPECTED PARTS
Improper installation, looseness
Out-of-round
Imbalance
Incorrect tire pressure
Uneven tire wear
Deformation or damage
Non-uniformity
Incorrect tire size
FRONT AXLE AND FRONT SUSPENSION
REAR AXLE AND REAR SUSPENSION
TIRES
ROAD WHEELS
DRIVE SHAFT
BRAKE
STEERING
SymptomTIRESNoise× ×××××× × × ××××
Shake× ××××× × × × ××××
Vibration××××××
Shimmy× ××××××× × × × ××
Shudder× ××××× × × × × ××
Poor quality
ride or handling× ××××× × × × ×
ROAD WHEELNoise××× × × × × ×××
Shake××× × × × × ×××
Shimmy, Shud-
der×××× ×××××
Poor quality
ride or handling××× × × × ×
Page 2823 of 2896

ROAD WHEEL
WT-5
C
D
F
G
H
I
J
K
L
MA
B
WT
Revision: June 20062007 Versa
ROAD WHEELPFP:40300
InspectionEES002D7
ALUMINUM WHEEL
1. Check tires for wear and improper inflation.
2. Check wheels for deformation, cracks and other damage. If deformed, remove wheel and check wheel
runout.
a. Remove tire from aluminum wheel and mount on a tire balance machine.
b. Set dial indicator as shown.
STEEL WHEEL
1. Check tires for wear and improper inflation.
2. Check wheels for deformation, cracks and other damage. If deformed, remove wheel and check wheel
runout.
a. Remove tire from steel wheel and mount on a tire balance machine.
b. Set two dial indicators as shown.
c. Set each dial indicator to 0.
d. Rotate wheel and check dial indicators at several points around
the circumference of the wheel.
e. Calculate runout at each point as shown.
f. Select maximum positive runout value and the maximum nega-
tive value.
Add the two values to determine total runout. In case a positive
or negative value is not available, use the maximum value (neg-
ative or positive) for total runout. If the total runout value
exceeds the limit, replace steel wheel.Wheel runout
(Dial indicator value): Refer to WT-29, "
Road Wheel" .
SFA975B
Radial runout = (A+B)/2
Lateral runout = (C+D)/2
Wheel runout : Refer to WT-29, "
Road Wheel" .
SEIA0558E
Page 2824 of 2896
WT-6
ROAD WHEEL TIRE ASSEMBLY
Revision: June 20062007 Versa
ROAD WHEEL TIRE ASSEMBLYPFP:40300
Balancing WheelsEES002D8
Adjust wheel balance using road wheel center.
CAUTION:
�Be careful not to scratch the road wheel during removal.
�Use clip-on type wheel balance weights only.
Wheel balance (Maximum allowable unbalance):
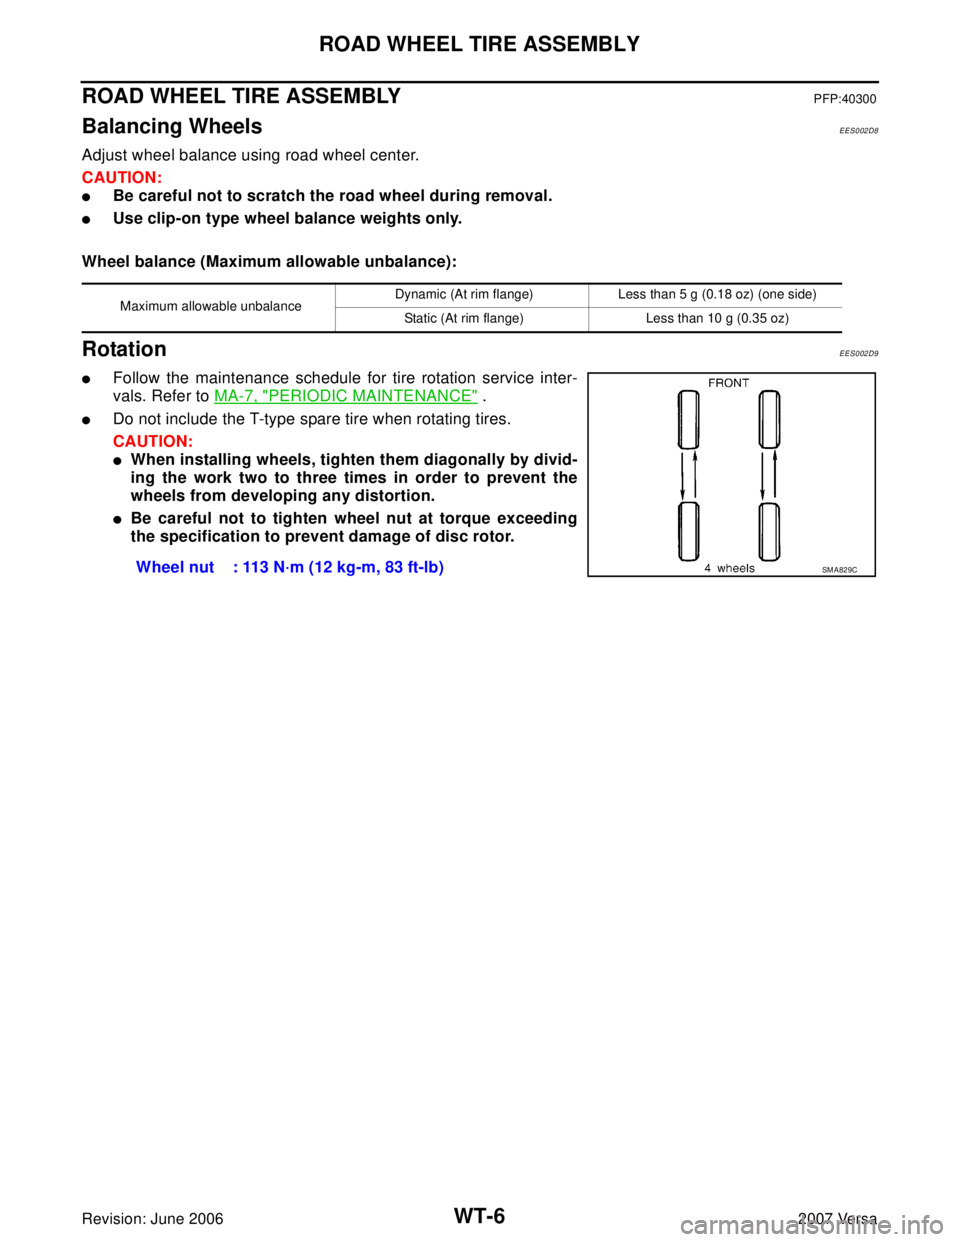
RotationEES002D9
�Follow the maintenance schedule for tire rotation service inter-
vals. Refer to MA-7, "
PERIODIC MAINTENANCE" .
�Do not include the T-type spare tire when rotating tires.
CAUTION:
�When installing wheels, tighten them diagonally by divid-
ing the work two to three times in order to prevent the
wheels from developing any distortion.
�Be careful not to tighten wheel nut at torque exceeding
the specification to prevent damage of disc rotor.
Maximum allowable unbalanceDynamic (At rim flange) Less than 5 g (0.18 oz) (one side)
Static (At rim flange) Less than 10 g (0.35 oz)
Wheel nut : 113 N·m (12 kg-m, 83 ft-lb)SM A82 9C
Page 2830 of 2896

WT-12
TROUBLE DIAGNOSES
Revision: June 20062007 Versa
ID REGISTRATION WITHOUT TRANSMITTER ACTIVATION TOOL
NOTE:
This procedure must be done after replacement of a low tire pressure warning transmitter or BCM.
New replacement transmitters are provided "asleep" and must first be "woken up" using Transmitter
Activation Tool J-45295 before ID registration can be performed.
1. Connect CONSULT-II. Refer to GI-38, "
CONSULT-II Start Procedure" .
2. Select “AIR PRESSURE MONITOR” on “SELECT TEST ITEM" screen.
3. Select “WORK SUPPORT” on “SELECT DIAG MODE" screen,
and select "ID REGIST".
4. Adjust the tire pressure to the values shown in the table below
and drive the vehicle at 15 km/h (9.4 MPH) or more for a few
minutes.
5. After completing all ID registrations, press “END” to complete the procedure.
6. Inflate all tires to proper pressure. Refer to WT-29, "
Tire" .
BCIA0031E
Tire position
Tire pressure kPa (kg/cm2 , psi)
Front – Left 250 (2.5, 36)
Front – Right 230 (2.3, 33)
Rear – Right 210 (2.1, 30)
Rear – Left 190 (1.9, 27)
Activation tire position CONSULT-II
Front LH
“YET”
↓
“DONE” Front RH
Rear RH
Rear LH
Page 2839 of 2896

TROUBLE DIAGNOSIS FOR SELF-DIAGNOSTIC ITEMS
WT-21
C
D
F
G
H
I
J
K
L
MA
B
WT
Revision: June 20062007 Versa
2. REPLACE TRANSMITTER
1. Check low tire pressure warning lamp again for flashing, replace malfunctioning transmitter. Refer to WT-
27, "Transmitter (Pressure Sensor)" .
2. Carry out ID registration of all transmitters. Refer to WT-11, "
ID Registration Procedure" .
Can ID registration of all transmitters be completed?
YES >> GO TO 3.
NO >> GO TO WT-20, "
Data From Transmitter Not Being Received" .
3. DRIVE VEHICLE
1. Drive at a speed of 40 km/h (25 MPH) or more for 3 minutes, and then drive the vehicle at any speed for
10 minutes.
2. Check all tire pressures with CONSULT-II within 5 minutes.
Does
“DATA MONITOR ITEM” display tire pressure as normal without any warning lamp?
YES >> Inspection End.
NO >> Replace malfunctioning transmitter, and perform Step 3 again. Refer to WT-27, "
Tran sm it ter
(Pressure Sensor)" .
Transmitter Pressure MalfunctionEES002F7
MALFUNCTION CODE NO. 35, 36, 37 OR 38
1. CHECK ALL TIRE PRESSURES
Check all tire pressures. Refer to WT-29, "
Tire" .
Are there any tires with pressure of 64 psi or more?
YES >> Adjust tire pressure to specified value.
NO >> GO TO 2.
2. ID REGISTRATION AND VEHICLE DRIVING
1. Carry out ID registration of all transmitters. Refer to WT-11, "
ID Registration Procedure" .
2. Drive at a speed of 40 km/h (25 MPH) or more for several minutes without stopping.
3. Check all tire pressures with CONSULT-II within 15 minutes after vehicle speed becomes 17 km/h (11
MPH).
Does
“DATA MONITOR ITEM” display 64 psi or more?
YES >> Replace transmitter. Refer to WT-27, "Transmitter (Pressure Sensor)" . GO TO 3.
NO >> GO TO 3.
3. ID REGISTRATION AND VEHICLE DRIVING
1. Carry out ID registration of all transmitters. Refer to WT-11, "
ID Registration Procedure" .
2. Drive at a speed of 40 km/h (25 MPH) or more for 3 minutes, and then drive the vehicle at any speed for
10 minutes.
3. Check all tire pressures with CONSULT-II within 5 minutes.
Does
“DATA MONITOR ITEM” display tire pressure as normal without any warning lamp?
YES >> Inspection End.
NO >> GO TO the inspection applicable to DTC.