Page 950 of 2896

TROUBLE DIAGNOSIS
CVT-53
D
E
F
G
H
I
J
K
L
MA
B
CVT
Revision: June 20062007 Versa
9. CHECK ENGINE BRAKE FUNCTION — PART 3
1. Move selector lever to “L” position.
2. Check engine brake.
Does engine braking effectively reduce speed in
“L” position?
YES >> 1. Stop the vehicle.
2. Perform self-diagnosis. Refer to CVT-60, "
SELF-DIAGNOSTIC RESULT MODE" .
NO >> Mark the box of CVT-189, "
Vehicle Does Not Decelerate by Engine Brake" on the CVT-37,
"DIAGNOSTIC WORKSHEET" . Then continue trouble diagnosis.
Vehicle Speed When Shifting GearsUCS005YG
Numerical value data are reference values.
CAUTION:
Lock-up clutch is engaged when vehicle speed is approximately 18 km/h (11 MPH) to 90 km/h (56 MPH).Engine type Throttle position Shift patternEngine speed (rpm)
At 40 km/h (25 MPH) At 60 km/h (37 MPH)
MR18DE8/8“D” position
Overdrive-off mode
“L” position3,600 - 4,400 4,400 - 5,200
2/8“D” position 1,400 - 2,400 1,500 - 2,500
Overdrive-off mode 2,200 - 3,000 2,800 - 3,600
“L” position 3,200 - 4,000 3,900 - 4,700
Page 956 of 2896
TROUBLE DIAGNOSIS
CVT-59
D
E
F
G
H
I
J
K
L
MA
B
CVT
Revision: June 20062007 Versa
*: Models without ABS does not indicate.
CONSULT-II SETTING PROCEDURE
Refer to GI-38, "CONSULT-II Start Procedure" .
WORK SUPPORT MODE
Display Item List
Engine Brake Adjustment
1. Touch “WORK SUPPORT” on “SELECT DIAG MODE” screen.
2. Touch “ENGINE BRAKE ADJ”.
3. Touch “START”.
4. Set “ENGINE BRAKE LEVEL” by touching “UP” or “DOWN”.
5. Turn ignition switch OFF, wait at least 5 seconds and then turn
ignition switch ON.
6. Engine brake level set is completed.
Item name Description
ENGINE BRAKE ADJ. The engine brake level setting can be canceled.
CONFORM CVTF DETERIORTN The CVT fluid deterioration level can be checked.
BCIA0031E
SCIA4287E
SCIA4288E
“ENGINE BRAKE LEVEL”
0: Initial set value (Engine brake level control is
activated)
OFF: Engine brake level control is deactivated.
SAT9 3 4J
Page 967 of 2896
CVT-70
DTC U1000 CAN COMMUNICATION LINE
Revision: June 20062007 Versa
TCM terminal data are reference values, measured between each terminal and ground.
Diagnostic ProcedureUCS005YP
1. CHECK CAN COMMUNICATION CIRCUIT
With CONSULT-II
1. Turn ignition switch ON and start engine.
2. Select “SELF-DIAG RESULTS” mode for “TRANSMISSION”
with CONSULT-II.
Is any malfunction of the
“U1000 CAN COMM CIRCUIT” indicated?
YES >> Print out CONSULT-II screen, go to LAN section. Refer
to LAN-47, "
CAN System Specification Chart" .
NO >>INSPECTION END
TerminalWire
colorItem Condition Data (Approx.)
5 L CAN-H — —
6 P CAN-L — —
SCIA5982E
Page 968 of 2896

DTC U1010 TRANSMISSION CONTROL MODULE (CAN)
CVT-71
D
E
F
G
H
I
J
K
L
MA
B
CVT
Revision: June 20062007 Versa
DTC U1010 TRANSMISSION CONTROL MODULE (CAN)PFP:31036
DescriptionUCS006KU
CAN (Controller Area Network) is a serial communication line for real time application. It is an on-vehicle mul-
tiplex communication line with high data communication speed and excellent malfunction detection ability.
Many electronic control units are equipped onto a vehicle, and each control unit shares information and links
with other control units during operation (not independent). In CAN communication, control units are con-
nected with 2 communication lines (CAN-H line, CAN-L line) allowing a high rate of information transmission
with less wiring. Each control unit transmits/receives data but selectively reads required data only.
On Board Diagnosis LogicUCS006KV
�This is an OBD-II self-diagnostic item.
�Diagnostic trouble code “U1010 CONTROL UNIT(CAN)” with CONSULT-II is detected when TCM cannot
communicate to other control units.
Possible CauseUCS006KW
Harness or connectors
(CAN communication line is open or shorted.)
DTC Confirmation ProcedureUCS006KX
NOTE:
If “DTC Confirmation Procedure” has been previously performed, always turn ignition switch OFF and
wait at least 10 seconds before performing the next test.
After the repair, touch “ERASE” on “SELF-DIAG RESULTS” and then perform the following procedure to con-
firm the malfunction is eliminated.
WITH CONSULT-II
1. Turn ignition switch ON. (Do not start engine.)
2. Select “DATA MONITOR” mode for “TRANSMISSION” with
CONSULT-II.
3. Start engine and wait for at least 6 seconds.
4. If DTC is detected, go to CVT-71, "
Diagnostic Procedure" .
WITH GST
Follow the procedure “WITH CONSULT-II”.
Diagnostic ProcedureUCS006KY
1. CHECK DTC
With CONSULT-II
1. Turn ignition switch ON. (Do not start engine.)
2. Select “SELF-DIAG RESULTS” mode for “TRANSMISSION” with CONSULT-II.
3. Touch “ERASE”.
4. Turn ignition switch OFF and wait for at least 10 seconds.
5. Perform “DTC confirmation procedure”. Refer to CVT-71, "
DTC Confirmation Procedure" .
Is any malfunction of the
“U1010 CONTROL UNIT(CAN)” indicated?
YES >> Replace the TCM. Refer to CVT-190, "Removal and Installation" .
NO >>INSPECTION END
BCIA0031E
Page 971 of 2896

CVT-74
DTC P0615 START SIGNAL CIRCUIT
Revision: June 20062007 Versa
TCM terminal data are reference values, measured between each terminal and ground.
Diagnostic ProcedureUCS005YW
1. CHECK STARTER RELAY SIGNAL
With CONSULT-II
1. Turn ignition switch ON. (Do not start engine.)
2. Select “SELECTION FROM MENU” in “DATA MONITOR” mode
for “TRANSMISSION” with CONSULT-II and check monitor
“STRTR RLY OUT”, “STRTR RLY MON”(PNP relay) ON/OFF.
Without CONSULT-II
1. Turn ignition switch ON. (Do not start engine.)
2. Check voltage between the TCM connector terminal and
ground.
OK or NG
OK >> GO TO 3.
NG >> GO TO 2.
2. DETECT MALFUNCTIONING ITEM
Check the following:
�Starter relay. Refer to PG-73, "STANDARDIZED RELAY" .
�Open or short-circuit in the harness between TCM and the starter relay. Refer to CVT-73, "Wiring Diagram
— CVT — STSIG" .
�Ground circuit for the starter relay. Refer to SC-12, "Wiring Diagram — START —" .
OK or NG
OK >> GO TO 3.
NG >> Repair or replace damaged parts.
Te r m i n a lWire
colorItem Condition Data (Approx.)
24 BR Starter relaySelector lever in “N” and “P” positions Battery voltage
Selector lever in other positions 0 V
Item name Condition Display value
STRTR RLY OUTSelector lever in “P” and
“N” positionsON
Selector lever in other
positionsOFF
STRTR RLY MONSelector lever in “P” and
“N” positionsON
Selector lever in other
positionsOFF
Terminal Item Condition Data (Approx.)
24St a r t e r
relaySelector lever in “N” and “P”
positionsBattery voltage
Selector lever in other posi-
tions0 V
SCIA2274E
SCIA2022E
Page 974 of 2896

DTC P0703 STOP LAMP SWITCH CIRCUIT
CVT-77
D
E
F
G
H
I
J
K
L
MA
B
CVT
Revision: June 20062007 Versa
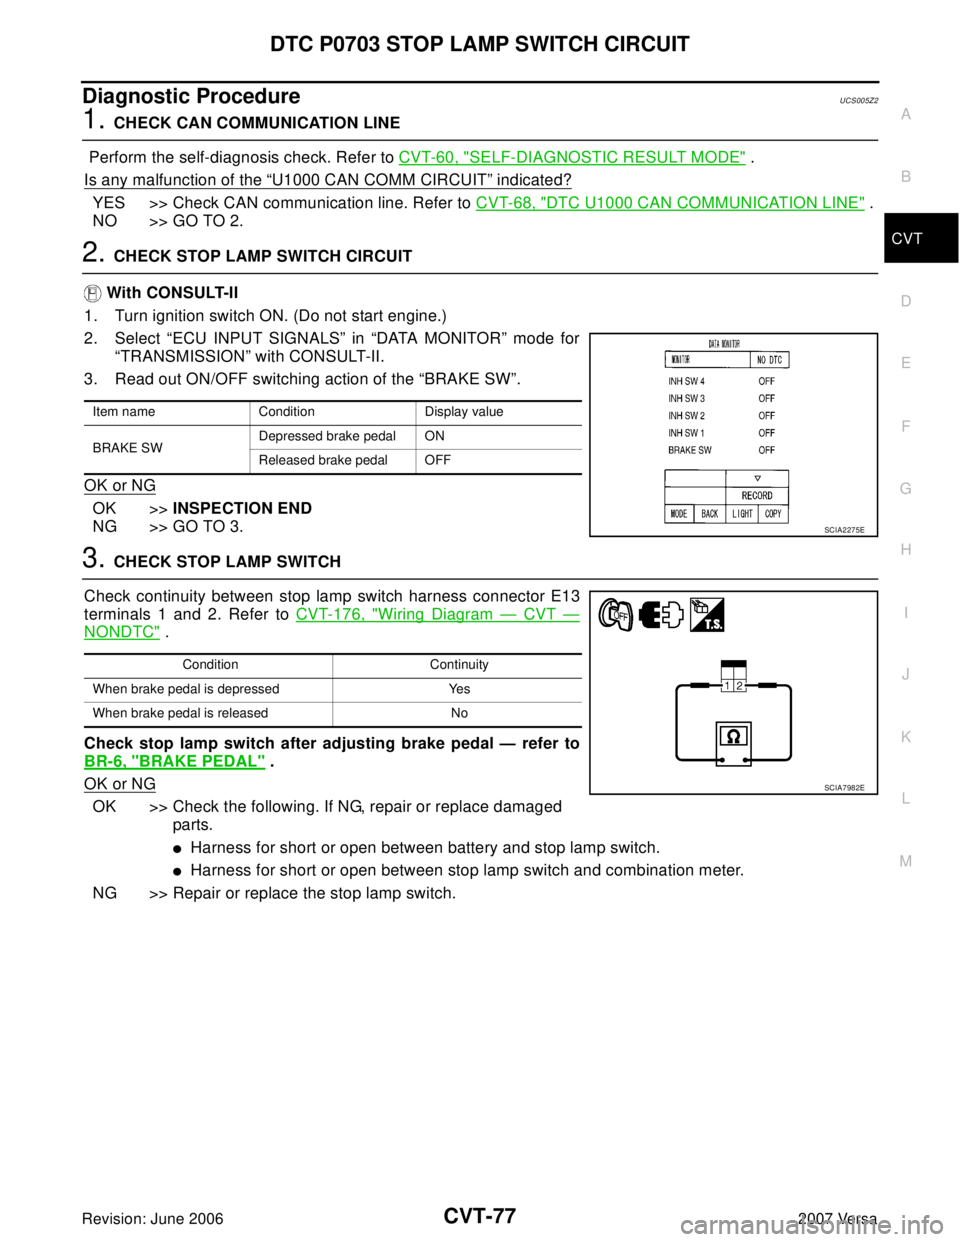
Diagnostic ProcedureUCS005Z2
1. CHECK CAN COMMUNICATION LINE
Perform the self-diagnosis check. Refer to CVT-60, "
SELF-DIAGNOSTIC RESULT MODE" .
Is any malfunction of the
“U1000 CAN COMM CIRCUIT” indicated?
YES >> Check CAN communication line. Refer to CVT-68, "DTC U1000 CAN COMMUNICATION LINE" .
NO >> GO TO 2.
2. CHECK STOP LAMP SWITCH CIRCUIT
With CONSULT-II
1. Turn ignition switch ON. (Do not start engine.)
2. Select “ECU INPUT SIGNALS” in “DATA MONITOR” mode for
“TRANSMISSION” with CONSULT-II.
3. Read out ON/OFF switching action of the “BRAKE SW”.
OK or NG
OK >>INSPECTION END
NG >> GO TO 3.
3. CHECK STOP LAMP SWITCH
Check continuity between stop lamp switch harness connector E13
terminals 1 and 2. Refer to CVT-176, "
Wiring Diagram — CVT —
NONDTC" .
Check stop lamp switch after adjusting brake pedal — refer to
BR-6, "
BRAKE PEDAL" .
OK or NG
OK >> Check the following. If NG, repair or replace damaged
parts.
�Harness for short or open between battery and stop lamp switch.
�Harness for short or open between stop lamp switch and combination meter.
NG >> Repair or replace the stop lamp switch.
Item name Condition Display value
BRAKE SWDepressed brake pedal ON
Released brake pedal OFF
SCIA2275E
Condition Continuity
When brake pedal is depressed Yes
When brake pedal is released No
SCIA7982E
Page 979 of 2896

CVT-82
DTC P0705 PARK/NEUTRAL POSITION SWITCH
Revision: June 20062007 Versa
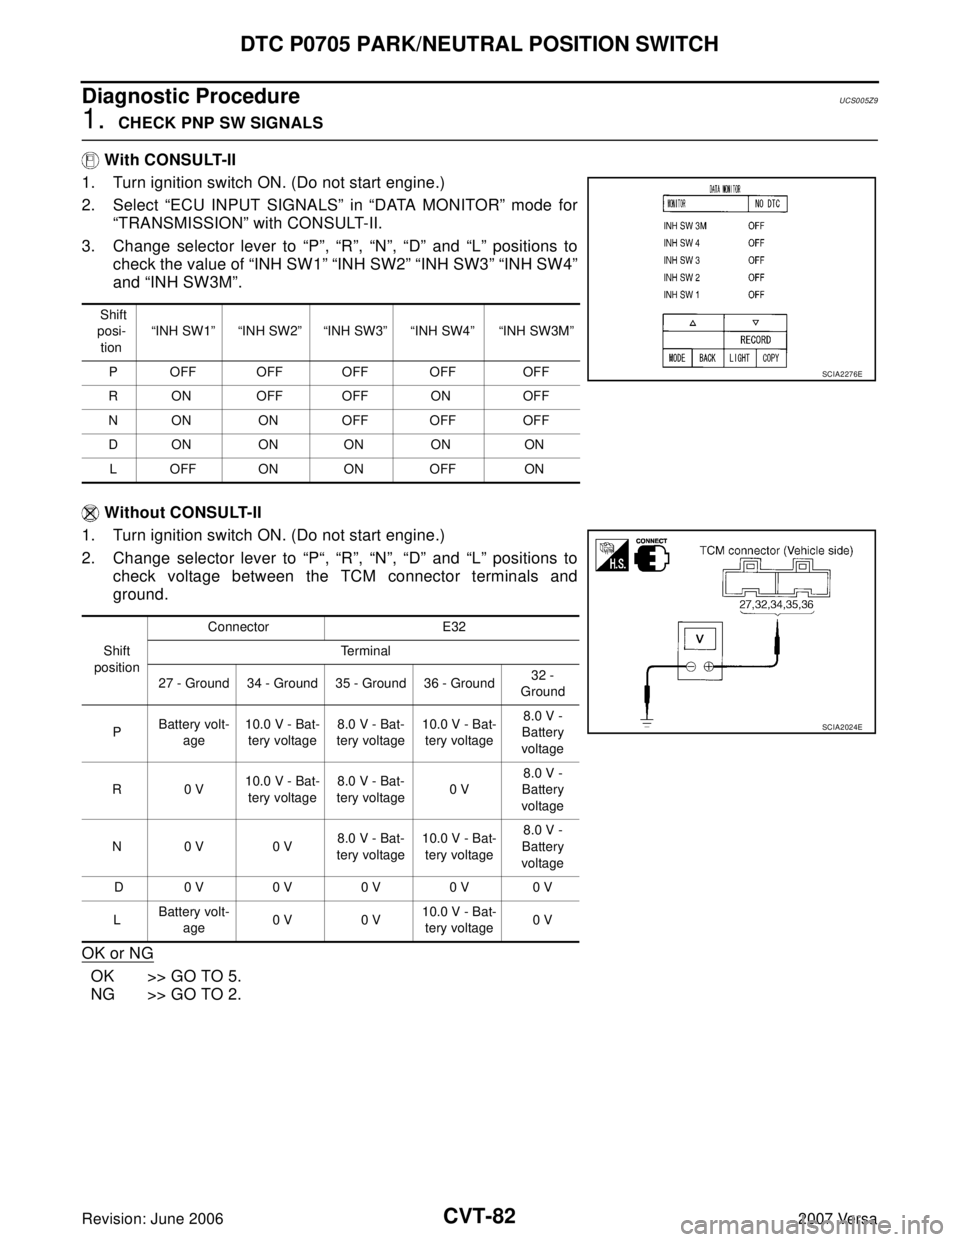
Diagnostic ProcedureUCS005Z9
1. CHECK PNP SW SIGNALS
With CONSULT-II
1. Turn ignition switch ON. (Do not start engine.)
2. Select “ECU INPUT SIGNALS” in “DATA MONITOR” mode for
“TRANSMISSION” with CONSULT-II.
3. Change selector lever to “P”, “R”, “N”, “D” and “L” positions to
check the value of “INH SW1” “INH SW2” “INH SW3” “INH SW4”
and “INH SW3M”.
Without CONSULT-II
1. Turn ignition switch ON. (Do not start engine.)
2. Change selector lever to “P“, “R”, “N”, “D” and “L” positions to
check voltage between the TCM connector terminals and
ground.
OK or NG
OK >> GO TO 5.
NG >> GO TO 2.
Shift
posi-
tion “INH SW1” “INH SW2” “INH SW3” “INH SW4” “INH SW3M”
P OFF OFF OFF OFF OFF
R ON OFF OFF ON OFF
N ON ON OFF OFF OFF
DONONONON ON
L OFF ON ON OFF ON
SCIA2276E
Shift
positionConnector E32
Te r m i n a l
27 - Ground 34 - Ground 35 - Ground 36 - Ground32 -
Ground
PBattery volt-
age10.0 V - Bat-
tery voltage8.0 V - Bat-
tery voltage10.0 V - Bat-
tery voltage8.0 V -
Battery
voltage
R0 V10.0 V - Bat-
tery voltage8.0 V - Bat-
tery voltage0 V8.0 V -
Battery
voltage
N0 V 0 V8.0 V - Bat-
tery voltage10.0 V - Bat-
tery voltage8.0 V -
Battery
voltage
D0 V0 V0 V0 V0 V
LBattery volt-
age0 V 0 V10.0 V - Bat-
tery voltage0 V
SCIA2024E
Page 984 of 2896

DTC P0710 CVT FLUID TEMPERATURE SENSOR CIRCUIT
CVT-87
D
E
F
G
H
I
J
K
L
MA
B
CVT
Revision: June 20062007 Versa
TCM terminal data are reference values, measured between each terminal and ground.
Diagnostic ProcedureUCS005ZH
1. CHECK CVT FLUID TEMPERATURE SENSOR SIGNAL
With CONSULT-II
1. Start engine.
2. Select “ECU INPUT SIGNALS” in “DATA MONITOR” mode for
“TRANSMISSION” with CONSULT-II.
3. Read out the value of “ATF TEMP SEN”.
Without CONSULT-II
1. Start engine.
2. Check voltage between TCM connector terminals.
3. Turn ignition switch OFF.
4. Disconnect TCM connector.
5. Check if there is continuity between connector terminal and
ground.
OK or NG
OK >> GO TO 5.
NG >> GO TO 2.
2. CHECK CVT FLUID TEMPERATURE SENSOR CIRCUIT
1. Turn ignition switch OFF.
2. Disconnect the TCM connector.
3. Check resistance between TCM connector terminals.
OK or NG
OK >> GO TO 5.
NG >> GO TO 3.
Terminal Wire color Item Condition Data (Approx.)
42 LG Sensor ground Always 0 V
47 GCVT fluid tempera-
ture sensorWhen CVT fluid temperature is 20°C (68°F). 2.0 V
When CVT fluid temperature is 80°C (176°F). 1.0 V
Item name ConditionDisplay value
(Approx.)
AT F T E M P S E NWhen CVT fluid temperature is 20°C
(68°F).2.0 V
When CVT fluid temperature is 80°C
(176°F).1.0 V
SCIA2277E
Name Connector TerminalTemperature
°C (°F)Voltage
(Approx.)
CVT fluid tem-
perature sen-
sorE32 47 - 4220 (68) 2.0 V
80 (176) 1.0 V
SCIA2027E
Name Connector TerminalTemperature
°C (°F)Resistance
(Approx.)
CVT fluid tem-
perature sensorE32 47 - 4220 (68) 6.5 kΩ
80 (176) 0.9 kΩ
SCIA2510E