Page 1031 of 1226
d. Tighten adapter plate to transmission case using 2 bolts.
e. Place dial indicator on rear end of counter gear.
f. Move counter gear up and down and measure dial indicator
de¯ection.
g. Select proper thrust washer using table below as a guide.
Counter gear end play:
0.10 - 0.25 mm (0.0039 - 0.0098 in)
Table for selecting proper counter gear front bearing
thrust washer:
Refer to SDS, MT-34.
6. Select proper reverse idler rear thrust washer when replacing
OD gear case, reverse idler gear, reverse idler shaft or reverse
idler front thrust washer.
a. Install reverse idler front gear, reverse idler needle bearings,
reverse idler front thrust washers and reverse idler shaft into
OD gear case.
+When replacing reverse idler rear thrust washer, install
either A or B.
Reverse idler rear thrust washer:
Refer to SDS, MT-34.
SMT578A
SMT442B
ASSEMBLY
Gear Components (Cont'd)
MT-24
Page 1032 of 1226
b. Place dial indicator on front end of reverse idler shaft.
c. Put straightedge on front surface of OD gear case as a stop-
per of reverse idler shaft.
d. Move reverse idler shaft up and down and measure reverse
idler gear end play.
Reverse idler gear end play:
0.30 - 0.53 mm (0.0118 - 0.0209 in)
e. If not within speci®cation, replace reverse idler rear thrust
washer with the other (A or B) and check again.
7. Install mainshaft and counter gear on adapter plate and main
drive gear on mainshaft.
a. Mount adapter plate on vise and apply multi-purpose grease to
counter gear rear bearing.
b. Install mainshaft a little on mainshaft front bearing.
+To allow for installation of counter gear, do not install
mainshaft completely.
c. Install counter gear on counter gear rear bearing and install
main drive gear, pilot bearing and spacer on mainshaft.
SMT433A
SMT438A
SMT440A
SMT441A
ASSEMBLY
Gear Components (Cont'd)
MT-25
Page 1041 of 1226

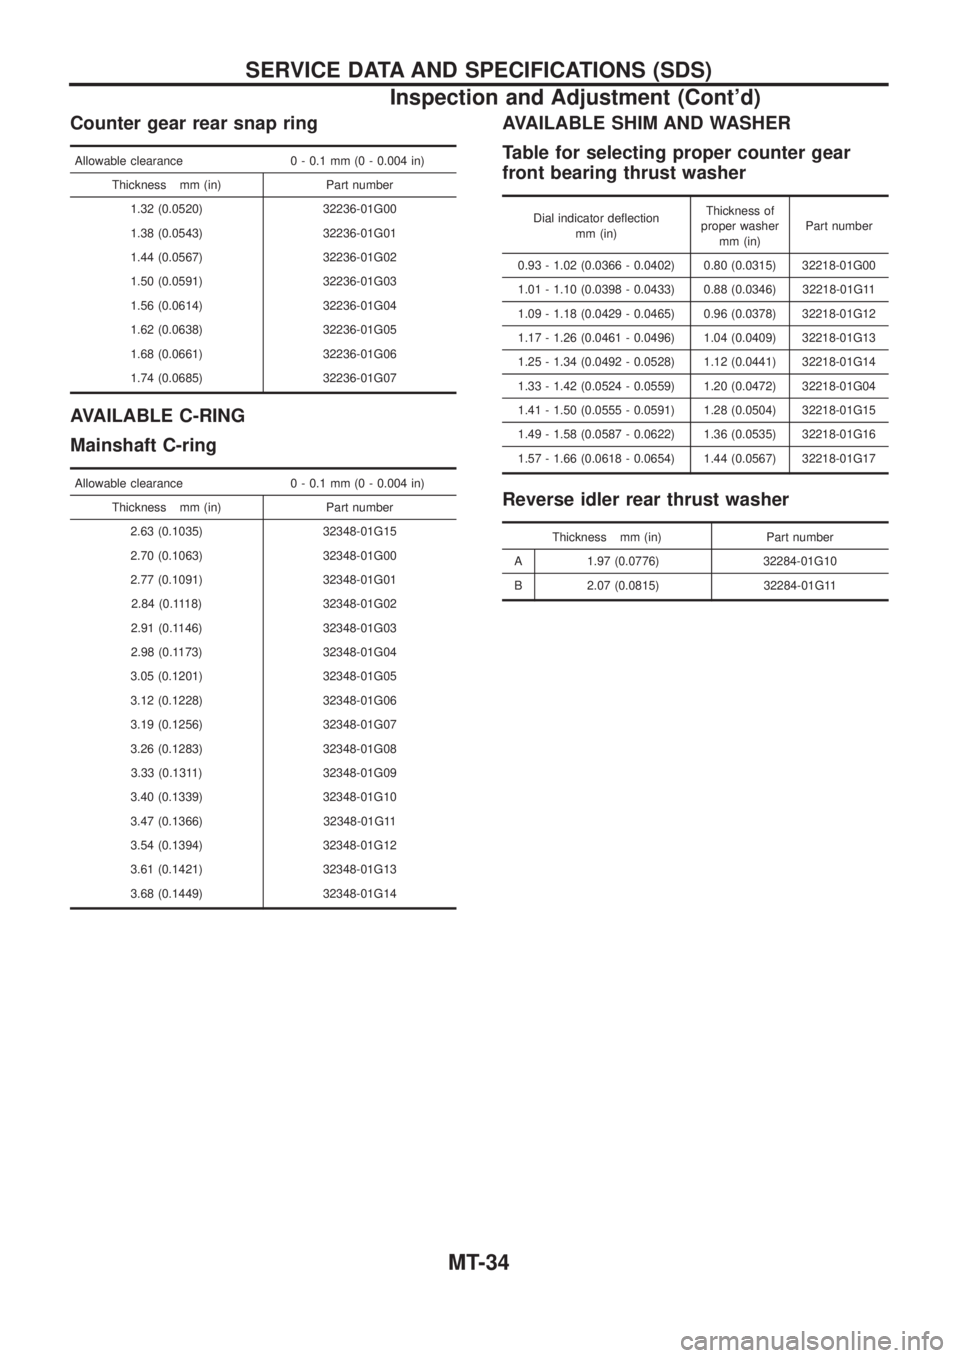
Counter gear rear snap ring
Allowable clearance 0 - 0.1 mm (0 - 0.004 in)
Thickness mm (in) Part number
1.32 (0.0520) 32236-01G00
1.38 (0.0543) 32236-01G01
1.44 (0.0567) 32236-01G02
1.50 (0.0591) 32236-01G03
1.56 (0.0614) 32236-01G04
1.62 (0.0638) 32236-01G05
1.68 (0.0661) 32236-01G06
1.74 (0.0685) 32236-01G07
AVAILABLE C-RING
Mainshaft C-ring
Allowable clearance 0 - 0.1 mm (0 - 0.004 in)
Thickness mm (in) Part number
2.63 (0.1035) 32348-01G15
2.70 (0.1063) 32348-01G00
2.77 (0.1091) 32348-01G01
2.84 (0.1118) 32348-01G02
2.91 (0.1146) 32348-01G03
2.98 (0.1173) 32348-01G04
3.05 (0.1201) 32348-01G05
3.12 (0.1228) 32348-01G06
3.19 (0.1256) 32348-01G07
3.26 (0.1283) 32348-01G08
3.33 (0.1311) 32348-01G09
3.40 (0.1339) 32348-01G10
3.47 (0.1366) 32348-01G11
3.54 (0.1394) 32348-01G12
3.61 (0.1421) 32348-01G13
3.68 (0.1449) 32348-01G14
AVAILABLE SHIM AND WASHER
Table for selecting proper counter gear
front bearing thrust washer
Dial indicator de¯ection
mm (in)Thickness of
proper washer
mm (in)Part number
0.93 - 1.02 (0.0366 - 0.0402) 0.80 (0.0315) 32218-01G00
1.01 - 1.10 (0.0398 - 0.0433) 0.88 (0.0346) 32218-01G11
1.09 - 1.18 (0.0429 - 0.0465) 0.96 (0.0378) 32218-01G12
1.17 - 1.26 (0.0461 - 0.0496) 1.04 (0.0409) 32218-01G13
1.25 - 1.34 (0.0492 - 0.0528) 1.12 (0.0441) 32218-01G14
1.33 - 1.42 (0.0524 - 0.0559) 1.20 (0.0472) 32218-01G04
1.41 - 1.50 (0.0555 - 0.0591) 1.28 (0.0504) 32218-01G15
1.49 - 1.58 (0.0587 - 0.0622) 1.36 (0.0535) 32218-01G16
1.57 - 1.66 (0.0618 - 0.0654) 1.44 (0.0567) 32218-01G17
Reverse idler rear thrust washer
Thickness mm (in) Part number
A 1.97 (0.0776) 32284-01G10
B 2.07 (0.0815) 32284-01G11
SERVICE DATA AND SPECIFICATIONS (SDS)
Inspection and Adjustment (Cont'd)
MT-34
Page 1056 of 1226

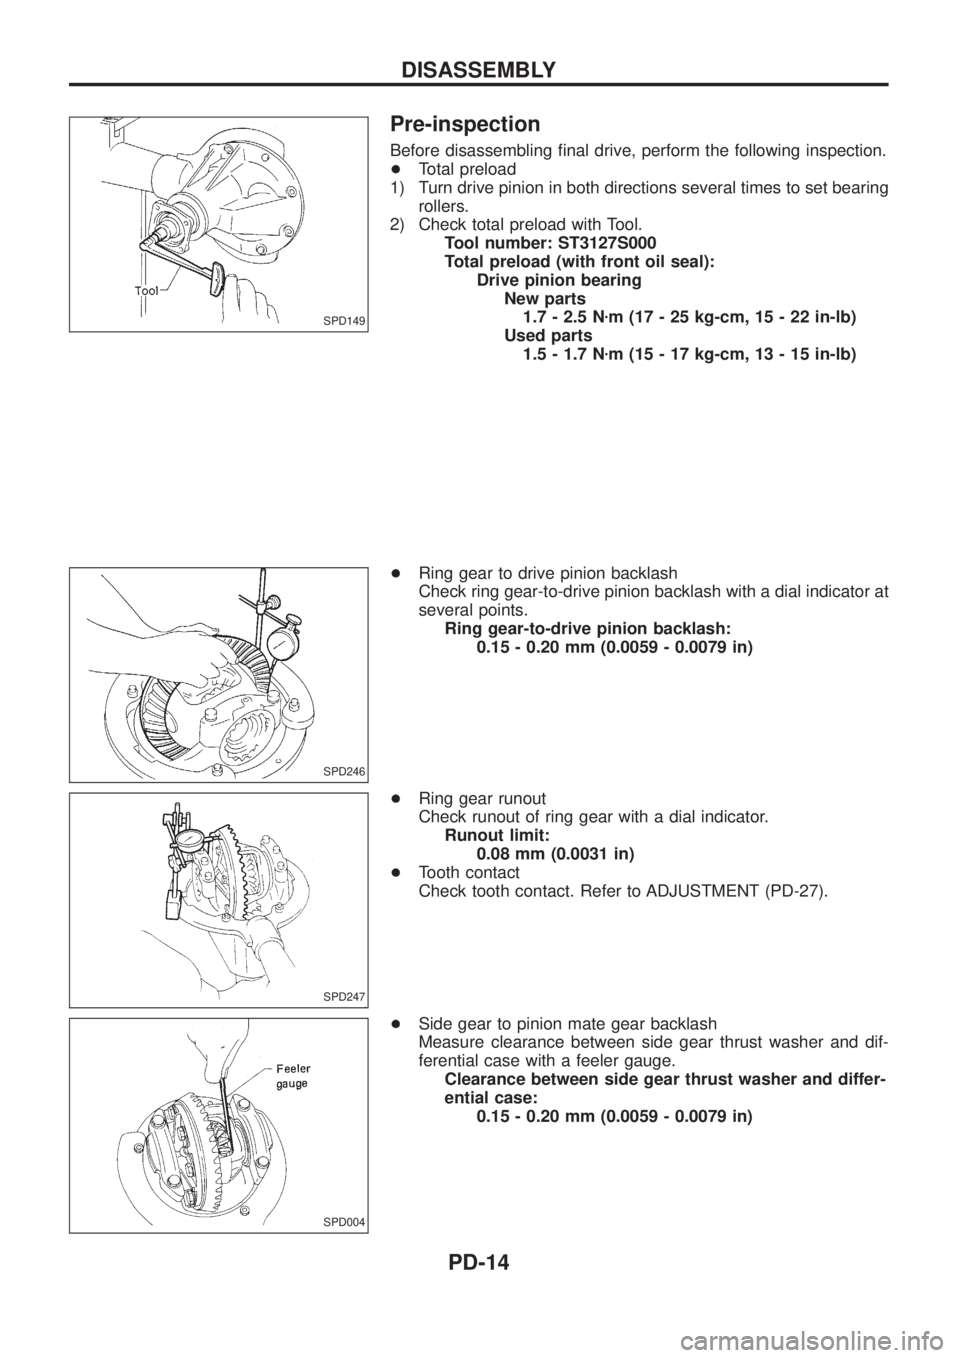
Pre-inspection
Before disassembling ®nal drive, perform the following inspection.
+Total preload
1) Turn drive pinion in both directions several times to set bearing
rollers.
2) Check total preload with Tool.
Tool number: ST3127S000
Total preload (with front oil seal):
Drive pinion bearing
New parts
1.7 - 2.5 Nzm (17 - 25 kg-cm, 15 - 22 in-lb)
Used parts
1.5 - 1.7 Nzm (15 - 17 kg-cm, 13 - 15 in-lb)
+Ring gear to drive pinion backlash
Check ring gear-to-drive pinion backlash with a dial indicator at
several points.
Ring gear-to-drive pinion backlash:
0.15 - 0.20 mm (0.0059 - 0.0079 in)
+Ring gear runout
Check runout of ring gear with a dial indicator.
Runout limit:
0.08 mm (0.0031 in)
+Tooth contact
Check tooth contact. Refer to ADJUSTMENT (PD-27).
+Side gear to pinion mate gear backlash
Measure clearance between side gear thrust washer and dif-
ferential case with a feeler gauge.
Clearance between side gear thrust washer and differ-
ential case:
0.15 - 0.20 mm (0.0059 - 0.0079 in)
SPD149
SPD246
SPD247
SPD004
DISASSEMBLY
PD-14
Page 1065 of 1226

Adjustment
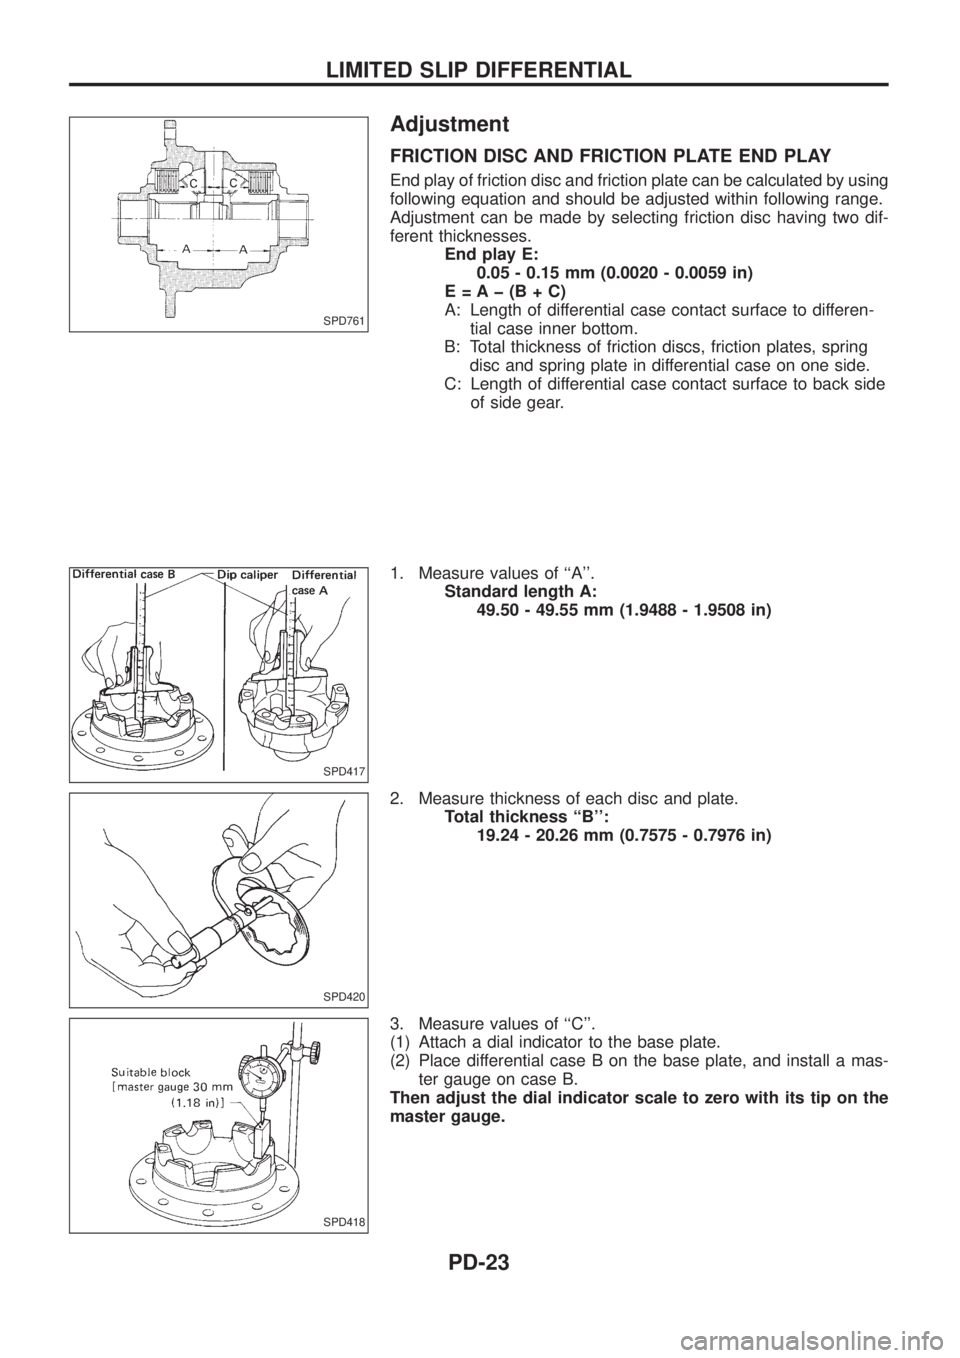
FRICTION DISC AND FRICTION PLATE END PLAY
End play of friction disc and friction plate can be calculated by using
following equation and should be adjusted within following range.
Adjustment can be made by selecting friction disc having two dif-
ferent thicknesses.
End play E:
0.05 - 0.15 mm (0.0020 - 0.0059 in)
E=Aþ(B+C)
A: Length of differential case contact surface to differen-
tial case inner bottom.
B: Total thickness of friction discs, friction plates, spring
disc and spring plate in differential case on one side.
C: Length of differential case contact surface to back side
of side gear.
1. Measure values of ``A''.
Standard length A:
49.50 - 49.55 mm (1.9488 - 1.9508 in)
2. Measure thickness of each disc and plate.
Total thickness ``B'':
19.24 - 20.26 mm (0.7575 - 0.7976 in)
3. Measure values of ``C''.
(1) Attach a dial indicator to the base plate.
(2) Place differential case B on the base plate, and install a mas-
ter gauge on case B.
Then adjust the dial indicator scale to zero with its tip on the
master gauge.
SPD761
SPD417
SPD420
SPD418
LIMITED SLIP DIFFERENTIAL
PD-23
Page 1066 of 1226

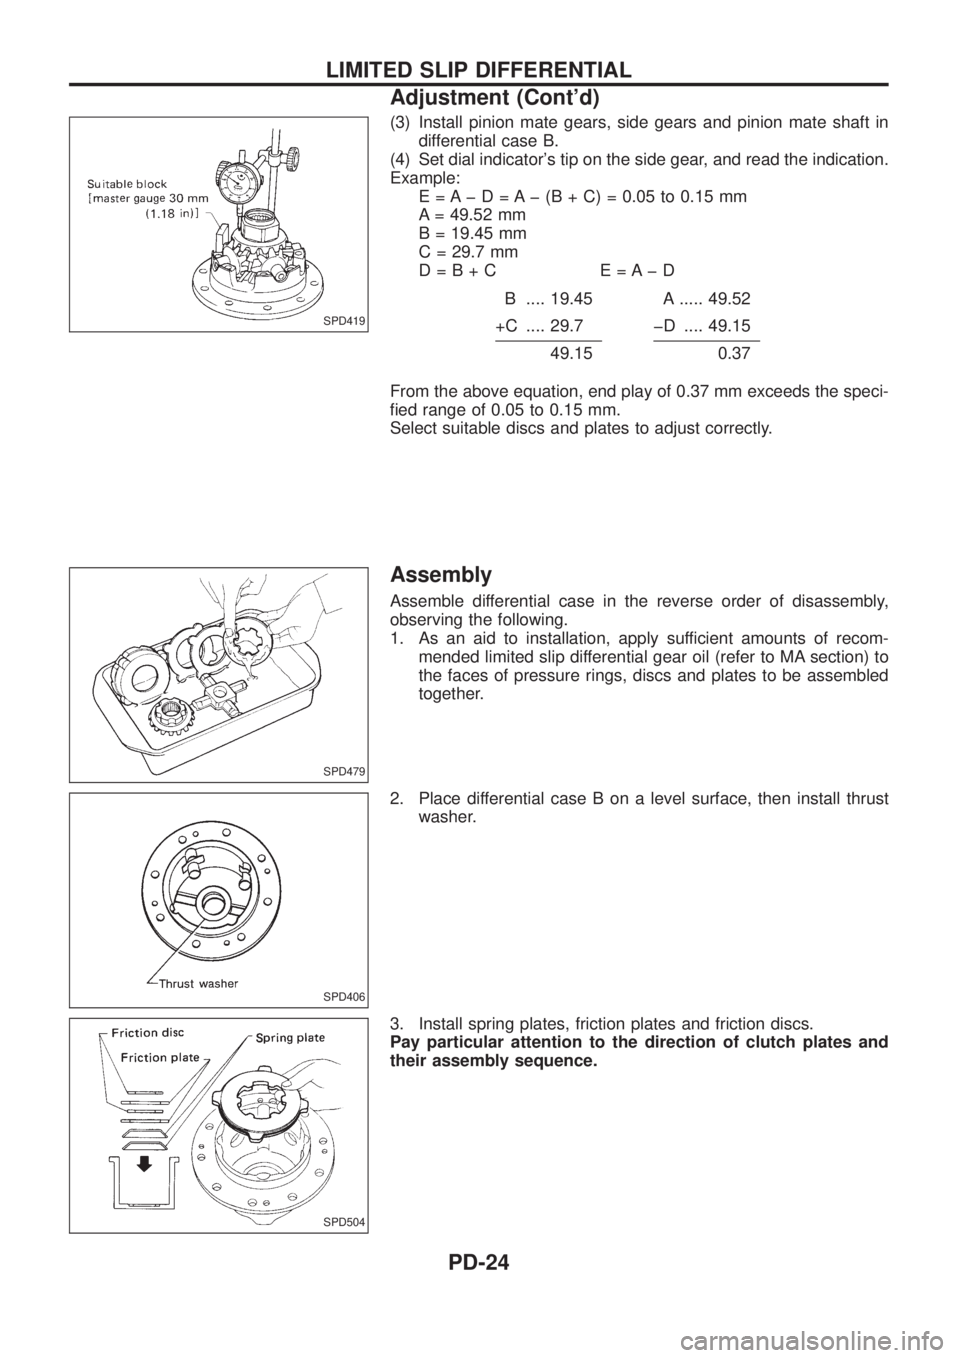
(3) Install pinion mate gears, side gears and pinion mate shaft in
differential case B.
(4) Set dial indicator's tip on the side gear, and read the indication.
Example:
E = A þ D = A þ (B + C) = 0.05 to 0.15 mm
A = 49.52 mm
B = 19.45 mm
C = 29.7 mm
D=B+C E=AþD
B .... 19.45 A ..... 49.52
+C .... 29.7 þD .... 49.15
49.150.37
From the above equation, end play of 0.37 mm exceeds the speci-
®ed range of 0.05 to 0.15 mm.
Select suitable discs and plates to adjust correctly.
Assembly
Assemble differential case in the reverse order of disassembly,
observing the following.
1. As an aid to installation, apply sufficient amounts of recom-
mended limited slip differential gear oil (refer to MA section) to
the faces of pressure rings, discs and plates to be assembled
together.
2. Place differential case B on a level surface, then install thrust
washer.
3. Install spring plates, friction plates and friction discs.
Pay particular attention to the direction of clutch plates and
their assembly sequence.
SPD419
SPD479
SPD406
SPD504
LIMITED SLIP DIFFERENTIAL
Adjustment (Cont'd)
PD-24
Page 1078 of 1226
14. Tighten side bearing cap bolts.
15. Install side lock ®nger in place to prevent rotation during opera-
tion.
16. Check runout of ring gear with a dial indicator.
Runout limit: 0.08 mm (0.0031 in)
+If backlash varies excessively in different places, the variance
may have resulted from foreign matter caught between the ring
gear and the differential case.
+If the backlash varies greatly when the runout of the ring gear
is within a speci®ed range, the hypoid gear set or differential
case should be replaced.
17. Check tooth contact. Refer to ADJUSTMENT (PD-27).
SPD698
SPD247
ASSEMBLY
Differential Carrier (Cont'd)
PD-36
Page 1091 of 1226
Electrical Components Inspection
DIFFERENTIAL LOCK INDICATOR SWITCH CHECK
+Check switch function by checking continuity.
Continuity:
ON Continuity should exist.
OFF Continuity should not exist.
If NG, replace differential lock indicator switch.
DIFFERENTIAL LOCK SOLENOID CHECK
1. Disconnect differential lock solenoid 4-pin connector.
2. Check continuity between terminals
V1andV3,V2andV4.
Continuity should exist.
If NG, replace differential lock solenoid.
SPEED SENSOR CHECK
Refer to EL section.
SPD443A
SPD444A
DIFFERENTIAL LOCK
PD-49