2006 NISSAN NOTE Open
[x] Cancel search: OpenPage 86 of 235
SIDE VENTS
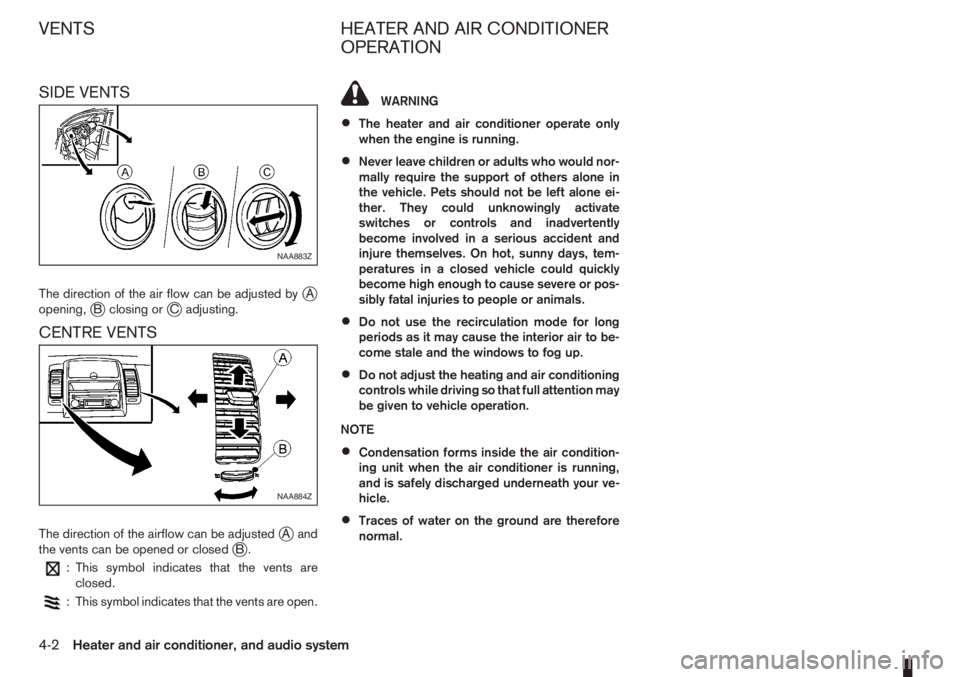
The direction of the air flow can be adjusted byjA
opening,jB closing orjC adjusting.
CENTRE VENTS
The direction of the airflow can be adjustedjAand
the vents can be opened or closedjB.
: This symbol indicates that the vents are
closed.
: This symbol indicates that the vents are open.
WARNING
•The heater and air conditioner operate only
when the engine is running.
•Never leave children or adults who would nor-
mally require the support of others alone in
the vehicle. Pets should not be left alone ei-
ther. They could unknowingly activate
switches or controls and inadvertently
become involved in a serious accident and
injure themselves. On hot, sunny days, tem-
peratures in a closed vehicle could quickly
become high enough to cause severe or pos-
sibly fatal injuries to people or animals.
•Do not use the recirculation mode for long
periods as it may cause the interior air to be-
come stale and the windows to fog up.
•Do not adjust the heating and air conditioning
controls while driving so that full attention may
be given to vehicle operation.
NOTE
•Condensation forms inside the air condition-
ing unit when the air conditioner is running,
and is safely discharged underneath your ve-
hicle.
•Traces of water on the ground are therefore
normal.
NAA883Z
NAA884Z
VENTS HEATER AND AIR CONDITIONER
OPERATION
4-2Heater and air conditioner, and audio system
Page 89 of 235
Operating tips
•In order to improve the heater operation, clear
the snow and ice from the wiper blade and air
inlet in front of the windscreen.
•After parking in the sun, drive for two or three
minutes with the windows open to vent hot air
from the passenger compartment. Then close
the windows to allow the acceleration of the air
conditioner’s cooling operation.
•Keep the windows closed while the air condi-
tioner is operating.
•The air conditioning system should be operated
for about 10 minutes, at least once a month. This
helps prevent damage to the system due to lack
of lubrication.
•If the coolant temperature warning light comes
on, turn the air conditioner off. For additional
information, see “Engine overheat” in the “6. In
case of emergency” section.
•If the engine coolant reaches an extremely high
temperature, the air conditioning system will au-
tomatically turn off. This may happen for example
if the engine runs at idle speed for a long time on
a hot day.
Air flow charts
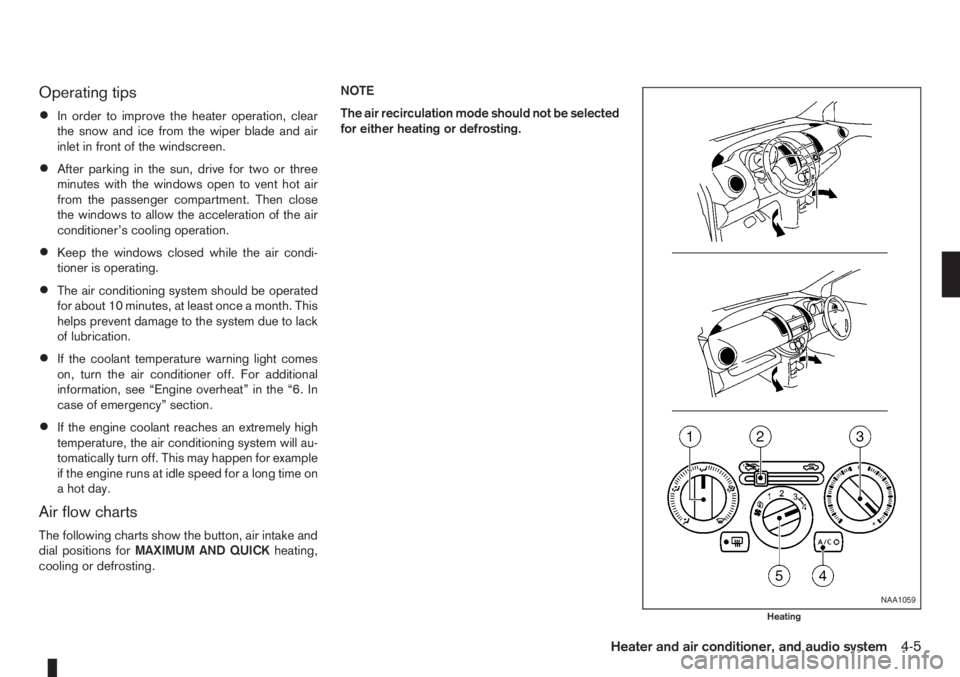
The following charts show the button, air intake and
dial positions forMAXIMUM AND QUICKheating,
cooling or defrosting.NOTE
The air recirculation mode should not be selected
for either heating or defrosting.
NAA1059
Heating
Heater and air conditioner, and audio system4-5
Page 93 of 235
Dehumidified defrosting or defogging:
1. Turn the air flow control dial to the
position.
2. Turn the fan speed control dial to the desired
position.
3. Turn the temperature control dial for the desired
temperature.
•To quickly remove ice from the outside of the
windscreen, turn the fan speed control dial to
the maximum position.
•As soon as possible after the windscreen has
been cleared of ice, turn the fan speed control
dial to the AUTO position for the automatic mode.
•When the air flow control dial is turned to theorposition, the outside air mode and
the air conditioner will automatically switch on
(except when the fan speed control dial is in the
OFF position) when the outside temperatures is
above −5°C (23°F) to defog the windscreen.
Outside air is drawn into the passenger com-
partment to improve the defogging performance.
Manual operation
Fan speed controlm:
Turn the fan speed control dial:
– to the OFF position to switch off the heater and
air conditioner system.
– to the AUTO position for automatic control of the
fan speed.
– to adjust the fan speed.Temperature control:
Turn temperature dial to set the desired air tempera-
ture.
Air flow control:
Turn the air flow control dial to one of following air
mode.
m
Air flows from centre and side vents.
m
Air flows from centre, side vents and
floor outlets.
mAir flows mainly from floor outlets.
m
Air flows from the defogger outlets and
floor outlets.
mAir flows mainly from defogger outlets.
Air recirculation
m:
Press the air intake button until the air recirculation
indicator light (
) comes on. When selected,
interior air will be recirculated inside the vehicle and
the air conditioner will switch on.
Use this mode to recirculate interior air inside the
passenger compartment in situations such as: driv-
ing on a dust raised road, avoiding traffic fumes or
having maximum cooling from the air conditioner.Outside air circulation
m:
Press the air intake button until outside air indicator
light (
) comes on. When selected, outside air
will be drawn into the vehicle.
Use this mode to draw outside air into the passen-
ger compartment for normal heating, ventilation or
air conditioner operation.
Operating tips
•In order to improve the heater operation, clear
the snow and ice from the wiper blade and air
inlet in front of the windscreen.
•When the engine coolant temperature and out-
side air temperature are low, the air flow from
the floor outlets may not operate for a maximum
of approximately 150 seconds. However, this is
not a malfunction. After the coolant temperature
has warmed up, the air flow from the floor outlets
will operate normally.
•After parking in the sun, drive for two or three
minutes with the windows open to vent hot air
from the passenger compartment. Then, close
the windows. This will allow the acceleration of
the air conditioner’s cooling operation.
•Keep the windows closed while the air condi-
tioner is operating.
•The air conditioning system should be operated
for approximately 10 minutes at least once a
month. This helps prevent damage to the system
due to lack of lubrication.
Heater and air conditioner, and audio system4-9
Page 113 of 235

Track details:
A long press on the<
/j5>button will turn the
display into a detailed overview and after a few sec-
onds it returns to the main display, or press
<
/j5>briefly.
CD eject button
CD player:
Press the <
> (eject) button and the CD will be
ejected.
Ejecting CD (with ignition switch in “OFF” or
LOCK):
When the ignition switch is in the “OFF” or LOCK
position it is possible to eject the currently played
CD. However the audio unit will not be activated.
Press the <
> button and the CD will be ejected.
NOTE
•When the CD is ejected and not removed
within 8 seconds, it will automatically retract
into the slot to protect it from damage.
•If an error message appears in the display,
press <> to eject the faulty CD and insert
another CD or check if the ejected CD is in-
serted upside down.
AUX SOCKET
j
AAUX
jBUSB
Audio main operation
Open the lid and connect the lead with the jack of a
compatible player (e.g. MP3 player) to the socket
jA.
Press the
USB MEMORY OPERATION
Connecting USB memory
Open the console lid and connect a USB memory
stick as illustrated. The display will show a notifica-
tion message, for a few seconds, that it is reading
the data.
If the audio system has been turned off while the
USB memory was playing, pressing<
>will start
the USB memory operation.
To operate the USB memory use one of the follow-
ing methods:
•Press the
press
•Press
lighted, then press
NAA1193NAA1194
Heater and air conditioner, and audio system4-29
Page 114 of 235
Audio main operation
The following operations are identical to the audio
main operation of the Compact Disc (CD) opera-
tion. For details, see “Audio main operation” earlier
in this section.
•List view
•Quick search
•,
•MIX (Random play)
•RPT (Repeat track)
•Folder browsing
button
While a track with recorded music information tags
(ID3–tags) is being played, the title of the played
track is displayed. If the tags are not provided then
a notification message is displayed.
When the<
/j5>button is pressed repeat-
edly, further information about the track can be dis-
played along with the track title as follows:
Track time→Artist name→Album title→Folder
name→Track time
Track details:
A long press on the<
/j5>button will turn the
display into a detailed overview and after a few sec-
onds it returns to the main display, or press
<
/j5>briefly.
iPod® PLAYER OPERATION
Connecting iPod®
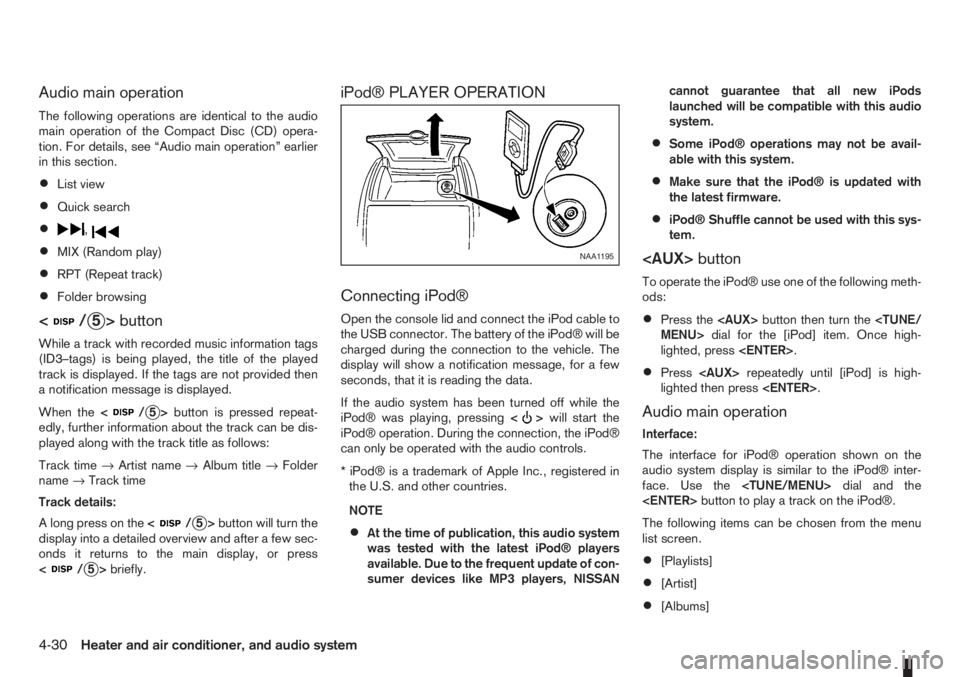
Open the console lid and connect the iPod cable to
the USB connector. The battery of the iPod® will be
charged during the connection to the vehicle. The
display will show a notification message, for a few
seconds, that it is reading the data.
If the audio system has been turned off while the
iPod® was playing, pressing<
>will start the
iPod® operation. During the connection, the iPod®
can only be operated with the audio controls.
* iPod® is a trademark of Apple Inc., registered in
the U.S. and other countries.
NOTE
•At the time of publication, this audio system
was tested with the latest iPod® players
available. Due to the frequent update of con-
sumer devices like MP3 players, NISSANcannot guarantee that all new iPods
launched will be compatible with this audio
system.
•Some iPod® operations may not be avail-
able with this system.
•Make sure that the iPod® is updated with
the latest firmware.
•iPod® Shuffle cannot be used with this sys-
tem.
To operate the iPod® use one of the following meth-
ods:
•Press the
lighted, press
•Press
lighted then press
Audio main operation
Interface:
The interface for iPod® operation shown on the
audio system display is similar to the iPod® inter-
face. Use the
The following items can be chosen from the menu
list screen.
•[Playlists]
•[Artist]
•[Albums]
NAA1195
4-30Heater and air conditioner, and audio system
Page 127 of 235
WARNING
•Do not leave children or adults who would
normally require the support of others alone
in your vehicle. Pets should also not be left
alone. They could accidentally injure them-
selves or others through inadvertent opera-
tion of the vehicle. Also, on hot, sunny days,
temperatures in a closed vehicle could quickly
become high enough to cause severe or pos-
sibly fatal injuries to people or animals.
•To prevent luggage or packages from sliding
forward during braking, do not stack anything
in the cargo area higher than the seatbacks.
•Secure all cargo with ropes or straps to pre-
vent it from sliding or shifting.
•Failure to follow proper seating instructions
see “Seats” in the “1. Safety — seats, seat
belts and supplemental restraint system” sec-
tion, could result in serious personal injury in
an accident or sudden stop.
EXHAUST GAS (Carbon Monoxide)
WARNING
•Do not breathe exhaust gases; they contain
colourless and odourless carbon monoxide.
Carbon monoxide is a dangerous gas and can
cause unconsciousness or death.
•If you suspect that exhaust fumes are enter-
ing the vehicle, drive with all windows fully
open and have the vehicle inspected immedi-
ately.
•Do not run the engine in closed spaces, such
as a garage, for any longer than is absolutely
necessary.
•Do not park the vehicle with the engine run-
ning for any extended length of time.
•Keep the back door closed while driving, oth-
erwise exhaust gases could be drawn into the
passenger compartment. If you must drive in
this way for some reason, take the following
steps:
1) Open all the windows.
2) Manual air conditioner equipped models:
Move the air intake lever to the
posi-
tion.
Automatic air conditioner equipped mod-
els: Switch on the outside air mode.
3) Set the fan speed control to the maximum
position to circulate the air.
•If electrical wiring or other cable connections
must pass to a trailer through the seal of the
body, follow the manufacturer’s recommen-
dations to prevent carbon monoxide entry into
the vehicle.
•When a vehicle has been stopped in an open
area with its engine running for any significant
length of time, turn the fan on to force outside
air into the vehicle.
•The exhaust system and body should be in-
spected by a NISSAN dealer or qualified work-
shop whenever:
– the vehicle is raised for service.
– you suspect that exhaust fumes are enter-
ing into the passenger compartment.
– you notice a change in the sound of the
exhaust system.
– you have had an accident involving dam-
age to the exhaust system, underbody, or
rear of the vehicle.
PRECAUTIONS WHEN STARTING
AND DRIVING
Starting and driving5-3
Page 159 of 235
In case of a flat tyre, follow the instructions as de-
scribed below:
STOPPING THE VEHICLE
WARNING
•Make sure that the handbrake is securely ap-
plied.
•For Manual Transmission (MT) models: Make
sure the gear lever is in the R (Reverse) posi-
tion.
For Automatic Transmission (AT) models:
Make sure that the selector lever is in the P
(Park) position.
•Never change tyres when the vehicle is on a
slope, ice or a slippery area. This is hazard-
ous.
•Never change tyres if oncoming traffic is close
to your vehicle. Wait for professional road as-
sistance.
1. Safely move the vehicle off the road, away from
traffic.
2. Switch on the hazard warning flashers.
3. Park on a level surface.
4. Apply the handbrake.
5. Shift the gear lever (MT models) into the R (Re-
verse) position [AT models, move the selector
lever to the P (Park) position].
6. Turn off the engine.7. Open the bonnet (for details, see “Bonnet
release” in the “3. Pre-driving checks and
adjustments” section) in order to:
•Warn other traffic.
•Signal to professional road assistance that
you require assistance.
8. Have all passengers exit the vehicle and stand in
a safe place, away from traffic and clear of the
vehicle.
CHANGING FLAT TYRE (Models with
spare wheel, where fitted)
Blocking the wheels
WARNING
Make sure to block the appropriate wheel to pre-
vent the vehicle from moving, which may cause
personal injury.
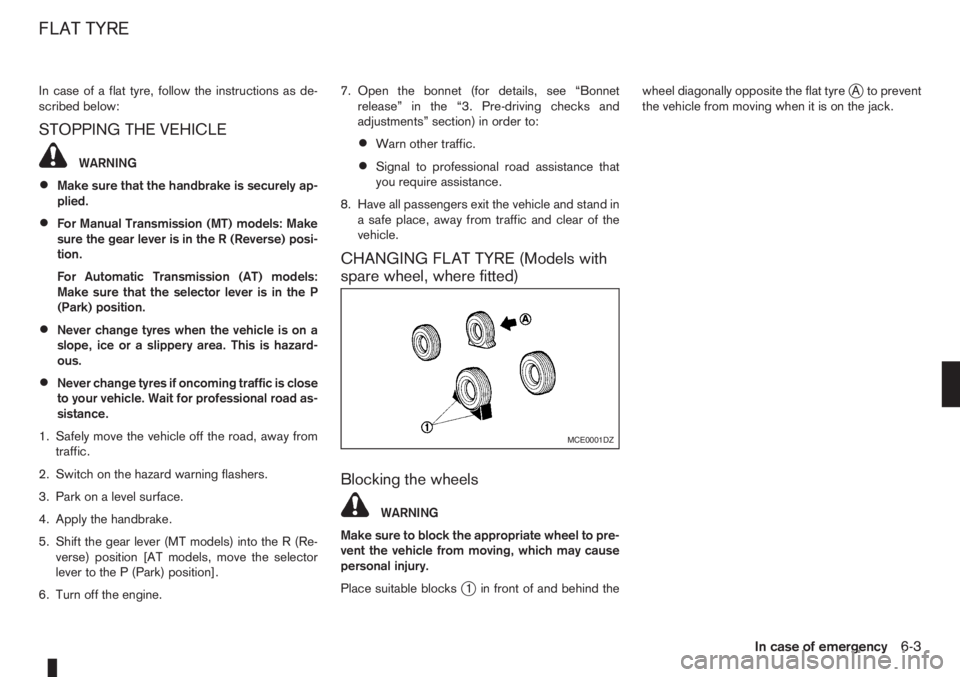
Place suitable blocks
j1 in front of and behind thewheel diagonally opposite the flat tyre
jA to prevent
the vehicle from moving when it is on the jack.
MCE0001DZ
FLAT TYRE
In case of emergency6-3
Page 160 of 235

Getting the tools and spare wheel
The spare wheel, jack and tools are located inside
the luggage compartment.
1. Open the back door.
2. Remove the below listed items in the following
sequence:
a. “Flexi-board” system (where fitted)b. Floor carpet
c. Spare wheel (where fitted) — Turn the re-
tainer anticlockwise to remove.
d. Jack
e. Tools
CAUTION
•When removing or replacing the spare wheel,
the rear sliding seat should be moved to the
forward position.
•When carrying the road wheel in the luggage
compartment, the rear sliding seat should be
located in the forward position.
REMOVING WHEEL COVER
(where fitted)
WARNING
Take care when removing the wheel cover as the
cover may detach suddenly.Remove the wheel cover as illustrated with a suit-
able tool or carefully remove the wheel cover with
both hands.
Removing the wheel
WARNING
•Make sure to read the caution label attached
to the jack body before use.
•Do not get under a vehicle that is supported
only by a jack: Use vehicle support stands.
•Use only the jack that is provided with your
vehicle. The jack is designed only for lifting
your vehicle during a tyre change.
•Do not use the jack provided with your vehicle
on other vehicles.
•Use the correct jack-up points. Never use any
other part of the vehicle for jack support.
•Never lift the vehicle more than necessary.
NCE317
SCE0173AZ
NCE176Z
Jack-up points
6-4In case of emergency