2006 NISSAN NOTE Open
[x] Cancel search: OpenPage 59 of 235
ward you once will activate the headlight for ap-
proximately 30 seconds. After that period of time, it
will automatically switch off.
It is possible to pull the headlight switch up to four
times to increase the lighting period up to 2 minutes.
NOTE
The “Friendly Lighting” function can be cancelled
by switching the ignition switch to the Acc or ON
position again.
Battery save function
The battery save feature prevents your vehicle from
discharging the battery after you have left the exter-
nal lights, map lamps or room lamps on (combina-
tion switch in the
orposition) when exiting
the vehicle. This occurs when the ignition switch or
ignition knob is in the “OFF” or LOCK position.
NOTE
The next time the engine is started the external
lights, map lamps or room lamp will come on
again
Battery save function for external lights:
If the ignition switch is turned to the “OFF” position
but the external lights are accidentally left on, the
external lights will automatically be switched off as
soon as the driver’s door is opened.
It is possible to leave the external lights on perma-
nently by switching them back on using the head-
light switch while the ignition switch is still in theLOCK or “OFF” position. In this case, the light re-
minder chime will sound when the driver’s door is
opened.
Battery save function for interior light:
The interior light will automatically be switched off
after approximately 15 minutes if it has been acci-
dentally left on.
TURN SIGNAL SWITCH
Lane change signal
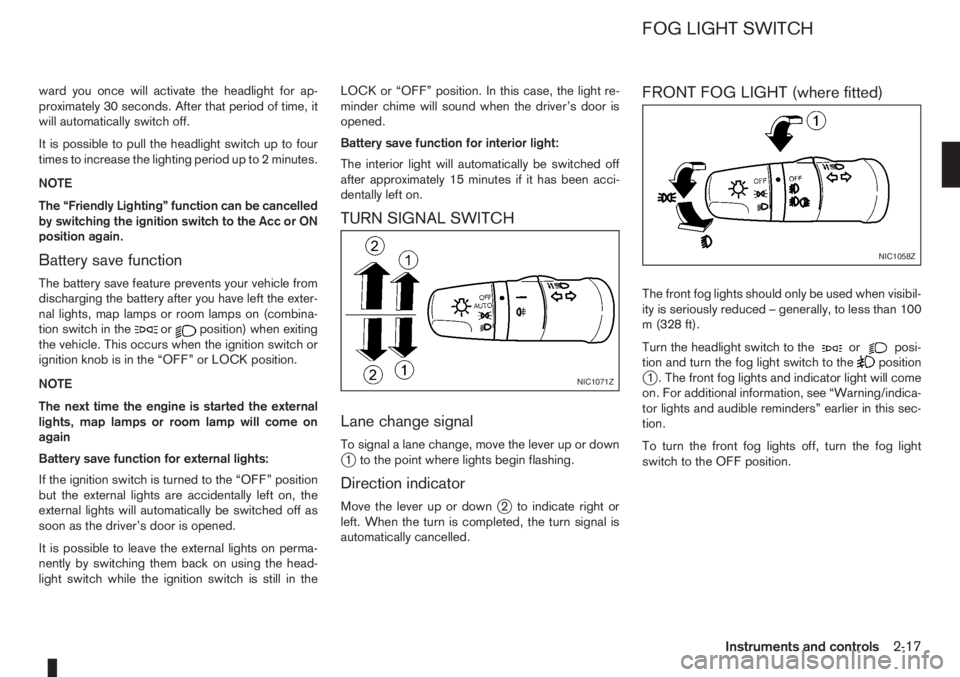
To signal a lane change, move the lever up or downj1 to the point where lights begin flashing.
Direction indicator
Move the lever up or downj2 to indicate right or
left. When the turn is completed, the turn signal is
automatically cancelled.
FRONT FOG LIGHT (where fitted)
The front fog lights should only be used when visibil-
ity is seriously reduced – generally, to less than 100
m (328 ft).
Turn the headlight switch to the
orposi-
tion and turn the fog light switch to thepositionj1 . The front fog lights and indicator light will come
on. For additional information, see “Warning/indica-
tor lights and audible reminders” earlier in this sec-
tion.
To turn the front fog lights off, turn the fog light
switch to the OFF position.NIC1071Z
NIC1058Z
FOG LIGHT SWITCH
Instruments and controls2-17
Page 64 of 235
CENTRE CONSOLE STORAGE BOX
WARNING
The centre console storage box should not be
used while driving so that full attention may be
given to the driving operation.
CAUTION
Do not leave sunglasses, cigarette lighter, etc. in
the centre console storage box while parking in
direct sunlight. The heat may damage these
items.
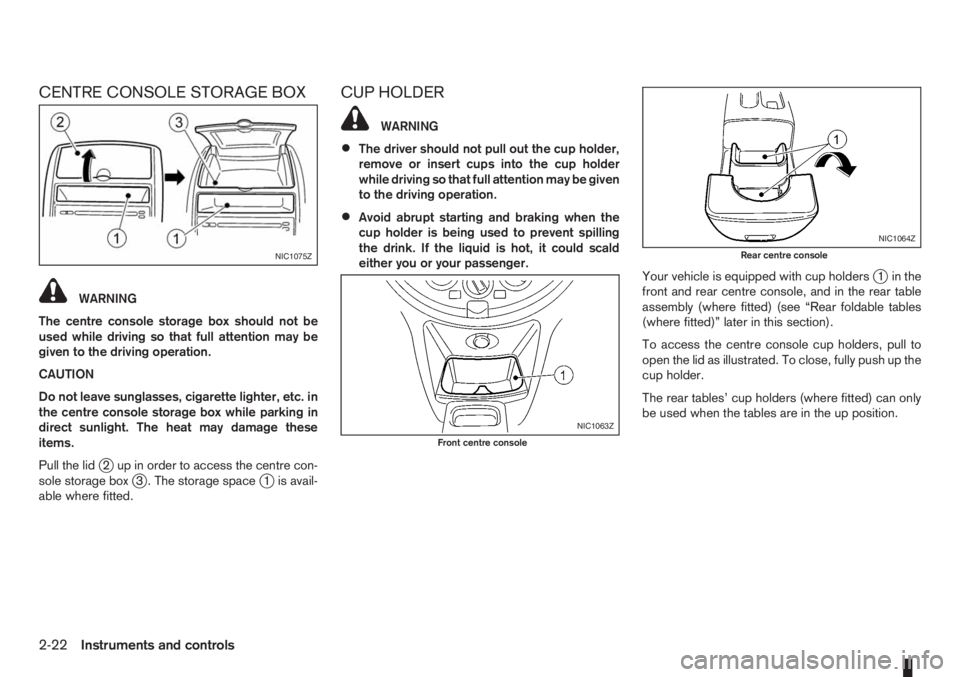
Pull the lid
j2 up in order to access the centre con-
sole storage boxj3 . The storage spacej1 is avail-
able where fitted.
CUP HOLDER
WARNING
•The driver should not pull out the cup holder,
remove or insert cups into the cup holder
while driving so that full attention may be given
to the driving operation.
•Avoid abrupt starting and braking when the
cup holder is being used to prevent spilling
the drink. If the liquid is hot, it could scald
either you or your passenger.
Your vehicle is equipped with cup holders
j1 in the
front and rear centre console, and in the rear table
assembly (where fitted) (see “Rear foldable tables
(where fitted)” later in this section).
To access the centre console cup holders, pull to
open the lid as illustrated. To close, fully push up the
cup holder.
The rear tables’ cup holders (where fitted) can only
be used when the tables are in the up position.
NIC1075Z
NIC1063Z
Front centre console
NIC1064Z
Rear centre console
2-22Instruments and controls
Page 65 of 235
REAR FOLDABLE TABLES
(where fitted)
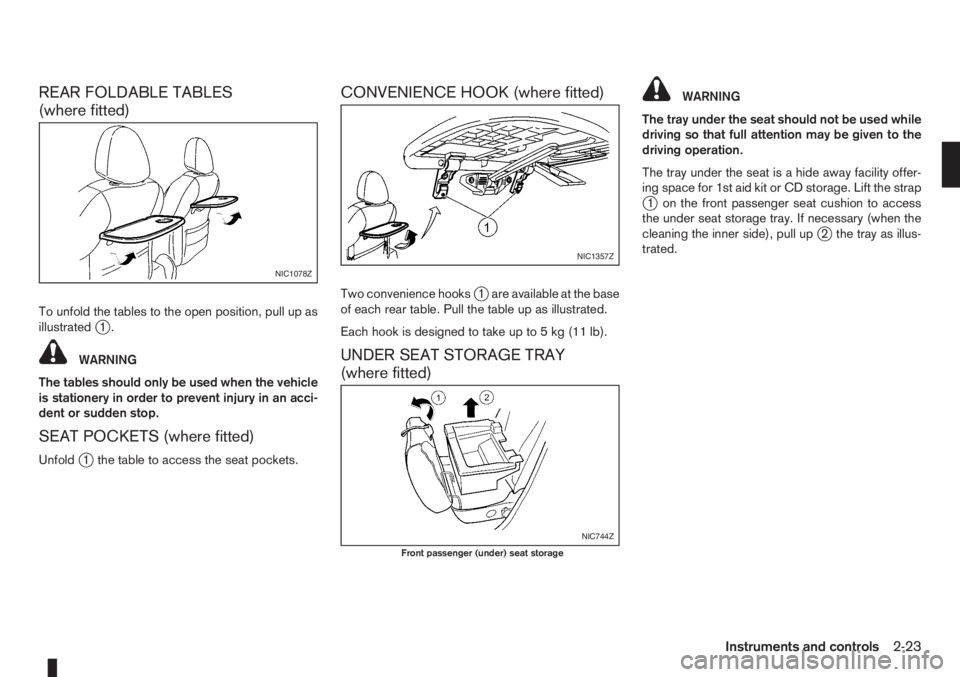
To unfold the tables to the open position, pull up as
illustratedj1.
WARNING
The tables should only be used when the vehicle
is stationery in order to prevent injury in an acci-
dent or sudden stop.
SEAT POCKETS (where fitted)
Unfoldj1 the table to access the seat pockets.
CONVENIENCE HOOK (where fitted)
Two convenience hooksj1 are available at the base
of each rear table. Pull the table up as illustrated.
Each hook is designed to take up to 5 kg (11 lb).
UNDER SEAT STORAGE TRAY
(where fitted)
WARNING
The tray under the seat should not be used while
driving so that full attention may be given to the
driving operation.
The tray under the seat is a hide away facility offer-
ing space for 1st aid kit or CD storage. Lift the strap
j1 on the front passenger seat cushion to access
the under seat storage tray. If necessary (when the
cleaning the inner side), pull up
j2 the tray as illus-
trated.
NIC1078Z
NIC1357Z
NIC744Z
Front passenger (under) seat storage
Instruments and controls2-23
Page 68 of 235
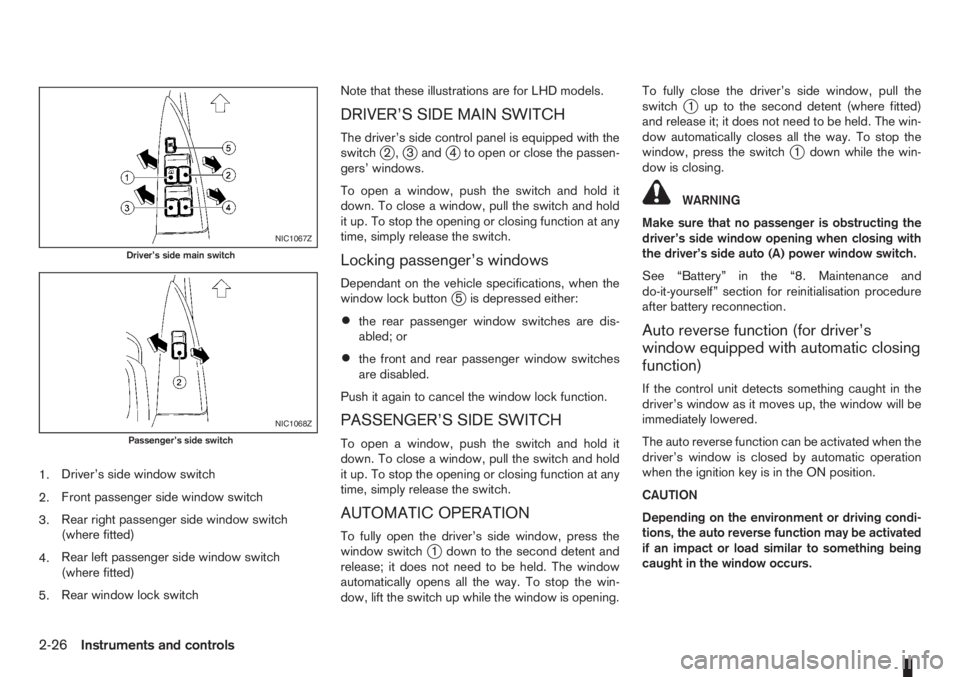
1.Driver’s side window switch
2.Front passenger side window switch
3.Rear right passenger side window switch
(where fitted)
4.Rear left passenger side window switch
(where fitted)
5.Rear window lock switchNote that these illustrations are for LHD models.
DRIVER’S SIDE MAIN SWITCH
The driver’s side control panel is equipped with the
switchj2,j3andj4 to open or close the passen-
gers’ windows.
To open a window, push the switch and hold it
down. To close a window, pull the switch and hold
it up. To stop the opening or closing function at any
time, simply release the switch.
Locking passenger’s windows
Dependant on the vehicle specifications, when the
window lock buttonj5 is depressed either:
•the rear passenger window switches are dis-
abled; or
•the front and rear passenger window switches
are disabled.
Push it again to cancel the window lock function.
PASSENGER’S SIDE SWITCH
To open a window, push the switch and hold it
down. To close a window, pull the switch and hold
it up. To stop the opening or closing function at any
time, simply release the switch.
AUTOMATIC OPERATION
To fully open the driver’s side window, press the
window switchj1 down to the second detent and
release; it does not need to be held. The window
automatically opens all the way. To stop the win-
dow, lift the switch up while the window is opening.To fully close the driver’s side window, pull the
switch
j1 up to the second detent (where fitted)
and release it; it does not need to be held. The win-
dow automatically closes all the way. To stop the
window, press the switch
j1 down while the win-
dow is closing.
WARNING
Make sure that no passenger is obstructing the
driver’s side window opening when closing with
the driver’s side auto (A) power window switch.
See “Battery” in the “8. Maintenance and
do-it-yourself” section for reinitialisation procedure
after battery reconnection.
Auto reverse function (for driver’s
window equipped with automatic closing
function)
If the control unit detects something caught in the
driver’s window as it moves up, the window will be
immediately lowered.
The auto reverse function can be activated when the
driver’s window is closed by automatic operation
when the ignition key is in the ON position.
CAUTION
Depending on the environment or driving condi-
tions, the auto reverse function may be activated
if an impact or load similar to something being
caught in the window occurs.
NIC1067Z
Driver’s side main switch
NIC1068Z
Passenger’s side switch
2-26Instruments and controls
Page 69 of 235
WARNING
There are some areas immediately before the
closed position where squeezing cannot be de-
tected. Be careful not to pinch your fingers.CAUTION
Do not use for extended periods of time with the
engine stopped. This could discharge the bat-
tery.
NOTE
The interior lights will go off after approximately
15 minutes unless the ignition switch is in the
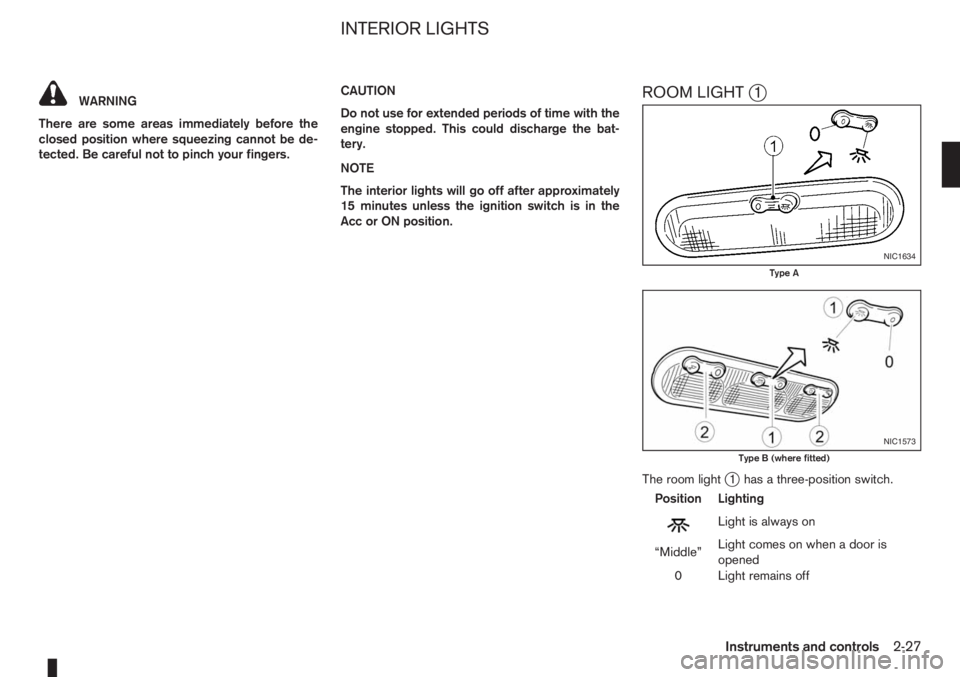
Acc or ON position.ROOM LIGHTj1
The room lightj1 has a three-position switch.
Position Lighting
mLightisalwayson
“Middle”Light comes on when a door is
opened
0 Light remains off
NIC1634
Type A
NIC1573
Type B (where fitted)
INTERIOR LIGHTS
Instruments and controls2-27
Page 70 of 235
Room light timer
The room light will stay on for approximately 30 sec-
onds when:
•The ignition is switched off.
•The doors are unlocked.
•Any door (except back door) is opened and then
closed.
The timer is cancelled, and the interior light will turn
off when:
•The doors are locked.
•The ignition switch is turned to the ON position.
MAP LIGHT (where fitted)j2
To switch on the map light, press eitherorof
the switchesj2.
LUGGAGE COMPARTMENT LIGHT
The light comes on when the back door is opened.
2-28Instruments and controls
Page 71 of 235

3Pre-driving checks and adjustmentsPre-driving checks and adjustments
Keys ........................................................................ 3-2
Integrated keyfob/remote control system .................. 3-3
Using the remote keyless entry system ................ 3-3
Locking the doors ............................................... 3-3
Unlocking the doors – convenience mode ........... 3-4
Unlocking the doors – anti-hijack mode ............... 3-4
Switching from convenience mode to
anti-hijack mode.................................................. 3-4
Keyfob operation failure ...................................... 3-4
Intelligent Key system (where fitted) ......................... 3-5
Locking/unlocking .............................................. 3-5
Starting the engine with the Intelligent Key .......... 3-6
Door locks ............................................................... 3-6
Super Lock System (Right-hand drive models) .... 3-6
Vehicle dead battery – left-hand side door
handle ................................................................ 3-7
Locking with power door lock switch .................. 3-7Child safety rear door lock .................................. 3-8
Back door lock ................................................... 3-8
Security system ....................................................... 3-9
NISSAN Anti-Theft System (NATS)..................... 3-9
Bonnet release ........................................................ 3-10
Fuel filler lid ............................................................. 3-11
Fuel filler lid opener lever .................................... 3-11
Fuel filler cap ...................................................... 3-11
Handbrake lever ...................................................... 3-11
Tilting steering wheel ............................................... 3-12
Mirrors..................................................................... 3-12
Inside rear-view mirror ........................................ 3-12
Outside rear-view mirrors.................................... 3-12
Vanity mirror ....................................................... 3-13
Rear parcel shelf...................................................... 3-14
Rear parcel shelf removal.................................... 3-14
Rear parcel shelf installation................................ 3-14
Page 73 of 235

All doors can be locked/unlocked from the outside
by pressing the lock/unlockbutton on the
keyfob.
A selective unlock or “anti-hijack” mode allows to
remotely unlock only the driver’s door in order to
prevent an attacker from entering the vehicle via an
unlocked passenger door. For details, see “Unlock-
ing the doors – anti-hijack mode” later in this section
for unlocking the doors.
The integrated keyfob can operate at a distance of
approximately 5m (15ft) from the vehicle (the effec-
tive distance depends upon the conditions around
the vehicle and the state of the keyfob battery).
As many as four integrated keyfobs can be used for
one vehicle. For information concerning the pur-
chase and use of additional integrated keyfobs, con-
tact your NISSAN dealer.CAUTION
•Always remove the ignition key or Intelligent
Key, close all windows before operating the
keyfob door lock system.
•Ensure that the driver’s door is securely
closed before operating the integrated keyfob
door lock system for a correct operation of
the system.
Listed below are conditions or occurrences that
will damage the integrated keyfob.
•If the integrated keyfob becomes wet.
•If the integrated keyfob is dropped.
•If the integrated keyfob is sharply struck
against another object.
USING THE REMOTE KEYLESS
ENTRY SYSTEM
WARNING
For Super Lock system equipped models, failure
to follow the precautions below may lead to haz-
ardous situations. Make sure that the Super Lock
system activation is always conducted safely.
•When the vehicle is occupied, never lock the
doors with the integrated keyfob. Doing so
will trap the occupants, since the Super Lock
system prevents the doors from being opened
from the inside of the vehicle.
•Only operate the integrated keyfob lock but-
ton when there is a clear view of the vehicle.This is to prevent anybody from being trapped
inside the vehicle through the Super Lock sys-
tem activation.
For further details on the Super Lock system see
“Door locks” later in this section.
LOCKING THE DOORS
1. Remove the ignition key or Intelligent Key.
2. Close all the doors.
3. Push the lock
button on the integrated keyfob.
•All the doors will lock.
•The hazard indicator flashes once.
When the lock
button is pushed with all doors
locked, the hazard indicator flashes once to remind
you that the doors are already locked.
NOTE
An auto-relock function will operate after a full or
partial unlock, when no further user action oc-
curs.
The relock will operate approximately 2 minutes af-
ter full or partial unlock.
The auto-relock function is cancelled when any door
is opened or the key is inserted in the ignition (type
jA).
NPA734Z
INTEGRATED KEYFOB/REMOTE
CONTROL SYSTEM
Pre-driving checks and adjustments3-3