2006 NISSAN FRONTIER brakes
[x] Cancel search: brakesPage 243 of 336

When driving in areas using road salt or other
corrosive materials, check lubrication frequently.
Lights*Clean the headlights on a regular basis.
Make sure that the headlights, stop lights, tail
lights, turn signal lights, and other lights are all
operating properly and installed securely. Also
check headlight aim.
Road wheel nuts*When checking the tires,
make sure no wheel nuts are missing, and check
for any loose wheel nuts. Tighten if necessary.
Tire rotation*Tires should be rotated every
7,500 miles (12,000 km) .
Tires*Check the pressure with a gauge often
and always prior to long distance trips. If neces-
sary, adjust the pressure in all tires, including the
spare, to the pressure specified. Check carefully
for damage, cuts or excessive wear.
Wheel alignment and balanceIf the vehicle
should pull to either side while driving on a
straight and level road, or if you detect uneven or
abnormal tire wear, there may be a need for wheel
alignment. If the steering wheel or seat vibrates at
normal highway speeds, wheel balancing may be
needed.
cFor additional information regarding tires,
refer to “Important Tire Safety Information”
(US) or “Tire Safety Information” (Canada) in
the Warranty Information Booklet .WindshieldClean the windshield on a regular
basis. Check the windshield at least every six
months for cracks or other damage. Have a dam-
aged windshield repaired by a qualified repair
facility.
Windshield wiper blades*Check for cracks or
wear if they do not wipe properly.
Inside the vehicle
The maintenance items listed here should be
checked on a regular basis, such as when per-
forming periodic maintenance, cleaning the ve-
hicle, etc.
Additional information on the following
items with an “*” is found later in this sec-
tion.
Accelerator pedalCheck the pedal for smooth
operation and make sure the pedal does not bind
or require uneven effort. Keep the floor mat away
from the pedal.
Automatic transmission P (Park) position
mechanismOn a fairly steep hill check that your
vehicle is held securely with the selector lever in
the P (Park) position without applying any brakes.
Brake pedal and booster*Check the pedal for
smooth operation and make sure it has the proper
distance under it when depressed fully. Checkthe brake booster function. Be certain to keep the
floor mat away from the pedal.
BrakesCheck that the brakes do not pull the
vehicle to one side when applied.
Parking brake*Check that the lever/pedal has
the proper travel and confirm that your vehicle is
held securely on a fairly steep hill with only the
parking brake applied.
SeatsCheck seat position controls such as seat
adjusters, seatback recliner, etc. to ensure they
operate smoothly and all latches lock securely in
every position. Check that the head restraints
move up and down smoothly and the locks (if so
equipped) hold securely in all latched positions.
Seat beltsCheck that all parts of the seat belt
system (for example, buckles, anchors, adjusters
and retractors) operate properly and smoothly,
and are installed securely. Check the belt web-
bing for cuts, fraying, wear or damage.
Steering wheelCheck for changes in the steer-
ing system, such as excessive freeplay, hard
steering or strange noises.
Warning lights and chimesMake sure all
warning lights and chimes are operating properly.
Windshield wiper and washer*Check that
the wipers and washer operate properly and that
the wipers do not streak.
Maintenance and do-it-yourself8-3
ZREVIEW COPYÐ2006 Truck/Frontier(d22)
Owners ManualÐUSA_English(nna)
10/17/05Ðdebbie
X
Page 263 of 336
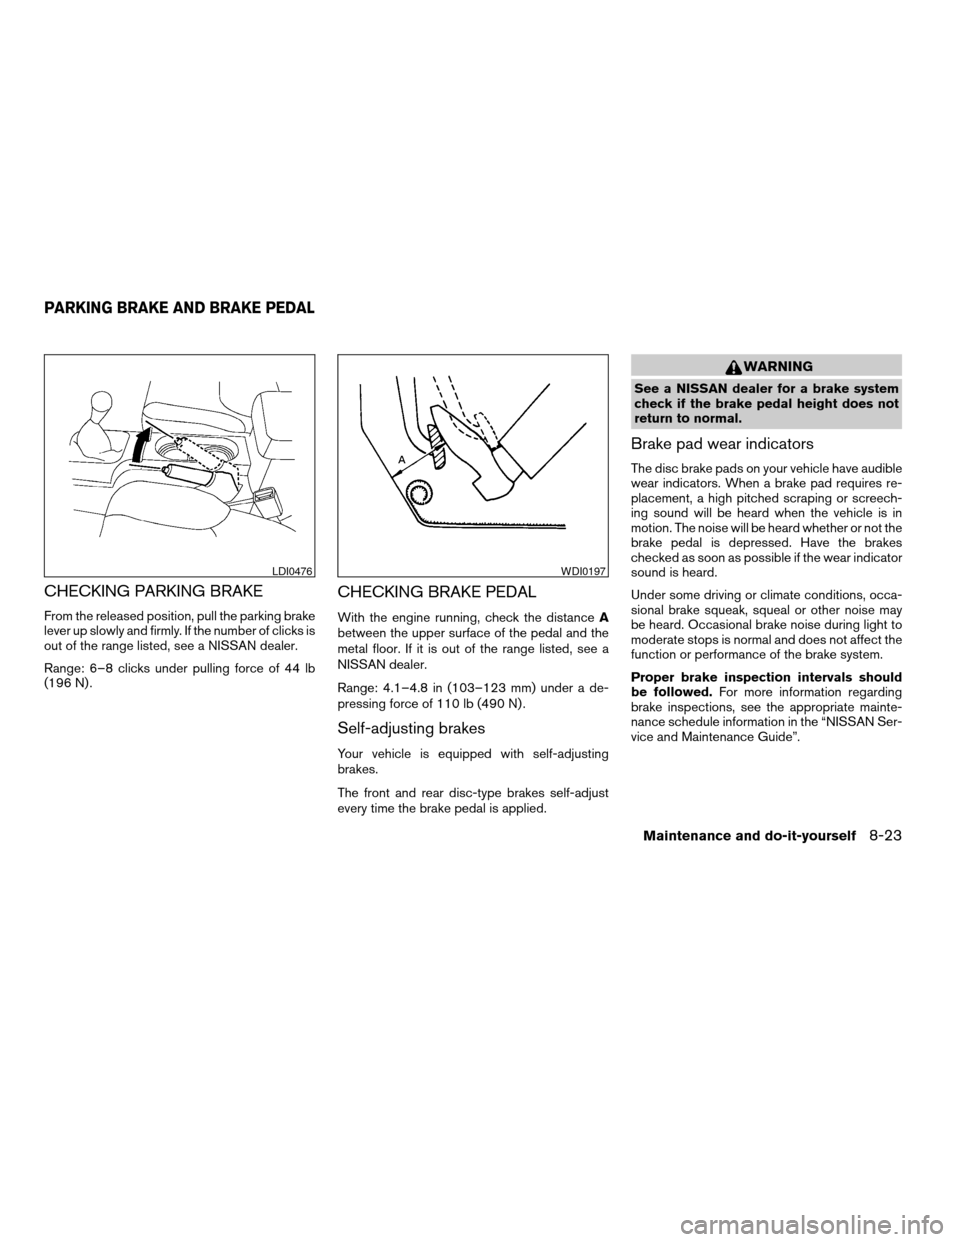
CHECKING PARKING BRAKE
From the released position, pull the parking brake
lever up slowly and firmly. If the number of clicks is
out of the range listed, see a NISSAN dealer.
Range: 6–8 clicks under pulling force of 44 lb
(196 N) .
CHECKING BRAKE PEDAL
With the engine running, check the distanceA
between the upper surface of the pedal and the
metal floor. If it is out of the range listed, see a
NISSAN dealer.
Range: 4.1–4.8 in (103–123 mm) under a de-
pressing force of 110 lb (490 N) .
Self-adjusting brakes
Your vehicle is equipped with self-adjusting
brakes.
The front and rear disc-type brakes self-adjust
every time the brake pedal is applied.
WARNING
See a NISSAN dealer for a brake system
check if the brake pedal height does not
return to normal.
Brake pad wear indicators
The disc brake pads on your vehicle have audible
wear indicators. When a brake pad requires re-
placement, a high pitched scraping or screech-
ing sound will be heard when the vehicle is in
motion. The noise will be heard whether or not the
brake pedal is depressed. Have the brakes
checked as soon as possible if the wear indicator
sound is heard.
Under some driving or climate conditions, occa-
sional brake squeak, squeal or other noise may
be heard. Occasional brake noise during light to
moderate stops is normal and does not affect the
function or performance of the brake system.
Proper brake inspection intervals should
be followed.For more information regarding
brake inspections, see the appropriate mainte-
nance schedule information in the “NISSAN Ser-
vice and Maintenance Guide”.
LDI0476WDI0197
PARKING BRAKE AND BRAKE PEDAL
Maintenance and do-it-yourself8-23
ZREVIEW COPYÐ2006 Truck/Frontier(d22)
Owners ManualÐUSA_English(nna)
10/17/05Ðdebbie
X
Page 264 of 336

BRAKE BOOSTER
Check the brake booster function as follows:
1. With the engine off, press and release the
brake pedal several times. When brake
pedal movement (distance of travel) remains
the same from one pedal application to the
next, continue on to the next step.
2. While depressing the brake pedal, start the
engine. The pedal height should drop a little.
3. With the brake pedal depressed, stop the
engine. Keep the pedal depressed for about
30 seconds. The pedal height should not
change.
4. Run the engine for one minute without de-
pressing the brake pedal, then turn it off.
Depress the brake pedal several times. The
pedal travel distance will decrease gradually
with each depression as the vacuum is re-
leased from the booster.
If the brakes do not operate properly, have the
brakes checked by a NISSAN dealer.Two types of fuses are used. Type A is used in the
fuse boxes in the engine compartment. Type B is
used in the passenger compartment fuse box.
Type A fuses are provided as spare fuses. They
are stored in the passenger compartment fuse
box.
Type A fuses can be installed in the engine com-
partment and passenger compartment fuse
boxes.If a type A fuse is used to replace a type B fuse,
the type A fuse will not be level with the fuse
pocket as shown in the illustration. This will not
affect the performance of the fuse. Make sure the
fuse is installed in the fuse box securely.
Type B fuses cannot be installed in the under-
hood fuse boxes. Only use type A fuses in the
underhood fuse boxes.
LDI0455LDI0457
FUSES
8-24Maintenance and do-it-yourself
ZREVIEW COPYÐ2006 Truck/Frontier(d22)
Owners ManualÐUSA_English(nna)
10/17/05Ðdebbie
X
Page 313 of 336
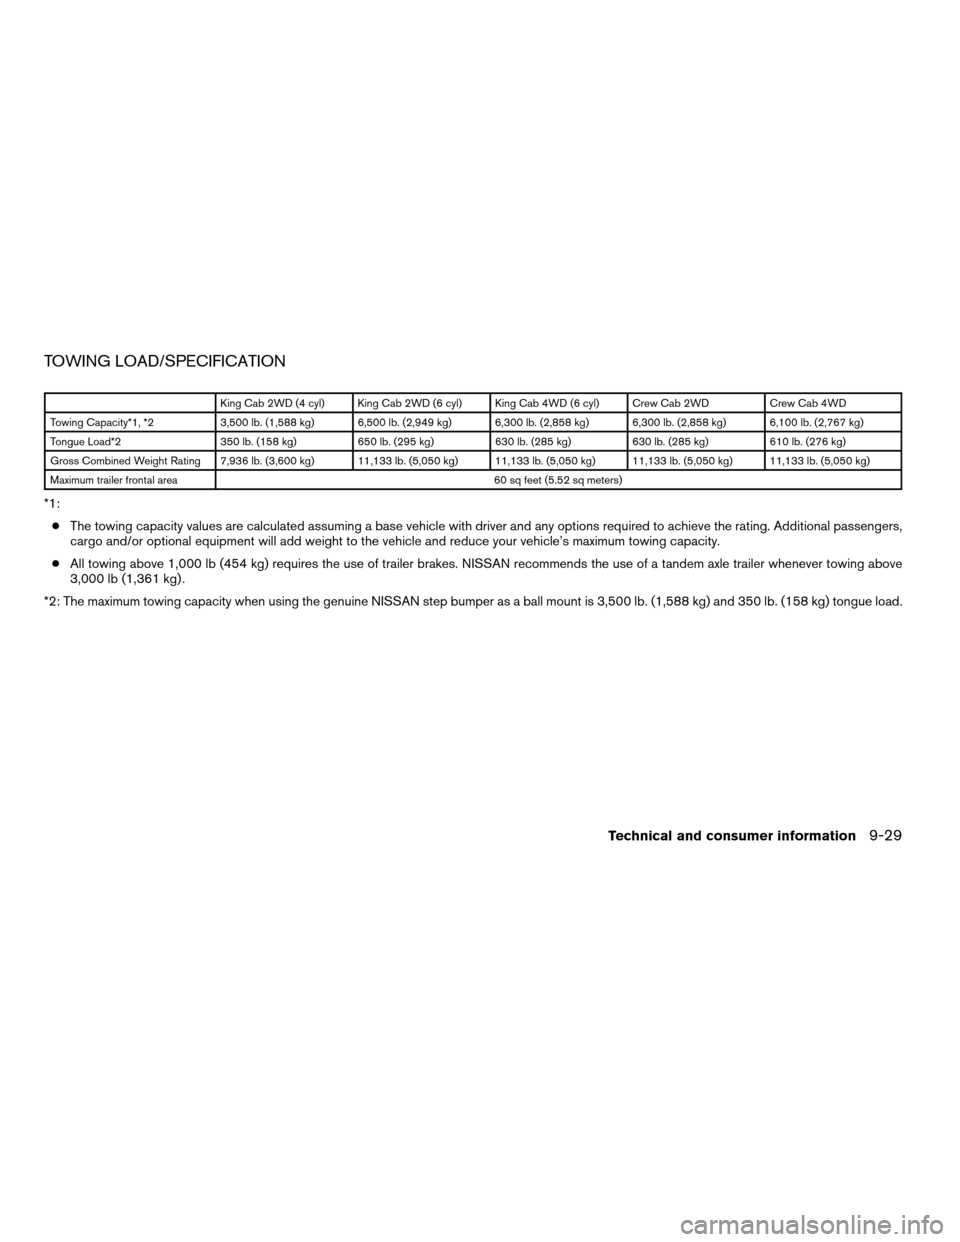
TOWING LOAD/SPECIFICATION
King Cab 2WD (4 cyl) King Cab 2WD (6 cyl) King Cab 4WD (6 cyl) Crew Cab 2WD Crew Cab 4WD
Towing Capacity*1, *2 3,500 lb. (1,588 kg) 6,500 lb. (2,949 kg) 6,300 lb. (2,858 kg) 6,300 lb. (2,858 kg) 6,100 lb. (2,767 kg)
Tongue Load*2 350 lb. (158 kg) 650 lb. (295 kg) 630 lb. (285 kg) 630 lb. (285 kg) 610 lb. (276 kg)
Gross Combined Weight Rating 7,936 lb. (3,600 kg) 11,133 lb. (5,050 kg) 11,133 lb. (5,050 kg) 11,133 lb. (5,050 kg) 11,133 lb. (5,050 kg)
Maximum trailer frontal area 60 sq feet (5.52 sq meters)
*1:
cThe towing capacity values are calculated assuming a base vehicle with driver and any options required to achieve the rating. Additional passengers,
cargo and/or optional equipment will add weight to the vehicle and reduce your vehicle’s maximum towing capacity.
cAll towing above 1,000 lb (454 kg) requires the use of trailer brakes. NISSAN recommends the use of a tandem axle trailer whenever towing above
3,000 lb (1,361 kg) .
*2: The maximum towing capacity when using the genuine NISSAN step bumper as a ball mount is 3,500 lb. (1,588 kg) and 350 lb. (158 kg) tongue load.
Technical and consumer information9-29
ZREVIEW COPYÐ2006 Truck/Frontier(d22)
Owners ManualÐUSA_English(nna)
10/17/05Ðdebbie
X
Page 317 of 336
Trailer lights
CAUTION
When splicing into the vehicle electrical
system, a commercially available power-
type module/converter must be used to
provide power for all trailer lighting. This
unit uses the vehicle battery as a direct
power source for all trailer lights while
using the vehicle tail light, stoplight and
turn signal circuits as a signal source. The
module/converter must draw no more
that 15 milliamps from the stop and tail
lamp circuits. Using a module/converter
that exceeds these power requirements
may damage the vehicle’s electrical sys-
tem. See a reputable trailer dealer to ob-
tain the proper equipment and to have it
installed.
Trailer lights should comply with federal and/or
local regulations. For assistance in hooking up
trailer lights, contact a NISSAN dealer or repu-
table trailer dealer. Vehicles equipped with the
optional trailer tow package are equipped with a
7-pin trailer harness connector. If your trailer is
equipped with a flat 4-pin connector, an adapter
will be needed to connect the trailer lights to the
vehicle. Adapters are available at NISSAN deal-
ers as well as auto parts stores and hitch retail-
ers.
Trailer brakes
If your trailer is equipped with a braking system,
make sure it conforms to federal and/or local
regulations and that it is properly installed.
WARNING
Never connect a trailer brake system di-
rectly to the vehicle brake system.
Pre-towing tips
cBe certain your vehicle maintains a level
position when a loaded and/or unloaded
trailer is hitched. Do not drive the vehicle if it
has an abnormal nose-up or nose-down
condition; check for improper tongue load,
overload, worn suspension or other possible
causes of either condition.
cAlways secure items in the trailer to prevent
load shift while driving.
cKeep the cargo load as low as possible in
the trailer to keep the trailer center of gravity
low.
cLoad the trailer so approximately 60% of the
trailer load is in the front half and 40% is in
the back half. Also make sure the load is
balanced side to side.cCheck your hitch, trailer tire pressure, ve-
hicle tire pressure, trailer light operation, and
trailer wheel lug nuts every time you attach a
trailer to the vehicle.
cBe certain your rearview mirrors conform to
all federal, state or local regulations. If not,
install any mirrors required for towing before
driving the vehicle.
cDetermine the overall height of the vehicle
and trailer so the required clearance is
known.
Trailer towing tips
In order to gain skill and an understanding of the
vehicle’s behavior, you should practice turning,
stopping and backing up in an area which is free
from traffic. Steering stability and braking perfor-
mance will be somewhat different than under
normal driving conditions.
cAlways secure items in the trailer to prevent
load shift while driving.
cLock the trailer hitch coupler with a pin or
lock to prevent the coupler from inadvert-
ently becoming unlatched.
cAvoid abrupt starts, acceleration or stops.
cAvoid sharp turns or lane changes.
Technical and consumer information9-33
ZREVIEW COPYÐ2006 Truck/Frontier(d22)
Owners ManualÐUSA_English(nna)
10/17/05Ðdebbie
X
Page 319 of 336
cCrosswinds and rough roads will adversely
affect vehicle/trailer handling, possibly caus-
ing vehicle sway. When being passed by
larger vehicles, be prepared for possible
changes in crosswinds that could affect ve-
hicle handling.
Do the following if the trailer begins to sway:
1.
Take your foot off the accelerator pedal to
allow the vehicle to coast and steer as
straight ahead as the road conditions allow.
This combination will help stabilize the vehicle
- Do not correct trailer sway by steering or
applying the brakes.
2. When the trailer sway stops, gently apply the
brakes and pull to the side of the road in a
safe area.
3. Try to rearrange the trailer load so it is bal-
anced as described earlier in this section.
cBe careful when passing other vehicles.
Passing while towing a trailer requires con-
siderably more distance than normal pass-
ing. Remember, the length of the trailer must
also pass the other vehicle before you can
safely change lanes.
cDown shift the transmission to a lower gear
for engine braking when driving down steep
or long hills. This will help slow the vehicle
without applying the brakes.cTo maintain engine braking efficiency and
electrical charging performance, do not use
overdrive.
cAvoid holding the brake pedal down too long
or too frequently. This could cause the
brakes to overheat, resulting in reduced
braking efficiency.
cIncrease your following distance to allow for
greater stopping distances while towing a
trailer. Anticipate stops and brake gradually
cDo not use cruise control while towing a
trailer.
cSome states or provinces have specific regu-
lations and speed limits for vehicles that are
towing trailers. Obey the local speed limits.
cCheck your hitch, trailer wiring harness con-
nections, and trailer wheel lug nuts after 50
miles (80 km) of travel and at every break.
cWhen stopped in traffic for long periods of
time in hot weather, put the vehicle in the P
(Park) position.
cWhen launching a boat, don’t allow the wa-
ter level to go over the exhaust tail pipe or
rear bumper.
cMake sure you disconnect the trailer lights
before backing the trailer into the water or
the trailer lights may burn out.When towing a trailer, final drive gear oil
should be replaced and transmission
oil/fluid should be changed more fre-
quently. For additional information, see the
“Maintenance and do-it-yourself” section
earlier in this manual.
FLAT TOWING
Towing your vehicle with all four wheels on the
ground is sometimes called flat towing. This
method is sometimes used when towing a vehicle
behind a recreational vehicle, such as a motor
home.
CAUTION
cFailure to follow these guidelines can
result in severe transmission damage.
cWhenever flat towing your vehicle, al-
ways tow forward, never backward.
cDO NOT tow any automatic transmis-
sion vehicle with all four wheels on the
ground (flat towing) . Doing so WILL
DAMAGE internal transmission parts
due to lack of transmission lubrication.
cFor emergency towing procedures refer
to “Towing recommended by NISSAN”
in the “In case of emergency” section of
this manual.
Technical and consumer information9-35
ZREVIEW COPYÐ2006 Truck/Frontier(d22)
Owners ManualÐUSA_English(nna)
10/17/05Ðdebbie
X
Page 325 of 336

10 Index
4WD warning light...............2-15
A
Active brake limited slip (ABLS) system
(if so equipped).................5-30
Active head restraint...............1-7
Air bag
(See supplemental restraint system).....1-48
Air bag system
Front (See supplemental front impact
air bag system)...............1-56
Air bag warning labels.............1-64
Air bag warning light...........1-64, 2-16
Air cleaner housing filter............8-19
Air conditioner
Air conditioner operation...........4-5
Air conditioner service............4-9
Air conditioner specification label.....9-11
Air conditioner system refrigerant and oil
recommendations..............9-6
Heater and air conditioner controls.....4-2
Servicing air conditioner...........4-9
Air flow charts..................4-6
Alarm system
(See vehicle security system).........2-21
Anchor point locations.............1-38
Antenna.....................4-26
Anti-lock brake system (ABS).........5-29
Anti-lock brake warning light..........2-13
Audible reminders................2-21Audio system..................4-10
Compact Disc (CD) changer.......4-23
Compact disc (CD) player.........4-19
FM-AM radio with compact disc (CD)
player.................4-16, 4-20
Radio....................4-10
Steering wheel audio control switch. . . .4-26
Autolight switch.................2-26
Automatic
Automatic power window switch.....2-46
Automatic transmission position indicator
light.....................2-17
Driving with automatic transmission. . . .5-11
Transmission selector lever lock
release....................5-13
Automatic anti-glare inside mirror.......3-13
B
Battery......................8-15
Charge warning light............2-14
Before starting the engine............5-9
Belts (See drive belts).............8-18
Booster seats..................1-42
Brake
Anti-lock brake system (ABS).......5-29
Brake booster................8-24
Brake fluid..................8-14
Brake light (See stop light).........8-29
Brake pedal.................8-23
Brake system................5-28Brake warning light.............2-13
Brake wear indicators........2-21, 8-23
Parking brake check............8-23
Parking brake operation..........5-17
Self-adjusting brakes............8-23
Break-in schedule................5-19
Brightness control
Instrument panel..............2-28
Bulb check/instrument panel..........2-12
Bulb replacement................8-29
C
Capacities and recommended
fuel/lubricants...................9-2
Car phone or CB radio.............4-27
Cargo light switch...............2-30
Cargo (See vehicle loading information) . . .9-12
CD care and cleaning.............4-25
CD changer (See audio system)........4-23
CD player (See audio system).........4-19
Child restraint with top tether strap......1-36
Child restraints.......1-14, 1-15, 1-21, 1-34
Precautions on child restraints . . .1-21, 1-42
Top tether strap anchor point locations . .1-38
Child safety rear door lock............3-6
Chimes, audible reminders...........2-21
Cleaning exterior and interior..........7-2
Clock......................4-17
Clutch
Clutch fluid.................8-14
ZREVIEW COPYÐ2006 Truck/Frontier(d22)
Owners ManualÐUSA_English(nna)
10/17/05Ðdebbie
X
Page 329 of 336

Recorders
Event data..................9-39
Refrigerant recommendation..........9-6
Registering your vehicle in another country. . .9-9
Remote keyless entry system..........3-6
Reporting safety defects (US only)......9-37
Roof rack....................2-43
S
Safety
Child safety rear door lock..........3-6
Child seat belts...........1-21, 1-42
Reporting safety defects (US only). . . .9-37
Seat
Jump seat...................1-6
Seat adjustment
Front manual seat adjustment........1-2
Front power seat adjustment........1-4
Seat belt
Child safety.................1-14
Infants and small children.........1-15
Injured Person................1-16
Larger children...............1-15
Precautions on seat belt usage......1-12
Pregnant women..............1-16
Pre-tensioner seat belt system.......1-62
Seat belt extenders.............1-20
Seat belt maintenance...........1-21
Seat belts..................1-12
Shoulder belt height adjustment......1-20
Three-point type with retractor.......1-16
Seat belt warning light.............2-16
Seatback pockets................2-40Seats
Adjustment..................1-2
Front seats..................1-2
Heated seats................2-30
Manual front seat adjustment........1-2
Security indicator light.............2-19
Security system (NISSAN vehicle immobilizer
system) , engine start.........2-22, 3-2, 5-9
Self-adjusting brakes..............8-23
Service manual order form...........9-39
Servicing air conditioner.............4-9
Shift lock release................5-13
Shifting
Automatic transmission...........5-11
Manual transmission............5-15
Shoulder belt height adjustment........1-20
Side air bag system (See supplemental side air
bag, curtain and rollover air bag systems). . .1-61
Spark plug replacement............8-19
Speedometer...................2-4
SRS warning label...............1-64
Starting
Before starting the engine..........5-9
Jump starting.................6-8
Precautions when starting and driving . . .5-2
Push starting................6-10
Starting the engine.............5-10
Steering
Power steering fluid.............8-13
Power steering system...........5-28
Tilting steering wheel............3-11
Steering wheel audio control switch......4-26
Stop light....................8-29
Storage.....................2-35
Storage tray...............2-35, 2-36Sun visors....................3-12
Sunglasses case................2-38
Sunroof.....................2-47
Supplemental air bag warning labels.....1-64
Supplemental air bag warning light . . .1-64, 2-16
Supplemental front impact air bag system . .1-56
Supplemental restraint system
Information and warning labels.......1-64
Precautions on supplemental restraint
system....................1-48
Supplemental restraint system
(Supplemental air bag system).........1-48
Switch
Autolight switch...............2-26
Automatic power window switch.....2-46
Clutch interlock (clutch start) switch . . .2-33
Electronic locking rear differential (E-Lock)
system switch................2-32
Fog light switch...............2-28
Hazard warning flasher switch.......2-29
Headlight and turn signal switch......2-25
Headlight control switch..........2-25
Hill descent control (HDC) switch.....2-31
Ignition switch................5-7
Overdrive switch..............5-14
Power door lock switch...........3-4
Rear window and outside mirror defroster
switch....................2-24
Turn signal switch..............2-28
Vehicle dynamic control (VDC) off
switch....................2-31
Windshield wiper and washer switch . . .2-23
10-5
ZREVIEW COPYÐ2006 Truck/Frontier(d22)
Owners ManualÐUSA_English(nna)
10/17/05Ðdebbie
X