Page 352 of 409

351 Practical hints
Flat tire
�Flat tire
The vehicle is equipped with the TIREFIT
kit.Preparing the vehicle�
Park the vehicle in a safe distance from
moving traffic on a hard, flat surface
when possible.
�
Turn on the hazard warning flashers.
�
Turn the steering wheel so that the
front wheels are in a straight ahead po-
sition.
�
Set the parking brake.
�
Move the gear selector lever to P.
�
Turn off the engine (
�page 58).
�
Remove the SmartKey from the starter
switch.
�
Open the driver’s door.
�
Have any passenger exit the vehicle at
a safe distance from the roadway.
Sealing tires with TIREFIT kit
Small tire punctures, particularly those in
the tread, can be sealed with TIREFIT.
TIREFIT can be used in ambient tempera-
tures down to -4°F (-20°C).
�
Foreign objects (e.g. screws or nails)
should not be removed from the tire.
�
Take TIREFIT, the sticker, and the elec-
tric air pump out of the trunk.
!A wheel change should only be carried
out at an authorized Mercedes-Benz
Center. Otherwise there is a danger of
damaging the vehicle by jacking it up
incorrectly.
iOpen door only when conditions are
safe to do so.Warning!
G
Keep TIREFIT away from sparks, open flame
or heat source.
Do not smoke.
Warning!
G
TIREFIT is a limited repair device. TIREFIT
cannot be used for cuts or punctures larger
than approximately 0.16 in (4 mm) and tire
damage caused by driving with extremely
low tire inflation pressure, or on a flat tire, or
a damaged wheel.
Do not drive the vehicle under such circum-
stances.
Contact your nearest Mercedes-Benz
Center for assistance or call Roadside
Assistance. !After using TIREFIT, the tire inflation
pressure sensor may have to be re-
placed.
��
Page 355 of 409
, press0 on electric
air pump switch8.
The electric air pump should now be
switched off.
�
Turn the SmartK")
354 Practical hintsFlat tire�
After attaining a tire inflation pressure
of 26 psi (1.8 bar), press0 on electric
air pump switch8.
The electric air pump should now be
switched off.
�
Turn the SmartKey in the ignition to
position0 (
�page 40).
�
Detach the electric air pump.
The air hose may still be hot. Please ex-
ercise appropriate caution.
�
Store the electrical plug and the air
hose behind the flap and place the air
pump back in the trunk.
�
Close the trunk lid.
�
Drive away immediately.
The TIREFIT sealant will distribute itself
evenly inside the tire.
�
After driving vehicle for an initial
10 minutes, check tire inflation pres-
sure using the pressure gauge on the
air pump.
Warning!
G
If a tire inflation pressure of 26 psi (1.8 bar)
is not attained, tire is too severely damaged
for TIREFIT to provide a reliable tire repair.
In this case, TIREFIT cannot properly seal
the tire.
Do not drive the vehicle.
Contact the nearest Mercedes-Benz Center
or call Roadside Assistance.
Warning!
G
Do not exceed vehicle speed of
50 mph (80 km/h). A TIREFIT repair is not
designed to operate at higher speeds.
The sticker must be attached on the instru-
ment cluster where it will be easily seen by
the driver.
Vehicle handling characteristics may
change. Adapt your driving accordingly.
Warning!
G
If tire inflation pressure has fallen below
20 psi (1.3 bar), do not continue to drive the
vehicle.
Park your vehicle safely away from the road-
way and contact the nearest authorized
Mercedes-Benz Center or Roadside
Assistance.
If tire inflation pressure is at least
20 psi (1.3 bar), inflate tire to correct pres-
sure (see placards on driver’s door B-pillar
or on fuel filler flap), and drive vehicle to
nearest tire repair facility to have tire re-
paired or replaced.
Recommended duration of use:
300 miles (500 km) at 50 mph (80 km/h)
with the recommended tire inflation
pressure.
��
Page 357 of 409

�
The battery for electrical consumers
(located in the trunk)
Warning!
G
Failu")
356 Practical hintsBatteries Your vehicle is equipped with two batter-
ies:�
The starter battery (located in the
trunk)
�
The battery for electrical consumers
(located in the trunk)
Warning!
G
Failure to follow these instructions can re-
sult in severe injury or death.
Never lean over batteries while connecting,
you might get injured.
Observe all safety instructions and precau-
tions when handling automotive batteries
(�page 251).
Battery fluid contains sulfuric acid. Do not
allow this fluid to come in contact with eyes,
skin or clothing. In case it does, immediately
flush affected area with water and seek
medical help if necessary.
A battery will also produce hydrogen gas,
which is flammable and explosive. Keep
flames or sparks away from battery, avoid
improper connection of jumper cables,
smoking, etc.
!You must not jump start the vehicle,
otherwise the vehicle electrical sys-
tems could be damaged.
Only use the battery charge unit tested
and approved by Mercedes-Benz for
use on the SLR to charge the battery or
maintain the battery charge. Using oth-
er battery chargers may cause damage
to the vehicle and/or personal injury.
Information on charging the batteries
(�page 358).
Have the batteries checked regularly
by an authorized Mercedes-Benz
Center. Refer to Maintenance Booklet
for maintenance intervals or contact an
authorized Mercedes-Benz Center for
further information.
If it is necessary to replace the batter-
ies, notify an authorized
Mercedes-Benz Center.
Page 359 of 409

358 Practical hintsBatteriesCharging the batteries
You can obtain detailed information on
charging the battery from your authorized
Mercedes-Benz Center.Charging with the battery charger
Only use the battery charge unit approved
by Mercedes-Benz and supplied with your
vehicle. This charger is designed to auto-
matically control the charge rate, and
charge the battery or maintain the existing
charge in the battery while the vehicle is
parked and not being driven for long peri-
ods of time (on average approximately
3 weeks or more). Not driving the vehicle
for such extended periods may cause the
charge in the vehicle battery to drop. Using the charging point
The charging point for the battery charger
is located next to the CD-changer on the
left-hand side in the trunk.
1Charging point
�
Remove the SmartKey from the starter
switch.
�
Open the cover of the charging
point1.
�
Connect the battery charger with the
charging point 1.
Warning!
G
Never charge a battery while still installed in
the vehicle unless the battery charge unit
approved by Mercedes-Benz (supplied with
your vehicle) is being used. Gases may es-
cape during charging and cause explosions
that may result in paint damage, corrosion
or personal injury.
A battery charge unit specially adapted for
Mercedes-Benz vehicles and tested and ap-
proved by Mercedes-Benz is available, per-
mitting the charging of the battery in its
installed position. Contact an authorized
Mercedes-Benz Center for information and
availability. Charge battery in accordance
with the separate operating instructions for
the battery charger.
Page 360 of 409
359 Practical hints
Batteries
�
Observe and follow the separate oper-
ating instructions for the battery
charger.
�
Charge up the battery.
The battery charger switches off auto-
matically when the battery is sufficient-
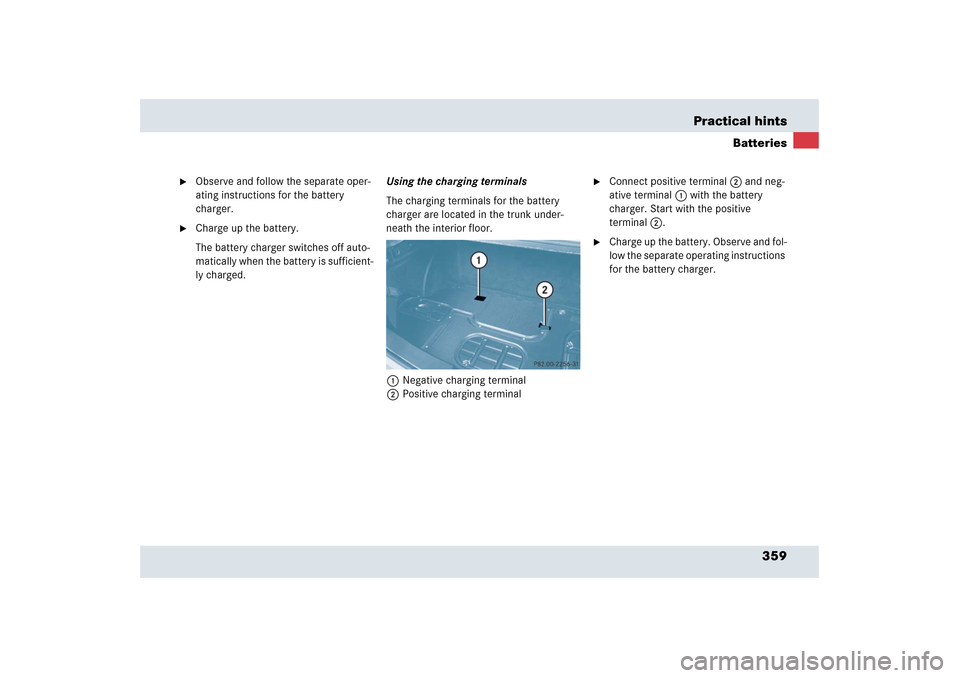
ly charged.Using the charging terminals
The charging terminals for the battery
charger are located in the trunk under-
neath the interior floor.
1Negative charging terminal
2Positive charging terminal
�
Connect positive terminal2 and neg-
ative terminal1 with the battery
charger. Start with the positive
terminal2.
�
Charge up the battery. Observe and fol-
low the separate operating instructions
for the battery charger.
Page 377 of 409
376 Technical dataWeightsTrunk load max.
220 lb (100 kg)
Page 394 of 409

393 Index
Body surface 292
Brake
Electrohydraulic brake system 84
Brake Assist System see BAS
Brake fluid 377, 379
Checking 242
Messages in the multifunction
display 300, 317
Brake lamps 349
High mounted 349
Messages in the multifunction
display 330
Brake pads
Messages in the multifunction
display 318
Brakes 232
Warning lamp 29, 300
Break-in the vehicle 230
Bulbs
Messages in the multifunction
display 330
Replacing 348C
CAC 385
California retail buyers and lessees, impor-
tant notice for 15
Call priority, Tele Aid 214
CAN system 386
Capacities and recommended
fuel/lubricants 377
Cargo area see Trunk
Cassette player 152
Catalytic converter 239
CD changer 156
Location 157
CD player 124
Cellular phone
Delayed switch-off time 206
Inserting the cradle 205
Making calls in hands-free mode 207
Making calls in private mode 206
Re-inserting 207
Removing the cradle 205
Center console
Lower part 32
Upper part 31
Center storage compartment 201Central locking
Automatic 103, 137
Central locking switch 31
Locking/unlocking from inside 103
Central locking switch 103
Children in the vehicle 72
Airbags 64
Indicator lamp, front passenger front
airbag 75
Infant and child restraint systems 62,
75, 77
Cigarette lighter 202
Clock 29, 131
Setting time 131
Cockpit 26, 386
Cold tire inflation pressure 281
Combination switch 27, 53, 109
Compact guide 343
Control and operation of radio
transmitters 238
Control system 117, 386
Multifunction display 117
Multifunction steering wheel 118
Resetting to factory default 127
Page 396 of 409

395 Index
Driving 46, 51
Abroad 238
Hints, Electrohydraulic brake
system 86
Hydroplaning 236
In winter 237
Instructions 46, 231
Problems 56
Safety systems 79
Systems 197
Through standing water 238
Tips, Automatic transmission 173
Driving safety systems 79
ABS 79
BAS 81
Electrohydraulic brake system 84
ESP
®
81
Driving systems
Cruise control 197
Dust cover 224E
Electric air pump 342
Electrical fuses 363
Electrical outlet see Power outlet
Electrical system, Technical data 374
Electrohydraulic brake system 79, 84,
388
Activation 85
Deactivation 86
Driving hints 86
Emergency operating mode 84
Messages in the multifunction
display 319
Self-check 85, 318
Warning lamp 84
Electronic Stability Program see ESP
®
Emergency calls
911 164
Tele Aid 209
Emergency operations
Automatic transmission (Limp Home
Mode) 178
Remote door unlock, Tele Aid 215
Trunk lid, Releasing from inside 102
Unlocking the vehicle 344
Emergency Tensioning Device see ETDEmergency, In case of
First aid kit 342
Flat tire 351
Hazard warning flasher 110
Instrument cluster, Indicator
lamps 298
Roadside Assistance 16, 211
Towing the vehicle 360
Emission control 240
Information label 368
System warranties 14
Vacuum line routing diagram
label 368
Engine
Break-in recommendations 230
Cleaning 293
Compartment 244
Malfunction indicator lamp 29, 301
Number 368, 386
Poly-V-belt layout 369
Starting 49
Tachometer 29
Technical data 370
Turning off 58
Engine coolant see Coolant
")