Page 105 of 409
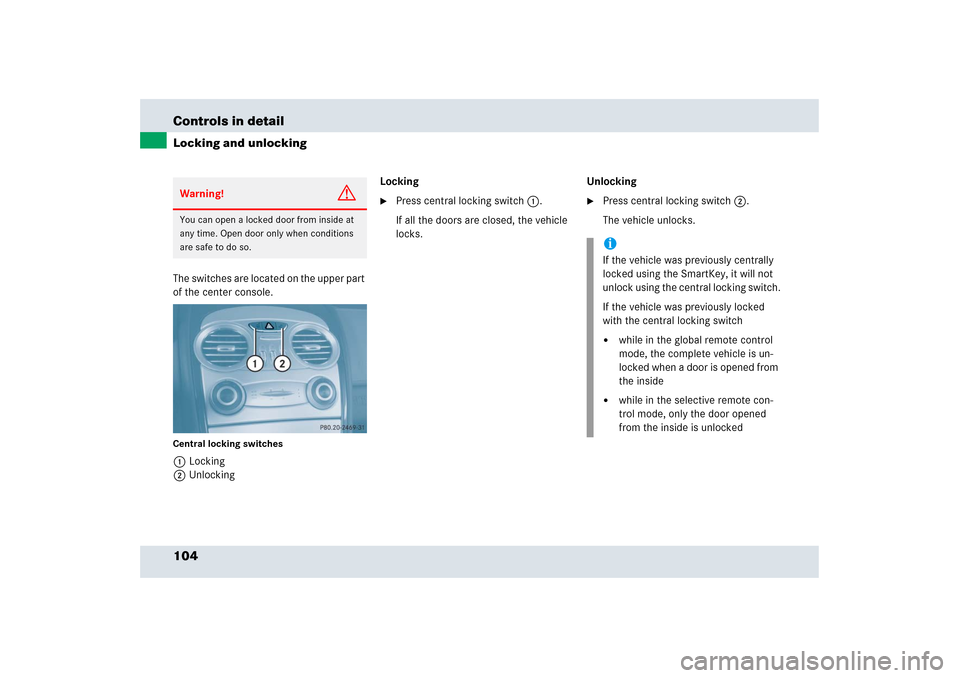
104 Controls in detailLocking and unlockingThe switches are located on the upper part
of the center console.Central locking switches1Locking
2UnlockingLocking
�
Press central locking switch1.
If all the doors are closed, the vehicle
locks.Unlocking
�
Press central locking switch2.
The vehicle unlocks.
Warning!
G
You can open a locked door from inside at
any time. Open door only when conditions
are safe to do so.
iIf the vehicle was previously centrally
locked using the SmartKey, it will not
unlock using the central locking switch.
If the vehicle was previously locked
with the central locking switch�
while in the global remote control
mode, the complete vehicle is un-
locked when a door is opened from
the inside
�
while in the selective remote con-
trol mode, only the door opened
from the inside is unlocked
Page 106 of 409

and (
�page 53).
Exterior lamp swi")
105 Controls in detail
Lighting
�Lighting
For information on how to switch on the
headlamps and use the turn signals, see
“Switching on headlamps” (
�page 52)
and (
�page 53).
Exterior lamp switch
The exterior lamp switch is located on the
dashboard to the left of the steering wheel.
MOff
UAutomatic headlamp mode
CParking lamps (also tail lamps,
license plate lamps, side marker
lamps, instrument panel lamps)
BLow beam headlamps (or high
beam headlamps when the
combination switch is pushed
forward) and parking lampsˆStanding lamps, right (turn left one
stop)
‚Standing lamps, left (turn left two
stops)
iIf you drive in countries where vehicles
drive on the other side of the road than
the country where the vehicle is regis-
tered, you must have the headlamps
modified for symmetrical low beams.
Relevant information can be obtained
at your authorized Mercedes-Benz
Center.
iIf you remove the SmartKey from the
starter switch and open the driver’s
door while the parking lamps or low
beam headlamps are switched on, then �
a warning sounds
�
$ appears in the left multifunc-
tion display
�
the message
Turn off lamps
appears in right multifunction dis-
play
Page 107 of 409

106 Controls in detailLightingManual headlamp mode
The low beam headlamps and the parking
lamps can be switched on and off with the
exterior lamp switch.
Automatic headlamp mode
The following lamps switch on and off
automatically depending on the brightness
of the ambient light:�
Low beam headlamps
�
Tail and parking lamps
�
License plate lamps
�
Side marker lamps
�
Turn the exterior lamp switch to
positionU.
With the SmartKey in starter switch
position1, only the parking lamps will
switch on and off automatically.
When the engine is running, the low
beam headlamps, the tail and parking
lamps, the license plate lamps, and the
side marker lamps will switch on and
off automatically.
Warning!
G
If the exterior lamp switch is set toU,�
the headlamps may switch off unexpect-
edly when the system senses bright
ambient light, for example light from
oncoming traffic.
�
the headlamps will not be automatically
switched on under foggy conditions.
To minimize risk to you and to others,
activate headlamps by turning exterior lamp
switch toB when driving or when traffic
and/or ambient lighting conditions require
you to do so.
In low ambient lighting conditions, only
switch from positionU toB with the
vehicle at a standstill in a safe location.
Switching fromU toB will briefly
switch off the headlamps. Doing so while
driving in low ambient lighting conditions
may result in an accident.
The automatic headlamp feature is only an
aid to the driver. The driver is responsible for
the operation of the vehicle's lights at all
times.iFog lamps cannot be switched on with
the exterior lamp switch in
positionU. For switching on the fog
lamps, turn the exterior lamp switch to
positionB first.
Page 111 of 409
110 Controls in detailLightingHazard warning flasher
The hazard warning flasher can be
switched on at all times, even with the
SmartKey removed from the starter
switch.
The hazard warning flasher switches on
automatically when an airbag deploys.
The hazard warning flasher switch is
located on the upper part of the center
console.
1Hazard warning flasher switchSwitching on hazard warning flasher
�
Press hazard warning flasher
switch1.
All turn signals are flashing.Switching off hazard warning flasher
�
Press hazard warning flasher switch1
again.
iWith the hazard warning flasher
activated and the combination switch
set for either left or right turn, only the
respective turn signals will operate
when the ignition is switched on.
iIf the hazard warning flasher has been
activated automatically, press hazard
warning flasher switch1 once to
switch it off.
Page 112 of 409
111 Controls in detail
Lighting
Interior lighting
The controls are located in the overhead
control panel.
1Left-hand reading lamp on/off
2Right-hand reading lamp on/off
3Interior lighting on/off
4Automatic control on/offAutomatic control
Activating
�
Slide switch 4 to the left.
Interior lamps switches on in darkness
when you �
unlock the vehicle
�
open a door
�
remove the SmartKey from the
starter switch
In addition, the entry/exit lamps in the
door come on when you open a door.
The interior lamps are switched off af-
ter a preset time, see “Interior lighting
delayed switch-off” (
�page 135).Deactivating
�
Slide switch4 to the right.
The interior lighting and the entry/exit
lamps remain switched off in darkness,
even when you�
unlock the vehicle
�
open a door
�
remove the SmartKey from the
starter switch
iIf a door remains open, the interior
lamps switch off automatically after ap-
proximately 5 minutes.
Page 113 of 409

112 Controls in detailLightingManual control
Switching interior lighting on�
Press switch3.
The interior lighting switches on.
Switching interior lighting off
�
Press switch 3 again.
The interior lighting switches off.
Reading lamps
The reading lamps are integrated into the
interior rear view mirror.
�
Press reading lamp switch1or2 to
switch on the desired reading lamp.
�
Press reading lamp switch1or2
again to switch off the respective read-
ing lamp.
Trunk lamp
The trunk lamp switches on if the trunk is
opened.
If you leave the trunk open for an extended
period of time, the trunk lamp will switch
off automatically after approximately
10 minutes.
Courtesy lighting
For better orientation in the dark, courtesy
lamps will illuminate the interior of your
vehicle.
When you open a door:�
the driver’s and passenger’s footwells
If the SmartKey is in starter switch
position1:
�
the center console
!Make sure the interior lighting is
switched off when leaving the vehicle.
iThe setting selected for the interior
lighting is used for the trunk lighting as
well.
iThe center console is lit from the
interior rear view mirror.
Page 118 of 409

117 Controls in detail
Control system
�Control system
The control system is activated as soon as
the SmartKey in the starter switch is
turned to position1. The control system
enables you to�
call up information about your vehicle
�
change vehicle settings
For example, you can use the control sys-
tem to find out when your vehicle is next
due for service, to set the language for
messages in the instrument cluster dis-
play, and much more.
The control system relays information to
the multifunction display.
Multifunction display
The multifunction display consists of the
display fields in the speedometer and the
tachometer. In its default state, the left
display field shows the outside tempera-
ture and main odometer, while the trip
odometer and the clock appears in the
right display field. This default setting is re-
ferred to as the standard display.Standard display1Main odometer
2Outside temperature
3Current gear selector lever posi-
tion/gear range
4Trip odometer
5Automatic transmission shift program
mode
6Clock
Warning!
G
A driver’s attention to the road and traffic
conditions must always be his/her primary
focus when driving.
For your safety and the safety of others, se-
lecting features through the multifunction
steering wheel should only be done by the
driver when traffic and road conditions per-
mit it to be done safely.
Bear in mind that at a speed of just 30 mph
(approximately 50 km/h), your vehicle is
covering a distance of 44 feet (approximate-
ly 14 m) every second.
Page 126 of 409

125 Controls in detail
Control system
�
Press buttonè orÿ repeatedly
until the vehicle status message
memory appears in the right display.
If the vehicle status message memory
menu does not appear, then there are
no messages stored.Vehicle status messages have been
recorded
If conditions have occurred causing status
messages to be recorded, the number of
messages appears in the right display:
1Number of messages
�
Press button k or j.
The stored messages will now be
displayed in the order in which they
have occurred.
For malfunction and warning messag-
es, see “Vehicle status messages in the
multifunction display” (
�page 307).Should the vehicle’s system record any
conditions while driving, the number of
messages will reappear in the multifunc-
tion display when the SmartKey in the
starter switch is turned to position0 or
removed from the starter switch.
Warning!
G
Malfunction and warning messages are only
indicated for certain systems and are inten-
tionally not very detailed. The malfunction
and warning messages are simply a remind-
er with respect to the operation of certain
systems and do not replace the owner’s
and/or driver’s responsibility to maintain
the vehicle’s operating safety by having all
required maintenance and safety checks
performed on the vehicle and by bringing
the vehicle to an authorized Mercedes-Benz
Center to address the malfunction and
warning messages (
�page 307).
iThe vehicle status message memory
will be cleared when you turn the
SmartKey in the starter switch to
position1 or2. You will then only see
high-priority messages (
�page 307).