Page 131 of 409
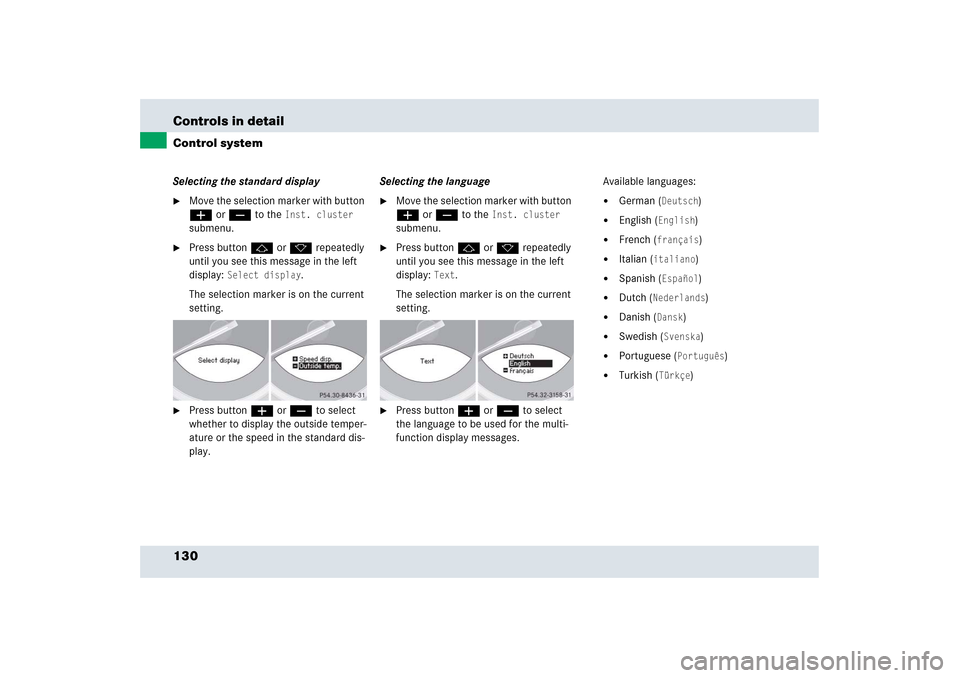
130 Controls in detailControl systemSelecting the standard display�
Move the selection marker with button
æ or ç to the
Inst. cluster
submenu.
�
Press button j or k repeatedly
until you see this message in the left
display:
Select display
.
The selection marker is on the current
setting.
�
Press button æ or ç to select
whether to display the outside temper-
ature or the speed in the standard dis-
play. Selecting the language
�
Move the selection marker with button
æ or ç to the
Inst. cluster
submenu.
�
Press button j or k repeatedly
until you see this message in the left
display:
Text
.
The selection marker is on the current
setting.
�
Press button æ or ç to select
the language to be used for the multi-
function display messages. Available languages:
�
German (
Deutsch
)
�
English (
English
)
�
French (
français
)
�
Italian (
italiano
)
�
Spanish (
Español
)
�
Dutch (
Nederlands
)
�
Danish (
Dansk
)
�
Swedish (
Svenska
)
�
Portuguese (
Português
)
�
Turkish (
Türkçe
)
Page 134 of 409
 or daytime
running lamp mode (
Constant
)
activated.
With daytime running lamp mode activated
and")
133 Controls in detail
Control system
�
Press buttonæ orç to select
manual operation (
Manual
) or daytime
running lamp mode (
Constant
)
activated.
With daytime running lamp mode activated
and the exterior lamp switch in
positionM orU, the low beam
headlamps are switched on when the
engine is running.
In low ambient light conditions the
following lamps will switch on additionally:
�
Parking lamps
�
Tail lamps
�
License plate lamps
�
Side marker lampsFor more information on the daytime
running lamp mode, see “Daytime running
lamp mode” (
�page 107).Setting locator lighting
With the locator lighting feature activated
and the exterior lamp switch in
positionU, the following lamps will
switch on during darkness when the vehi-
cle is unlocked with the SmartKey:
�
Parking lamps
�
Tail lamps
�
License plate lamps
�
Side marker lamps
�
Front fog lamps
The locator lighting switches off when the
driver’s door is opened.
If you do not open a door after unlocking
the vehicle with the SmartKey the lamps
will switch off automatically after approxi-
mately 40 seconds.
iIf you turn the exterior lamp switch to
another position, the corresponding
lamp(s) will switch on.
For safety reasons, resetting the Lighting
submenu to factory settings
(
�page 127) will not reset the daytime
running lamp mode.
The following message appears in the
right display:
Cannot be fully reset
to factory settings when driving
.
Page 151 of 409
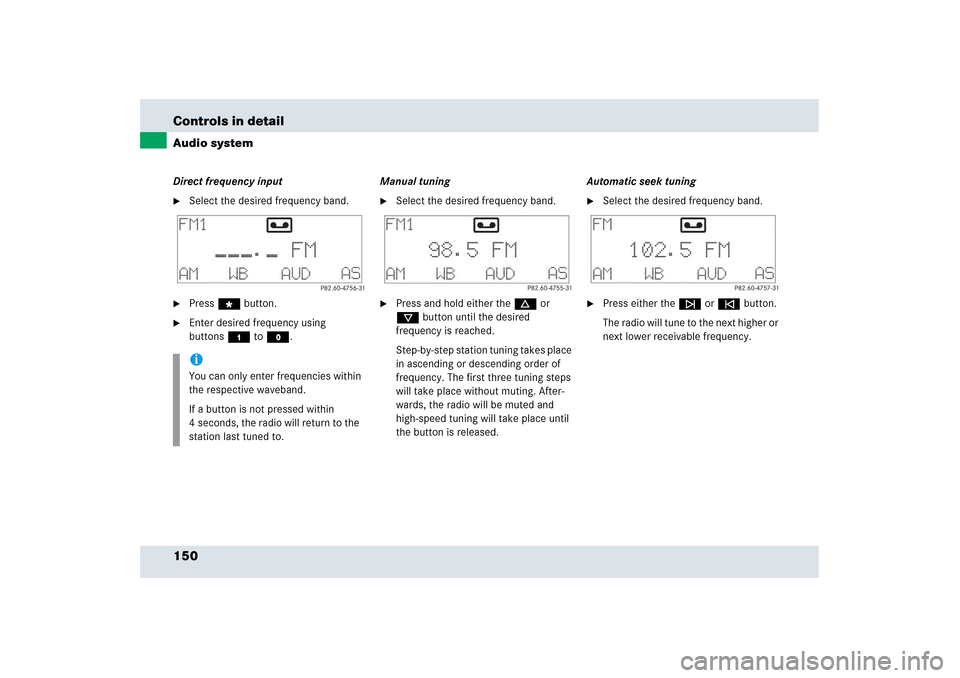
150 Controls in detailAudio systemDirect frequency input�
Select the desired frequency band.
�
Press“ button.
�
Enter desired frequency using
buttons4 toM.Manual tuning
�
Select the desired frequency band.
�
Press and hold either thed or
cbutton until the desired
frequency is reached.
Step-by-step station tuning takes place
in ascending or descending order of
frequency. The first three tuning steps
will take place without muting. After-
wards, the radio will be muted and
high-speed tuning will take place until
the button is released.Automatic seek tuning
�
Select the desired frequency band.
�
Press either thef or ebutton.
The radio will tune to the next higher or
next lower receivable frequency.
iYou can only enter frequencies within
the respective waveband.
If a button is not pressed within
4 seconds, the radio will return to the
station last tuned to.
Page 157 of 409

156 Controls in detailAudio systemCD changer operation
General notes
Should excessively high temperatures oc-
cur while in CD mode,
CD TEMP HIGH
will
appear on the display and the CD will be
muted. The unit will then switch back to
the last operating mode used until the tem-
perature has decreased to a safe operating
level.
Should excessively low temperatures oc-
cur while in CD mode,
CD TEMP LOW
will ap-
pear on the display, but the CD will
continue to play.
Handle CDs carefully to prevent interfer-
ence during playback. Avoid fingerprints
and dust on CDs. Do not write on CDs or
apply any labels or other material to them.Only use original CDs. Using copied CDs
may create problems during playback.
Clean CDs from time to time with a com-
mercially available cleaning cloth. Do not
use solvents, anti-static sprays, etc. for
cleaning. Replace the CD in its case after
use. Protect CDs from heat and direct sun-
light.
Only use CDs, which bear the label shown
and that conform to the compact disc
digital audio standard (IEC 60908). You
can therefore only use CDs with a maxi-
mum thickness of 1.3 mm.
iUse of CDs which do not meet this
standard may cause damage to the CD
changer. Do not play single-CDs
(80 mm) with an adapter.
Your CD drive has been designed to
play CDs which correspond to the
IEC 60908 standard.
If you insert thicker data carriers, e.g.
ones that have data on both sides (one
side with DVD data, the other side with
audio data), they cannot be ejected and
will damage the drive.Warning!
G
The CD changer is a Class 1 laser product.
There is a danger of invisible laser radiation
if the cover is opened or damaged.
Do not remove the cover. The CD changer
does not contain any parts which can be ser-
viced by the user. For safety reasons, have
any service work which may be necessary
performed only by qualified personnel.
Page 159 of 409

158 Controls in detailAudio systemSelecting CDs�
You can select from among the CDs in
the CD magazine using buttons4
to6.CD and the magazine slot number of the
selected CD appear on the display. The
number of the current track is dis-
played after
TRACK
.
If there is no CD in the selected maga-
zine slot,
NO CD
appears on the display
with the corresponding slot number.Skipping tracks forward/backward
�
Skipping tracks forward�
Pressf button.
The next track will be played.
�
Skipping tracks backward�
Presse button.
If the track has been playing for
more than 10 seconds, it will revert
to the start of that track. If it has
been playing for less than
10 seconds, it will revert to the pre-
ceding track.
Pressing thef or ebutton repeat-
edly will result in multiple tracks being
skipped.
Fast forward/reverse
�
Fast forward�
Press and holdd button until
desired point has been reached.
�
Fast reverse�
Press and holdc button until
desired point has been reached.
Scanning
�
Starting scan�
Press2 button.SC appears in the display.
Each track on the current CD will be
played for approximately 8 seconds
in ascending order.
iThe relative time of the track is shown
on the display during the search.
Page 165 of 409

164 Controls in detailAudio systemQuick-dialing�
Press one of the desired number
buttons4 toM longer than
1 second.
The telephone number saved under
that number will be dialed.Emergency calls “911”
The following describes how to dial a “911”
emergency call using the audio system
head unit when a Mercedes-Benz specified
mobile phone is inserted in the phone cra-
dle. Unless otherwise specified, the de-
scriptions refer to the audio system head
unit.
Consult the separate telephone operating
instructions that came with your mobile
phone for information on how to place a
“911” emergency call on the mobile
phone. The following conditions must be met for a
“911” emergency call:
�
Telephone must be switched on.
�
The corresponding mobile communica-
tions network must be available.
If you cannot make an emergency call, you
will have to initiate rescue measures
yourself.
!Please be aware that button4
might already be reserved for an emer-
gency call number.
Warning!
G
The “911” emergency call system is a public
service. Using it without due cause is a crim-
inal offense.
iEmergency calls may not be possible
with all telephone networks or if certain
network services and/or telephone
functions are active. Check with your
local service providers.
Page 172 of 409

171 Controls in detail
Automatic transmission
Gear selector lever positions
Effect
ì
Park position
Gear selector lever position
when the vehicle is parked. Place
gear selector lever in positionP
only when vehicle is stopped.
The park position is not intended
to serve as a brake when the
vehicle is parked. Rather, the
driver should always set the
parking brake in addition to
placing the gear selector lever in
positionP to secure the vehicle.
EffectThe SmartKey can only be
removed from the starter switch
with the gear selector lever in
positionP. With the SmartKey
removed, the gear selector lever
is locked in positionP.
If the vehicle’s electrical system
is malfunctioning, the gear
selector lever could remain
locked in positionP.
í
Reverse gear
Place gear selector lever in
positionR only when vehicle is
stopped.
Effect
ë
Neutral
No power is transmitted from the
engine to the drive axle. When
the brakes are released, the
vehicle can be moved freely
(pushed or towed).
To avoid damage to the trans-
mission, never engageN while
driving.
If the ESP
® is deactivated or
malfunctioning:
Move gear selector lever toN
only if the vehicle is in danger of
skidding, e.g. on icy roads.
ê
Drive
The transmission shifts
automatically. All five forward
gears are available.
Page 177 of 409
 or by using the gear
selec")
176 Controls in detailAutomatic transmissionManual gearshift program
In the manual gearshift programM you can
change the gears manually on the steering
wheel (
�page 174) or by using the gear
selector lever (
�page 168).
Activating manual gearshift program
�
Turn program mode selector switch1
(�page 173) to the MAN setting.
The transmission switches to the
manual program modeM. The letter
M
appears in the right multifunction dis-
play and the lamp in program mode se-
lector switch3 (
�page 176) comes
on. Automatic shifting is switched off.
The gear range is not limited.Selecting manual gearshift program
3Program selector switch for the manual
gearshift program
I Sport For sporty driving
II Super Sport For very sporty driving
III Race For racing-like driving
1
The individual shifting programs differ with
regard to spontaneity, response time, and
shifting smoothness.
�
Turn program selector switch3 to the
desired setting (I, II or III).
1Please always drive carefully and obey applicable
speed limits.
iThe currently selected manual gear-
shift program (I, II or III) does not ap-
pear in the right multifunction display.
The current setting is indicated only on
the program mode selector switch 3.