Page 220 of 409

219 Controls in detail
Useful features
Step 9:�
Press the “training” button on the ga-
rage door opener motor head unit.
The “training light” is activated.
You have 30 seconds to initiate the follow-
ing step.
Step 10:
�
Return to the vehicle and firmly press,
hold for 2 seconds and release the pro-
grammed signal transmitter button
(2, 3 or4).
Step 11:
�
Press, hold for 2 seconds and release
same signal transmitter button a sec-
ond time to complete the training pro-
cess.Step 12:
�
Confirm the garage door operation by
pressing the programmed signal trans-
mitter button (2, 3 or4).
Step 13:
�
To program the remaining two signal
transmitter buttons, repeat the steps
above starting with step 3.Gate operator/Canadian programming
Canadian radio-frequency laws require
transmitter signals to “time-out” (or quit)
after several seconds of transmission
which may not be long enough for the
integrated signal transmitter to pick up the
signal during programming. Similar to this
Canadian law, some U.S. gate operators
are designed to “time-out” in the same
manner.
If you live in Canada or if you are having
difficulties programming a gate operator
(regardless of where you live) by using the
programming procedures, replace step 4
with the following:
Step 4:
�
Press and hold the signal transmitter
button (2, 3 or4). Do not release
this button until it has been successful-
ly trained.
iSome garage door openers (or other
rolling code equipped devices) may
require you to press, hold for 2 seconds
and release the same signal transmit-
ter button a third time to complete the
training process.
��
Page 308 of 409

307 Practical hints
What to do if ...
Vehicle status messages in the multifunction display
Warning and malfunction messages
appear in the multifunction display located
in the instrument cluster.
Certain warning and malfunction messag-
es are accompanied by an audible signal.
Address these messages accordingly and
follow the additional instructions given in
this Operator’s Manual.
Selecting the vehicle status message
memory menu in the control system
(�page 124) displays both cleared and
uncleared messages.
High-priority messages appear in the
multifunction display in red color.
Certain messages of high priority cannot
be cleared from the multifunction display
using the reset button (
�page 29). Other messages of high priority and
messages of less immediate priority can
be cleared from the multifunction display
using the reset button. They are then
stored in the vehicle status message mem-
ory (
�page 124). Remember that clearing
a message will only make the message dis-
appear. Clearing a message will not cor-
rect the condition that caused the
message to appear.
Warning!
G
All categories of messages contain
important information which should be
taken note of and, where a malfunction is
indicated, addressed as soon as possible at
an authorized Mercedes-Benz Center.
Failure to repair condition noted may cause
damage not covered by the Mercedes-Benz
Limited Warranty, or result in property
damage or personal injury.
Warning!
G
No messages will be displayed if either the
instrument cluster or the multifunction
display is inoperative.
Contact your nearest authorized
Mercedes-Benz Center.iSwitching on the ignition causes all in-
strument cluster lamps (except high
beam headlamp indicator lamp and
turn signal indicator lamps unless acti-
vated) as well as the multifunction dis-
play to come on. Make sure the lamps
and multifunction display are in work-
ing order before starting your journey.
Page 332 of 409

331 Practical hints
What to do if ...
Left display
Right display
Possible cause/
consequence
Possible solution
.
High beam
Left
The left high beam lamp is mal-
functioning.
�
Visit an authorized Mercedes-Benz Center as soon as
possible.
High beam
Right
The right high beam lamp is
malfunctioning.
�
Visit an authorized Mercedes-Benz Center as soon as
possible.
Left turn signal
Mirror
The left turn signal in the side
mirror is malfunctioning. This
message will only appear if all
light emitting diodes have
stopped working.
�
Have the LEDs replaced as soon as possible.
License plate
lamp, L
The left license plate lamp is
malfunctioning.
�
Visit an authorized Mercedes-Benz Center as soon as
possible.
License plate
lamp, R
The right license plate lamp is
malfunctioning.
�
Visit an authorized Mercedes-Benz Center as soon as
possible.
Light sensor
Drive to
workshop
The light sensor is malfunction-
ing. The headlamps switch on
automatically.
�
In the control system, set lamp operation to manual
(�page 132).
�
Switch on headlamps using the exterior lamp switch.
�
Visit an authorized Mercedes-Benz Center immediately.
Low beam
Left
The left low beam lamp is mal-
functioning.
�
Visit an authorized Mercedes-Benz Center as soon as
possible.
Page 334 of 409

333 Practical hints
What to do if ...
Left display
Right display
Possible cause/
consequence
Possible solution
.
Right turn signal
Mirror
The right turn signal in the side
mirror is malfunctioning. This
message will only appear if all
light emitting diodes have
stopped working.
�
Have the LEDs replaced as soon as possible.
Tail lamp
Left
Substitute
bulb on
The left tail lamp is malfunc-
tioning. This message will only
appear if a critical number of
LEDs have blown.
�
Visit an authorized Mercedes-Benz Center as soon as
possible.
Tail lamp
Right
Substitute
bulb on
The right tail lamp is malfunc-
tioning. This message will only
appear if a critical number of
LEDs have blown.
�
Visit an authorized Mercedes-Benz Center as soon as
possible.
Turn off
lamps
You have removed the Smart-
Key from the starter switch and
opened the driver’s door.
�
Turn the exterior lamp switch toM.
Turn signal
Front left
T h e l e f t f r o n t t u r n s i g n a l l a m p i s
malfunctioning.
�
Visit an authorized Mercedes-Benz Center as soon as
possible.
Turn signal
Front right
The right front turn signal lamp
is malfunctioning.
�
Visit an authorized Mercedes-Benz Center as soon as
possible.
Page 335 of 409
334 Practical hintsWhat to do if ...Left display
Right display
Possible cause/
consequence
Possible solution
.
Turn signal
Rear left
Substitute
bulb on
The left rear turn signal lamp is
malfunctioning. A backup bulb
has been brought into use.
�
Visit an authorized Mercedes-Benz Center as soon as
possible.
Turn signal
Rear right
Substitute
bulb on
The right rear turn signal lamp
is malfunctioning. A backup
bulb has been brought into use.
�
Visit an authorized Mercedes-Benz Center as soon as
possible.
Visit
workshop
The display for the lights is mal-
functioning.
�
Visit an authorized Mercedes-Benz Center as soon as
possible.
<
Seat belt system
Drive to
workshop
The seat belt system is mal-
functioning.
�
Visit an authorized Mercedes-Benz Center immediately.
L
Tele Aid
Drive to
workshop
One or more main functions of
the Tele Aid system are mal-
functioning.
�
Have the Tele Aid system checked by an authorized
Mercedes-Benz Center immediately.
Page 349 of 409

348 Practical hintsReplacing bulbsSafe vehicle operation depends on proper
exterior lighting and signaling. It is there-
fore essential that all bulbs and lamp as-
semblies are in good working order at all
times.
Correct headlamp adjustment is extremely
important. Have headlamps checked and
readjusted at regular intervals and when a
bulb has been replaced. See an authorized
Mercedes-Benz Center for headlamp ad-
justment.
!You must not change the bulbs or LEDs
yourself, as you could damage the vehi-
cle lighting systems.
Have blown bulbs or LEDs replaced by
an authorized Mercedes-Benz Center.iIf the headlamps are fogged up on the
inside as a result of high humidity, driv-
ing the vehicle a distance should clear
up the fogging.
iSubstitute bulbs will be brought into
use when lamps malfunction. Observe
the messages in the multifunction dis-
play (
�page 330).
iIf one of the following bulbs blows, an-
other bulb will adopt its function:�
Rear turn signals
�
Brake lamps
�
Side lamps
�
Tail lamps
Page 350 of 409
349 Practical hints
Replacing bulbs
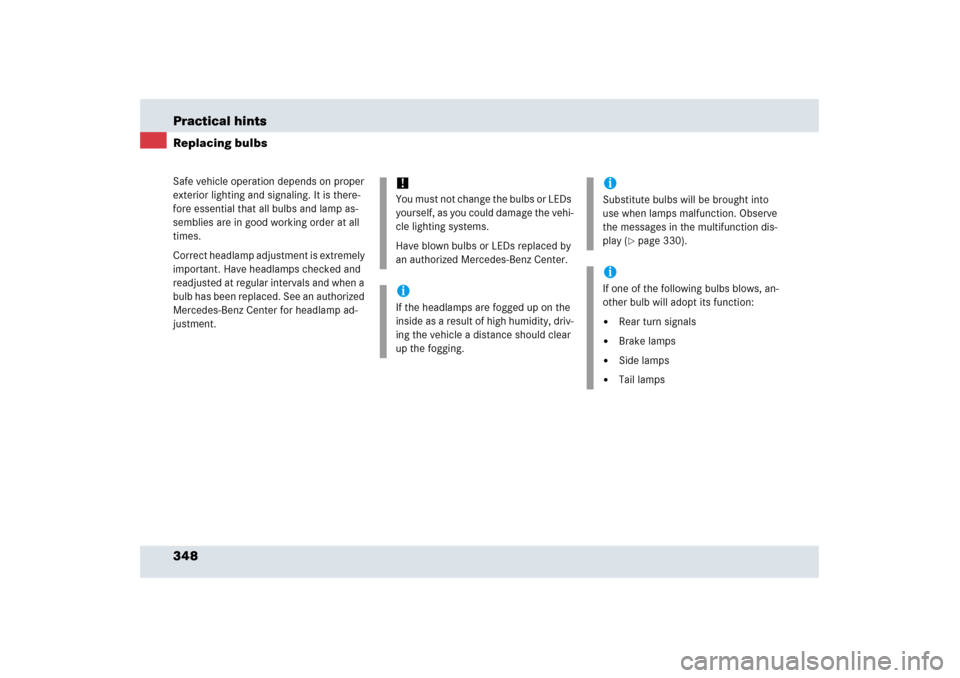
Front lamps
Rear lamps
Lamp
Type
1
Additional turn signal
LEDs
2
Turn signal
PY, 21 W
3
Side marker lamp
WY 5 W
4
Parking lamp
W5W
5
Low and high beam
lamp
D2S, 35 W
6
High beam flasher
H7, 55 W
7
Front fog lamp
H3, 55 W
Lamp
Type
8
Brake/parking lamp
LEDs
9
Turn signal lamp
LEDs
a
Side marker lamp
P 21 W
b
High mounted brake
lamp
LEDs
c
License plate lamp
C 5 W
d
Rear fog lamp
P 21 W
e
Backup lamp
P 21 W
f
Reflector
-
Page 362 of 409

361 Practical hints
Towing the vehicle
Prior to towing the vehicle with all wheels on
the ground, make certain that the SmartKey
is in starter switch position2.
If the SmartKey is left in starter switch
position0 for an extended period of time, it
can no longer be turned in the switch. In this
case, the steering is locked. To unlock, re-
move SmartKey from starter switch and re-
insert.iTo signal turns while being towed with
the hazard warning flasher in use, turn
SmartKey in starter switch to
position2 and activate the combina-
tion switch for the left or right turn sig-
nal in the usual manner – only the
selected turn signal will operate.
Upon canceling the turn signal, the haz-
ard warning flasher will operate again.
Warning!
G
The brake system requires electrical power
to operate.
A malfunction in the vehicle’s power supply
or electrical system may impair brake sys-
tem operation and switch it into its emer-
gency operation mode. To brake, the driver
must then apply significantly greater brake
pedal pressure and depress the pedal much
further to obtain the expected braking ef-
fect. If necessary, apply full pressure to the
brake pedal. Brakes are only applied to the
front wheels. Stopping distance is in-
creased! Adapt your driving style according-
ly. For more information, see
“Electrohydraulic brake system”
(�page 84).
With the engine not running, there is no
power assistance for the brake and steering
systems. In this case, it is important to keep
in mind that a considerably higher degree of
effort is necessary to brake and steer the ve-
hicle. Adapt your driving accordingly.
!Towing of the vehicle should only be
done using the properly installed tow-
ing eye bolt. Never attach tow cable,
tow rope or tow rod to the vehicle chas-
sis, frame or suspension parts.iWhen towing the vehicle with all wheels
on the ground, please note the follow-
ing:
With the automatic central locking acti-
vated and the SmartKey in starter
switch position2 the vehicle doors
lock if the left front wheel as well as the
right rear wheel are turning at vehicle
speeds of approximately 9 mph
(15 km/h) or more.
To prevent the vehicle door locks from
locking, deactivate the automatic
central locking (
�page 137).