Page 84 of 409

83 Safety and Security
Driving safety systems
Switching off the ESP
®
To improve the vehicle’s traction, turn off
the ESP
® in driving situations where it
would be advantageous to have the drive
wheels spin and thus cut into surfaces for
better grip such as:
�
when driving with snow chains
�
in deep snow
�
in sand or gravelWhen you switch off the ESP
®
�
the ESP
® does not stabilize the vehicle
�
the engine output is not limited, which
allows the drive wheels to spin and
thus cut into surfaces for better grip
�
the traction control will still brake a
spinning wheel
�
the ESP
® continues to operate when
you are braking
Turn on the ESP
® immediately if the afore-
mentioned circumstances do not apply
anymore.The switch is located on the lower part of
the center console.
1ESP
® switch (off/on)
�
Press switch1.
The v ABS/ESP
® warning lamp in
the instrument cluster comes on.
The ESP
® is deactivated.
Warning!
G
The ESP
® should not be switched off during
normal driving other than in the circum-
stances described below. Disabling of the
system will reduce vehicle stability in stan-
dard driving maneuvers.
iWhen the ESP
® is switched off and one
or more drive wheels are spinning, the
v ABS/ESP® warning lamp in the
instrument cluster flashes. However,
the ESP
® will then not stabilize the ve-
hicle.
Page 95 of 409
Controls in detailLocking and unlocking
Lighting
Instrument cluster
Control system
Audio system
Automatic transmission
Good visibility
Automatic climate control
Power windows
Driving systems
Useful features
Page 110 of 409
�
Switch on the front fog lamps
(�page 108).
�
Pull out the exterior lamp switch to
second stop.
The rear fog lamp switches on.
Th")
109 Controls in detail
Lighting
Rear fog lamp (driver’s side only)�
Switch on the front fog lamps
(�page 108).
�
Pull out the exterior lamp switch to
second stop.
The rear fog lamp switches on.
The yellow indicator lamp† in the
exterior lamp switch comes on.
�
Push in the exterior lamp switch to first
stop.
The rear fog lamp switches off.
The yellow indicator lamp† in the
exterior lamp switch goes out.
The front fog lamps remain lit.
Combination switch
The combination switch is located on the
left of the steering column.Combination switch1High beam
2High beam flasherHigh beam
�
Turn the exterior lamp switch to
positionB orU (
�page 105).
�
Push the combination switch in
direction of arrow1 to switch on the
high beam.
The high beam headlamp indicator
lampA in the instrument cluster
comes on (
�page 29).
�
Pull the combination switch in direction
of arrow2 to its original position to
switch off the high beam.
The high beam headlamp indicator
lampA in the instrument cluster
goes out.
High beam flasher
�
Pull the combination switch briefly in
direction of arrow2.
Page 114 of 409
113 Controls in detail
Instrument cluster
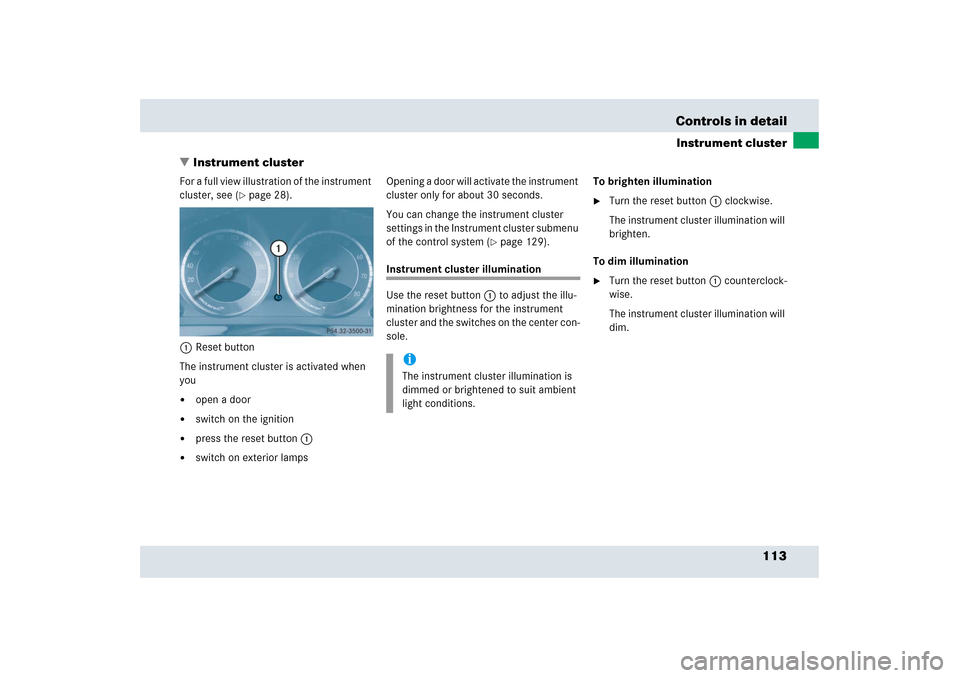
�Instrument cluster
For a full view illustration of the instrument
cluster, see (
�page 28).
1Reset button
The instrument cluster is activated when
you
�
open a door
�
switch on the ignition
�
press the reset button1
�
switch on exterior lampsOpening a door will activate the instrument
cluster only for about 30 seconds.
You can change the instrument cluster
settings in the Instrument cluster submenu
of the control system (
�page 129).
Instrument cluster illumination
Use the reset button1 to adjust the illu-
mination brightness for the instrument
cluster and the switches on the center con-
sole.To brighten illumination
�
Turn the reset button1 clockwise.
The instrument cluster illumination will
brighten.
To dim illumination
�
Turn the reset button1 counterclock-
wise.
The instrument cluster illumination will
dim.
iThe instrument cluster illumination is
dimmed or brightened to suit ambient
light conditions.
Page 115 of 409
114 Controls in detailInstrument clusterCoolant temperature gaugeDuring severe operating conditions, e.g.
stop-and-go traffic, the coolant tempera-
ture may rise close to 248°F (120°C).
The engine should not be operated with
the coolant temperature above 248°F
(120°C). Doing so may cause serious en-
gine damage which is not covered by the
Mercedes-Benz Limited Warranty.Warning!
G
�
Driving when your engine is badly over-
heated can cause some fluids which
may have leaked into the engine com-
partment to catch fire. You could be se-
riously burned.
�
Steam from an overheated engine can
cause serious burns an can occur just by
opening the hood. Stay away from the
engine if you see or hear steam coming
from it.
Turn off the engine, get out of the vehicle
and do not stand near the vehicle until the
engine has cooled down.
!Excessive coolant temperature triggers
the coolant temperature warning lamp
(�page 302) and a warning in the
multifunction display (
�page 323).
Page 116 of 409
.
�
If it is not displayed, press b")
115 Controls in detail
Instrument cluster
Resetting the trip odometer�
Make sure you are viewing the trip
odometer in the right multifunction dis-
play (
�page 117).
�
If it is not displayed, press buttonè
orÿ on the multifunction steering
wheel until the trip odometer appears
in the right multifunction display.
�
Press and hold the reset button1
(�page 113) until the trip odometer is
reset.
Tachometer
The red marking on the tachometer
(�page 29) denotes excessive engine
speed.
To help protect the engine, the fuel supply
is interrupted if the engine is operated
within the red marking.
Outside temperature indicator
The outside temperature is displayed in
the left multifunction display (
�page 117).
For information on how to select the unit of
the displayed temperature, i.e. degrees
Celsius (°C) or degrees Fahrenheit (°F),
see “Selecting temperature display mode”
(
�page 129).
!Avoid driving at excessive engine
speeds, as it may result in serious
engine damage that is not covered by
the Mercedes-Benz Limited Warranty.
Warning!
G
The outside temperature indicator is not de-
signed to serve as an ice-warning device and
is therefore unsuitable for that purpose.
Indicated temperatures just above the freez-
ing point do not guarantee that the road sur-
face is free of ice. The road may still be icy,
especially in wooded areas or on bridges.
Page 117 of 409
116 Controls in detailInstrument clusterThe temperature sensor is located in the
front bumper area. Due to its location, the
sensor can be affected by road or engine
heat during idling or slow driving. There-
fore, the accuracy of the displayed temper-
ature can only be verified by comparison to
a thermometer placed next the sensor, not
by comparison to external displays, e.g.
bank signs, etc.
When moving the vehicle into colder ambi-
ent temperatures (e.g. when leaving your
garage), you will notice a delay before the
lower temperature is displayed.
A delay also occurs when ambient temper-
atures rise. This prevents inaccurate tem-
perature indications caused by heat
radiated from the engine during idling or
slow driving.
Page 118 of 409

117 Controls in detail
Control system
�Control system
The control system is activated as soon as
the SmartKey in the starter switch is
turned to position1. The control system
enables you to�
call up information about your vehicle
�
change vehicle settings
For example, you can use the control sys-
tem to find out when your vehicle is next
due for service, to set the language for
messages in the instrument cluster dis-
play, and much more.
The control system relays information to
the multifunction display.
Multifunction display
The multifunction display consists of the
display fields in the speedometer and the
tachometer. In its default state, the left
display field shows the outside tempera-
ture and main odometer, while the trip
odometer and the clock appears in the
right display field. This default setting is re-
ferred to as the standard display.Standard display1Main odometer
2Outside temperature
3Current gear selector lever posi-
tion/gear range
4Trip odometer
5Automatic transmission shift program
mode
6Clock
Warning!
G
A driver’s attention to the road and traffic
conditions must always be his/her primary
focus when driving.
For your safety and the safety of others, se-
lecting features through the multifunction
steering wheel should only be done by the
driver when traffic and road conditions per-
mit it to be done safely.
Bear in mind that at a speed of just 30 mph
(approximately 50 km/h), your vehicle is
covering a distance of 44 feet (approximate-
ly 14 m) every second.

.
The engine")
