Page 102 of 409

101 Controls in detail
Locking and unlocking
The vehicle must be unlocked.�
Pull on handle2 and lift the trunk lid.
The trunk can also be opened using
buttonŠ on the SmartKey or from its
inside in an emergency, see “Trunk emer-
gency release” (
�page 102).
Opening the trunk from the inside
You can open the trunk from the inside if
the vehicle is stationary.
A minimum height clearance of
5.5 ft (1.65 m) is required to open the
trunk lid.
The switch is located on the lower part of
the center console.1Remote trunk opening switch
�
Press remote trunk lid release
switch1 until the trunk lid unlocks
and opens slightly.
�
Lift the trunk lid.
The trunk can also be opened using
buttonŠ on the SmartKey or from its
inside in an emergency, see “Trunk emer-
gency release” (
�page 102).
Closing the trunk lid
1Handle
!Always make sure that there is suffi-
cient overhead clearance.
!Always make sure that there is suffi-
cient overhead clearance.
Warning!
G
To prevent possible personal injury, always
keep hands and fingers away from the trunk
opening when closing the trunk lid. Be espe-
cially careful when small children are
around.
Only drive with the trunk closed as, among
other dangers such as blocked visibility, ex-
haust fumes may enter the vehicle interior.
Page 106 of 409

and (
�page 53).
Exterior lamp swi")
105 Controls in detail
Lighting
�Lighting
For information on how to switch on the
headlamps and use the turn signals, see
“Switching on headlamps” (
�page 52)
and (
�page 53).
Exterior lamp switch
The exterior lamp switch is located on the
dashboard to the left of the steering wheel.
MOff
UAutomatic headlamp mode
CParking lamps (also tail lamps,
license plate lamps, side marker
lamps, instrument panel lamps)
BLow beam headlamps (or high
beam headlamps when the
combination switch is pushed
forward) and parking lampsˆStanding lamps, right (turn left one
stop)
‚Standing lamps, left (turn left two
stops)
iIf you drive in countries where vehicles
drive on the other side of the road than
the country where the vehicle is regis-
tered, you must have the headlamps
modified for symmetrical low beams.
Relevant information can be obtained
at your authorized Mercedes-Benz
Center.
iIf you remove the SmartKey from the
starter switch and open the driver’s
door while the parking lamps or low
beam headlamps are switched on, then �
a warning sounds
�
$ appears in the left multifunc-
tion display
�
the message
Turn off lamps
appears in right multifunction dis-
play
Page 107 of 409

106 Controls in detailLightingManual headlamp mode
The low beam headlamps and the parking
lamps can be switched on and off with the
exterior lamp switch.
Automatic headlamp mode
The following lamps switch on and off
automatically depending on the brightness
of the ambient light:�
Low beam headlamps
�
Tail and parking lamps
�
License plate lamps
�
Side marker lamps
�
Turn the exterior lamp switch to
positionU.
With the SmartKey in starter switch
position1, only the parking lamps will
switch on and off automatically.
When the engine is running, the low
beam headlamps, the tail and parking
lamps, the license plate lamps, and the
side marker lamps will switch on and
off automatically.
Warning!
G
If the exterior lamp switch is set toU,�
the headlamps may switch off unexpect-
edly when the system senses bright
ambient light, for example light from
oncoming traffic.
�
the headlamps will not be automatically
switched on under foggy conditions.
To minimize risk to you and to others,
activate headlamps by turning exterior lamp
switch toB when driving or when traffic
and/or ambient lighting conditions require
you to do so.
In low ambient lighting conditions, only
switch from positionU toB with the
vehicle at a standstill in a safe location.
Switching fromU toB will briefly
switch off the headlamps. Doing so while
driving in low ambient lighting conditions
may result in an accident.
The automatic headlamp feature is only an
aid to the driver. The driver is responsible for
the operation of the vehicle's lights at all
times.iFog lamps cannot be switched on with
the exterior lamp switch in
positionU. For switching on the fog
lamps, turn the exterior lamp switch to
positionB first.
Page 109 of 409

108 Controls in detailLightingLocator lighting and night security
illumination
The locator lighting and the night security
illumination are described in the “Control
system” section, see “Setting locator light-
ing” (
�page 133) and “Setting night secu-
rity illumination” (
�page 134).
Fog lampsFront fog lamps
�
Switch on the low beam headlamps
(�page 105).
�
Pull out the exterior lamp switch to first
stop.
The front fog lamps switch on.
The green indicator lamp‡ in the
exterior lamp switch comes on.
�
Push in the exterior lamp switch.
The front fog lamps switch off.
The green indicator lamp‡ in the
exterior lamp switch goes out.
Warning!
G
In low ambient lighting or foggy conditions,
only switch from positionU toB with
the vehicle at a standstill in a safe location.
Switching fromU toB will briefly
switch off the headlamps. Doing so while
driving in low ambient lighting conditions
may result in an accident.
iFog lamps will operate with the parking
lamps and/or the low beam headlamps
on. Fog lamps should only be used in
conjunction with low beam headlamps.
Consult your State or Province Motor
Vehicle Regulations regarding permis-
sible lamp operation.iFog lamps cannot be switched on with
the exterior lamp switch in
positionU. For switching on the fog
lamps, turn the exterior lamp switch to
positionB first.
Page 111 of 409
110 Controls in detailLightingHazard warning flasher
The hazard warning flasher can be
switched on at all times, even with the
SmartKey removed from the starter
switch.
The hazard warning flasher switches on
automatically when an airbag deploys.
The hazard warning flasher switch is
located on the upper part of the center
console.
1Hazard warning flasher switchSwitching on hazard warning flasher
�
Press hazard warning flasher
switch1.
All turn signals are flashing.Switching off hazard warning flasher
�
Press hazard warning flasher switch1
again.
iWith the hazard warning flasher
activated and the combination switch
set for either left or right turn, only the
respective turn signals will operate
when the ignition is switched on.
iIf the hazard warning flasher has been
activated automatically, press hazard
warning flasher switch1 once to
switch it off.
Page 157 of 409

156 Controls in detailAudio systemCD changer operation
General notes
Should excessively high temperatures oc-
cur while in CD mode,
CD TEMP HIGH
will
appear on the display and the CD will be
muted. The unit will then switch back to
the last operating mode used until the tem-
perature has decreased to a safe operating
level.
Should excessively low temperatures oc-
cur while in CD mode,
CD TEMP LOW
will ap-
pear on the display, but the CD will
continue to play.
Handle CDs carefully to prevent interfer-
ence during playback. Avoid fingerprints
and dust on CDs. Do not write on CDs or
apply any labels or other material to them.Only use original CDs. Using copied CDs
may create problems during playback.
Clean CDs from time to time with a com-
mercially available cleaning cloth. Do not
use solvents, anti-static sprays, etc. for
cleaning. Replace the CD in its case after
use. Protect CDs from heat and direct sun-
light.
Only use CDs, which bear the label shown
and that conform to the compact disc
digital audio standard (IEC 60908). You
can therefore only use CDs with a maxi-
mum thickness of 1.3 mm.
iUse of CDs which do not meet this
standard may cause damage to the CD
changer. Do not play single-CDs
(80 mm) with an adapter.
Your CD drive has been designed to
play CDs which correspond to the
IEC 60908 standard.
If you insert thicker data carriers, e.g.
ones that have data on both sides (one
side with DVD data, the other side with
audio data), they cannot be ejected and
will damage the drive.Warning!
G
The CD changer is a Class 1 laser product.
There is a danger of invisible laser radiation
if the cover is opened or damaged.
Do not remove the cover. The CD changer
does not contain any parts which can be ser-
viced by the user. For safety reasons, have
any service work which may be necessary
performed only by qualified personnel.
Page 175 of 409
174 Controls in detailAutomatic transmissionStopping
When you stop briefly, e.g. at traffic lights:�
Leave the transmission in gear.
�
Hold the vehicle with the brake.
When you stop longer with the engine
idling and/or on a hill:
�
Set the parking brake.
�
Move the gear selector lever to
positionP.Maneuvering
When you maneuver in tight areas,
e.g. when pulling into a parking space:
�
Control the vehicle speed by gradually
releasing the brakes.
�
Accelerate gently.
�
Never abruptly step on the accelerator.
Working on the vehicle
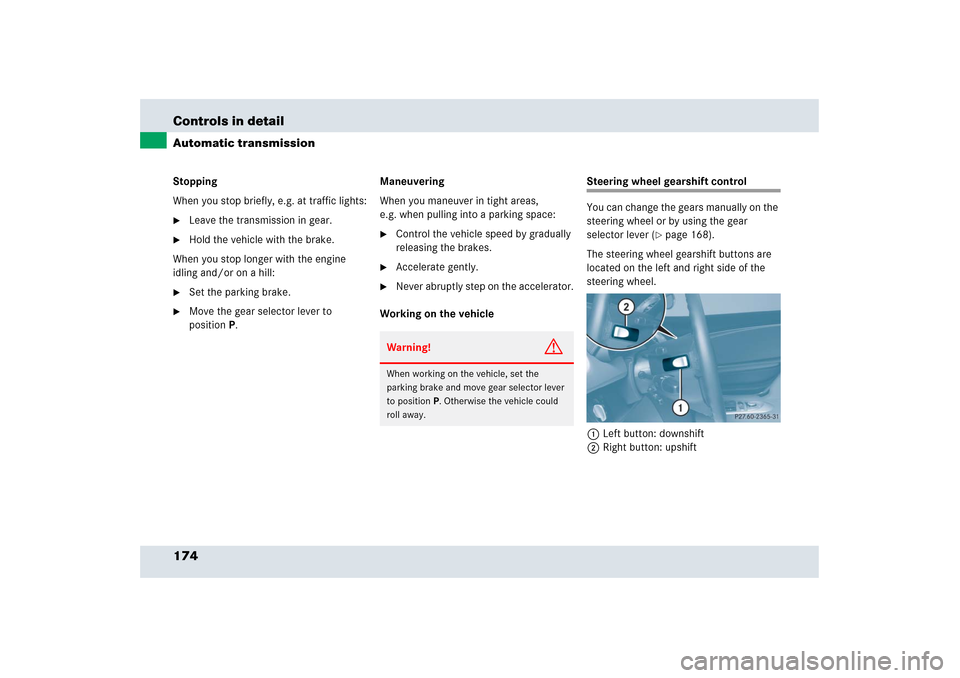
Steering wheel gearshift control
You can change the gears manually on the
steering wheel or by using the gear
selector lever (
�page 168).
The steering wheel gearshift buttons are
located on the left and right side of the
steering wheel.
1Left button: downshift
2Right button: upshift
Warning!
G
When working on the vehicle, set the
parking brake and move gear selector lever
to positionP. Otherwise the vehicle could
roll away.
Page 180 of 409
 and adjusting the mirrors,
see (�page 44).
Headlamp cleaning system
The switch is lo")
179 Controls in detail
Good visibility
�Good visibility
For information on the windshield wipers,
see (
�page 54) and adjusting the mirrors,
see (�page 44).
Headlamp cleaning system
The switch is located on the left side of the
dashboard.
1To clean the headlamps�
Switch on the ignition (
�page 40).
�
Press switch 1.
The headlamps are cleaned with a
high-pressure water jet.For information on filling up the washer
reservoir, see “Windshield washer system
and headlamp cleaning system”
(
�page 252).
Rear view mirrors
For more information on setting the rear
view mirrors, see “Mirrors” (
�page 44).
Auto-dimming mirror
The reflection brightness of the interior
rear view mirror will respond automatically
to glare when
�
the ignition is switched on
and
�
incoming light from headlamps falls on
the sensor in the interior rear view
mirror.
The rear view mirror will not react if
�
reverse gearR is engaged
�
the interior lighting is turned on
Warning!
G
The auto-dimming function does not react if
incoming light is not aimed directly at sen-
sors in the interior rear view mirror.
Glare can endanger you and others.Warning!
G
In case of an accident, liquid electrolyte may
escape from the mirror housing if the mirror
glass breaks.
Electrolyte has an irritating effect. Do not
allow the liquid to come into contact with
eyes, skin, clothing, or respiratory system.
In case it does, immediately flush affected
area with water, and seek medical help if
necessary.