Page 387 of 481

386 Practical hintsWhat to do if ….
Turn off
lights
You have forgotten to switch off the
headlamps when exiting the vehicle
and no SmartKey is in the starter
switch.
�
Switch off the headlamps.
Turn signal in
mirror, left
T h e l e f t t u r n s i g n a l i n t h e s i d e m i r r o r
is malfunctioning. This message will
only appear if a critical number of
LEDs have stopped working.
�
Visit an authorized Mercedes-Benz Center
as soon as possible.
Turn signal in
mirror, right
The right turn signal in the side mir-
ror is malfunctioning. This message
will only appear if a critical number
of LEDs have stopped working.
�
Visit an authorized Mercedes-Benz Center
as soon as possible.
Turn signal
,
front left
The left front turn signal is malfunc-
tioning.
�
Replace the bulb as soon as possible.
Turn signal
,
front right
The right front turn signal is mal-
functioning.
�
Replace the bulb as soon as possible.
Rear left turn signal
Back-up lamp on
The left rear turn signal is malfunc-
tioning. A backup bulb has been
brought into use.
�
Replace the bulb as soon as possible.
Rear right turn signal
Back-up lamp on
The right rear turn signal is malfunc-
tioning. A backup bulb has been
brought into use.
�
Replace the bulb as soon as possible.
Display symbol
Display message
Possible cause/consequence
Possible solution
Page 402 of 481
401 Practical hints
Replacing bulbs
Bulbs Front lamps Rear lamps
Lamp
Type
1
Additional turn signal
lamp
LED
2
Turn signal lamp
PY 21 W
3
Halogen headlamp:
Low beam
H7 (55 W)
Bi-Xenon* headlamp:
Low and high beam
1
1Vehicles with Bi-Xenon* headlamps: Low beam
and high beam use the same D2S-35W lamp. Do
not replace the Bi-Xenon* bulbs yourself. See an
authorized Mercedes-Benz Center.
D2S-35W
4
Front fog lamp
HB4 (51 W)
5
Parking and standing
lamp
W5W
6
Halogen headlamp:
High beam/high beam
flasher
H7 (55 W)
Bi-Xenon* headlamp:
High beam flasher
H7 (55 W)
7
Side marker lamp
W5W
Lamp
Type
8
Rear fog lamp (driver’s
side only)
P21W
9
High mounted brake
lamp
LED
a
Tail, parking, standing,
side marker lamp and
brake lamp
LED
b
License plate lamps
C5W
c
Backup lamp
P21W
d
Turn signal lamp
PY 21 W
iVehicles equipped with
corner-illuminating front fog lamps*:
Front fog lamps use H7 (55 W) lamps.
Page 403 of 481

402 Practical hintsReplacing bulbs
Notes on bulb replacement�
Only use 12-volt bulbs of the same type
and with the specified watt rating.
�
Switch lights off before changing a bulb
to prevent short circuits.
�
Always use a clean lint-free cloth when
handling bulbs.
�
Your hands should be dry and free of oil
and grease.
�
If the newly installed bulb does not
come on, visit an authorized
Mercedes-Benz Center.Have the LEDs and bulbs for the following
lamps replaced by an authorized
Mercedes-Benz Center:
�
Additional turn signal lamps in the
exterior rear view mirrors
�
Bi-Xenon* lamps
�
Front fog lamps
�
High mounted brake lamp
�
Brake lamps
�
Front and rear side marker lamps
�
Parking/standing lamps in the tail
lamp assemblies
Warning!
G
Bulbs and bulb sockets can be very hot. Al-
low the lamp to cool down before changing
a bulb.
Keep bulbs out of reach of children.
Halogen lamps contain pressurized gas.
A bulb can explode if you:�
touch or move it when hot
�
drop the bulb
�
scratch the bulb
Wear eye and hand protection.
Because of high voltage in Xenon lamps, it is
dangerous to replace the bulb or repair the
lamp and its components. We recommend
that you have such work done by a qualified
technician.
iHave the headlamp adjustment
checked regularly.
Page 404 of 481
403 Practical hints
Replacing bulbs
Replacing bulbs for front lamps
Before you start to replace a bulb for a
front lamp, do the following first:�
Turn the exterior lamp switch to
positionM (
�page 110).
�
Open the hood (
�page 307).
1Housing cover for low beam (halogen
headlamps only)
Housing cover for Bi-Xenon* head-
lamps. Do not remove.
2Bulb socket for turn signal lamp
3Bulb socket for high beam/high beam
flasher lamp
4Bulb socket for parking and standing
light lamp
5Bulb socket for low beam bulb
(Halogen headlamps only)
Warning!
G
Do not remove the cover1 for the
Bi-Xenon* headlamp. Because of high volt-
age in Bi-Xenon lamps, it is dangerous to re-
place the bulb or repair the lamp and its
components. We recommend that you have
such work done by a qualified technician.
Page 405 of 481
�
Turn housing cover1 counterclock-
wise and remove.
�
Turn bulb socket5 with the bulb
counterclockwise and remove.
�
Pull the")
404 Practical hintsReplacing bulbsLow beam bulb (Halogen headlamps
only)�
Turn housing cover1 counterclock-
wise and remove.
�
Turn bulb socket5 with the bulb
counterclockwise and remove.
�
Pull the bulb out of bulb socket5.
�
Press the new bulb into bulb socket5.
�
Place bulb socket5 back into the
lamp and turn it clockwise.
�
Reinstall housing cover1.High beam/high beam flasher bulb
(Halogen headlamps) / High beam
flasher bulb (Bi-Xenon* headlamps)
�
Turn bulb socket3 with the bulb
counterclockwise and remove.
�
Pull the bulb out of bulb socket3.
�
Press the new bulb into bulb socket3.
�
Place bulb socket3 back into the
lamp and turn it clockwise.Front turn signal bulb
�
Turn bulb socket2 with the bulb
counterclockwise and remove.
�
Press gently onto the bulb and turn it
counterclockwise out of bulb
socket2.
�
Press the new bulb gently into bulb
socket2 and turn it clockwise.
�
Place bulb socket2 back into the
lamp and turn it clockwise.
Parking and standing lamp bulb
�
Turn bulb socket4 with the bulb
counterclockwise and remove.
�
Pull the bulb out of bulb socket4.
�
Press the new bulb into bulb socket4.
�
Place bulb socket4 back into the
lamp and turn it clockwise.
Page 406 of 481
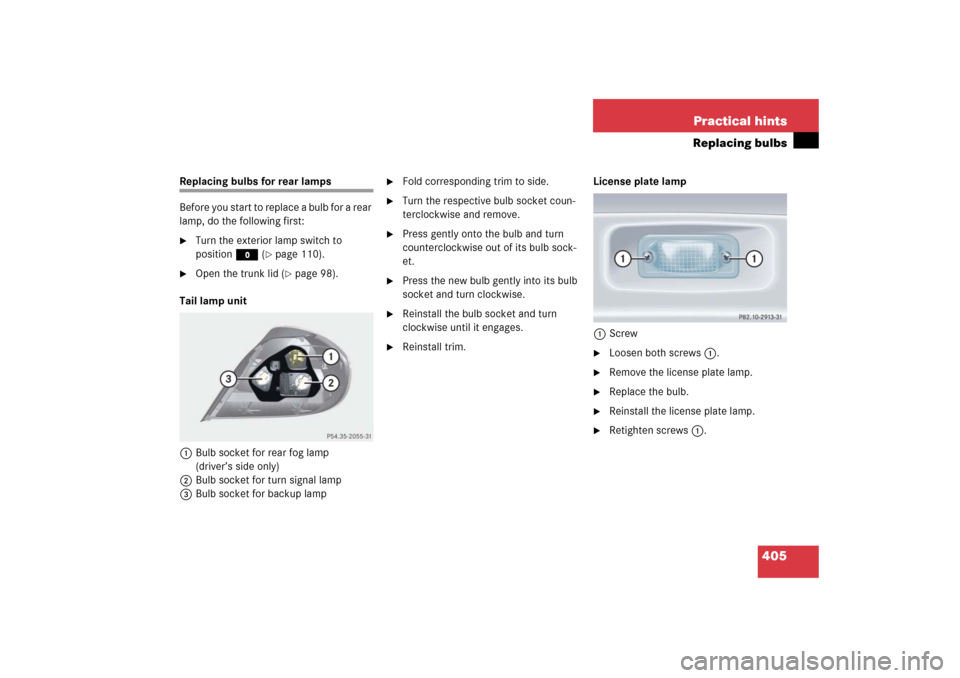
405 Practical hints
Replacing bulbs
Replacing bulbs for rear lamps
Before you start to replace a bulb for a rear
lamp, do the following first:�
Turn the exterior lamp switch to
positionM (
�page 110).
�
Open the trunk lid (
�page 98).
Tail lamp unit
1Bulb socket for rear fog lamp
(driver’s side only)
2Bulb socket for turn signal lamp
3Bulb socket for backup lamp
�
Fold corresponding trim to side.
�
Turn the respective bulb socket coun-
terclockwise and remove.
�
Press gently onto the bulb and turn
counterclockwise out of its bulb sock-
et.
�
Press the new bulb gently into its bulb
socket and turn clockwise.
�
Reinstall the bulb socket and turn
clockwise until it engages.
�
Reinstall trim.License plate lamp
1Screw
�
Loosen both screws1.
�
Remove the license plate lamp.
�
Replace the bulb.
�
Reinstall the license plate lamp.
�
Retighten screws1.
Page 428 of 481

427 Practical hints
Towing the vehicle
Warning!
G
If circumstances require towing the vehicle
with all wheels on the ground, always tow
with a tow bar if:�
the engine will not run
�
there is a malfunction in the power sup-
ply or in the vehicle’s electrical system
as that will be necessary to adequately con-
trol the towed vehicle.
Prior to towing the vehicle with all wheels on
the ground, make sure the SmartKey is in
starter switch position2.
If the SmartKey is left in starter switch
position0 for an extended period of time, it
can no longer be turned in the switch. In this
case, the steering is locked. To unlock, re-
move SmartKey from starter switch and re-
insert.
Warning!
G
With the engine not running, there is no
power assistance for the brake and steering
systems. In this case, it is important to keep
in mind that a considerably higher degree of
effort is necessary to brake and steer the ve-
hicle. Adapt your driving accordingly.iTo signal turns while being towed with
the hazard warning flasher in use,
switch on ignition and activate the
combination switch for the left or right
turn signal in the usual manner – only
the selected turn signal will operate.
Upon canceling the turn signal, the haz-
ard warning flasher will operate again.
!When towing the vehicle with all wheels
on the ground, please note the follow-
ing:
With the automatic central locking acti-
vated and the SmartKey in starter
switch position2, the vehicle doors
lock if the left front wheel as well as the
right rear wheel are turning at vehicle
speeds of approx. 9 mph (15 km/h) or
more.
To prevent the vehicle door locks from
locking, deactivate the automatic cen-
tral locking (
�page 101).
Switch off the tow-away alarm
(
�page 88).
The vehicle should only be towed using
a properly installed towing eye bolt.
Never attach a tow cable, tow rope or
tow rod to the vehicle chassis, frame or
suspension parts.
Page 467 of 481

Replacing")
466 IndexB
BabySmart
TM
Air bag deactivation system 457
Compatible child seats 76, 457
Passenger front air bag off indicator
lamp 77
Back-up lamp 401
Bar 344
BAS 83, 457
Battery (SmartKey)
Replacing 398
Battery (Vehicle) 314, 421
Jump starting 424
Bead 344
Bi-Xenon* 457
Headlamps 401
Brake Assist System see BAS
Brakes 294
Brake fluid 306, 451
Display message 375
SLK 55 AMG 295
Warning lamp 363
Break-in period 292
Bulbs
Front/rear lamps 401
Replacing 400, 401C
CAC 457
California, important notice 11
CAN system 458
Capacities (Fuels, coolants, lubricants,
etc.) 449
Cargo compartment cover 253
Carpets, cleaning 359
Catalytic converter 302
CD
Changer* 219, 266
Player/Changer*, operation 131,
219
CD changer* (Audio system) 223
Center console 28
Lamp 367
Central locking
Automatic 101, 147
From outside (SmartKey) 62
Locking/unlocking from inside 102
Certification label 436
CHECK ENGINE indicator lamp 364
Child safety
Air bags 66
Children in the vehicle 75Cigarette lighter 270
Cleaning tires 319
Climate control 178
Air conditioning 187
Air recirculation mode 185
Control panel, overview 179
Switching on/off 181
Clock 122
Cockpit 458
Overview 22
Cold tire inflation pressure 344
Collapsible tire 458
Collapsible wheel chock 390
COMAND* 122, 458
Navigation 132
Radio transmitter 301
Combination switch 114
High beam flasher 114
High beam headlamps 55, 114
Low beam headlamps 55
Turn signals 55
Windshield wipers 56
Comfort driving
Transmission program mode* 163
Compatible child seat see BabySmart
TM

Bi-Xenon* headlamp:
Low")