Page 116 of 481
115 Controls in detail
Lighting
High beam�
Turn the exterior lamp switch to
positionBorU (
�page 110).
�
Push the combination switch in direc-
tion of arrow1 to switch on the high
beam.
The high beam headlamp indicator
lampA in the instrument cluster
comes on (
�page 24).
�
Pull the combination switch in direction
of arrow2 to its original position to
switch off the high beam.
The high beam headlamp indicator
lampA in the instrument cluster
goes out.
High beam flasher
�
Pull the combination switch briefly in
direction of arrow2.Corner-illuminating front fog lamps*
(SLK 280, SLK 350: with Bi-Xenon*
headlamps and without
Sport Package*)
The corner-illuminating front fog lamps im-
prove illumination of the road onto which
you are turning.
The corner-illuminating front fog lamps will
operate with the engine running and with�
the exterior lamp switch in
positionB (
�page 110)
or
�
the exterior lamp switch in
positionU (
�page 110)
or
�
the daytime running lamp mode
activated (
�page 112)Driving forward
Switching on corner-illuminating front
fog lamps
�
Depending on whether you are turning
left or right, switch on the left or right
turn signal (
�page 55).
The respective front fog lamp comes on
and illuminates the road onto which
you are turning.
iCorner-illuminating front fog lamps will
only come on in low ambient lighting
conditions.
The corner-illuminating front fog lamps
function is not available at a vehicle
speed above 25 mph (40 km/h).
��
Page 117 of 481
116 Controls in detailLighting
Switching off corner-illuminating front
fog lamps
The combination switch for the turn signal
resets automatically after major steering
wheel movements. This will switch off the
corner-illuminating front fog lamps if they
where activated by switching on the left or
right turn signal.
If the turn signal should stay on after mak-
ing the turn, the turn signal and corner-illu-
minating front fog lamp can be switched
off by returning the combination switch to
its original position.Driving rearward
Switching on corner-illuminating front
fog lamps
�
Place the gearshift lever (gear selector
lever*) in positionR.
The inverse front fog lamp comes on
automatically depending on the
steering direction and steering angle.
Switching off corner-illuminating front
fog lamps
�
Place the gearshift lever (gear selector
lever*) out of positionR.
The respective front fog lamp goes out.
iThe respective corner-illuminating
front fog lamp will stay lit until you
switch off the turn signal, even if the
steering wheel is in the straight-ahead
position.
The respective corner-illuminating
front fog lamp may stay on for a brief
period after the turn signal is switched
off.
The respective corner-illuminating
front fog lamp stays on for a maximum
of 3 minutes. After that period, it will go
out even if the turn signal is still on.iThe corner-illuminating front fog lamps
will come on automatically depending
on the steering angle, even if you did
not switch on either turn signal.
If the corner-illuminating front fog
lamps came on automatically, they will
also go out automatically depending on
the steering angle.
��
Page 118 of 481
117 Controls in detail
Lighting
Hazard warning flasher
The hazard warning flasher can be
switched on at all times, even with the
SmartKey removed from the starter
switch.
The hazard warning flasher switches on au-
tomatically when an air bag deploys.
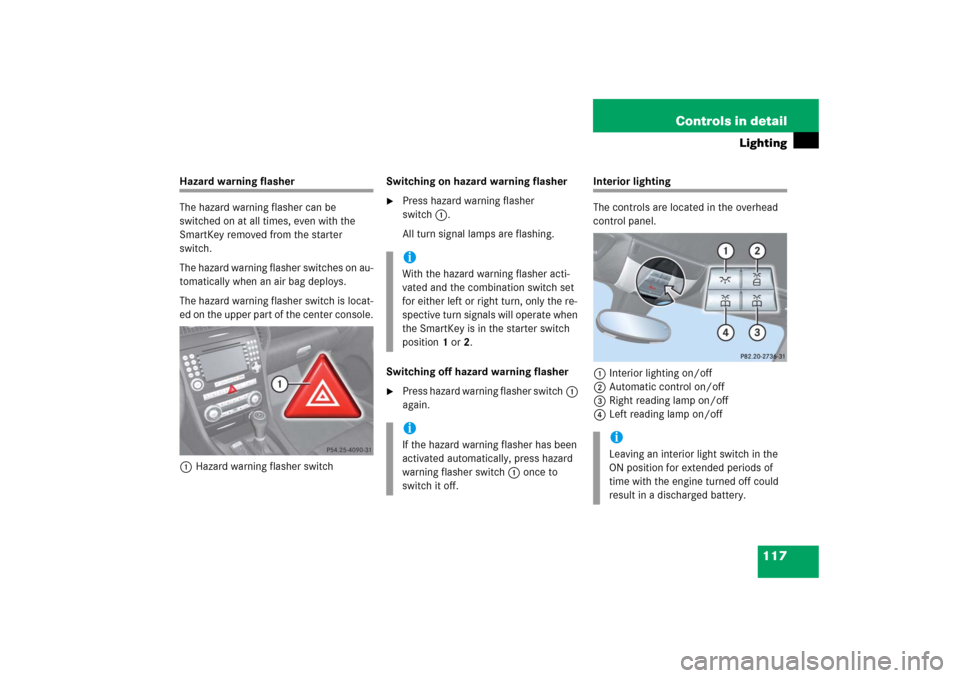
The hazard warning flasher switch is locat-
ed on the upper part of the center console.
1Hazard warning flasher switchSwitching on hazard warning flasher
�
Press hazard warning flasher
switch1.
All turn signal lamps are flashing.
Switching off hazard warning flasher
�
Press hazard warning flasher switch1
again.
Interior lighting
The controls are located in the overhead
control panel.
1Interior lighting on/off
2Automatic control on/off
3Right reading lamp on/off
4Left reading lamp on/off
iWith the hazard warning flasher acti-
vated and the combination switch set
for either left or right turn, only the re-
spective turn signals will operate when
the SmartKey is in the starter switch
position1or2.iIf the hazard warning flasher has been
activated automatically, press hazard
warning flasher switch1 once to
switch it off.
iLeaving an interior light switch in the
ON position for extended periods of
time with the engine turned off could
result in a discharged battery.
Page 219 of 481
218 Controls in detailAudio systemObtaining additional text information
Additional text information (artist, title)
related to the current channel can be
displayed.�
Press
INF
soft key.
The title being played is displayed.
�
Press
INF
soft key again.
The name of the artist performing the
title being played is displayed.Storing stations
�
Tune in desired station.
�
Press and hold desired station
button1 to R until a brief signal
tone is heard.
The frequency is stored on the selected
station button.
The radio saves the current station at
the memory preset selected. The
memory preset selected appears in the
status line, e.g. S3.Calling up the ESN information menu
�
Press
INF
soft key.
�
Press
ESN
soft key.
The twelve-digit electronic serial
number (ESN) of the SAT tuner*
installed in your vehicle is displayed.
�
Press
RET
soft key to exit the menu.
iIf a button is not pressed within
4 seconds, the radio will return to the
standard display.
iThere are ten presets available.
An existing entry is overwritten in the
memory list when a new entry is given.
Page 284 of 481

283 Controls in detail
Useful features
Step 5:�
After the indicator lamp1 changes
from a slow to a rapidly flashing light,
release the hand-held remote control
button and the signal transmitter but-
ton.
Step 6:
�
Press and hold the just-trained signal
transmitter button (2, 3 or4) and
observe the indicator lamp1.If the indicator lamp1 stays on
constantly, programming is complete
and your device should activate when
the respective signal transmitter
button (2, 3 or4) is pressed and re-
leased.
Step 7:
�
To program the remaining two signal
transmitter buttons, repeat the steps
above starting with step 3.Rolling code programming
To train a garage door opener (or other
rolling code devices) with the rolling code
feature, follow these instructions after
completing the “Programming” portion
(steps 1 through 6) of this text. (A second
person may make the following training
procedures quicker and easier.)
Step 8:
�
Locate “training” button on the garage
door opener motor head unit.
Exact location and color of the button
may vary by garage door opener brand.
Depending on manufacturer, the
“training” button may also be referred
to as “learn”or “smart” button. If there
is difficulty locating the transmitting
button, refer to the garage door opener
operator’s manual.
iThe indicator lamp1 flashes immedi-
ately the first time the signal transmit-
ter button is programmed. If this button
has already been programmed, the in-
dicator lamp will only start flashing af-
ter 20 seconds.
iIf the indicator lamp1 flashes rapidly
for about 2 seconds and then turns to a
constant light, continue with
programming steps 8 through 12 as
your garage door opener may be
equipped with the “rolling code”
feature.
��
Page 285 of 481
284 Controls in detailUseful featuresStep 9:�
Press the “training” button on the ga-
rage door opener motor head unit.
The “training light” is activated.
You have 30 seconds to initiate the follow-
ing step.
Step 10:
�
Return to the vehicle and firmly press,
hold for 2 seconds and release the pro-
grammed signal transmitter button
(2, 3 or4).
Step 11:
�
Press, hold for 2 seconds and release
same signal transmitter button a sec-
ond time to complete the training pro-
cess.Step 12:
�
Confirm the garage door operation by
pressing the programmed signal trans-
mitter button (2, 3 or4).
Step 13:
�
To program the remaining two signal
transmitter buttons, repeat the steps
above starting with step 3.Gate operator/Canadian programming
Canadian radio-frequency laws require
transmitter signals to “time-out” (or quit)
after several seconds of transmission
which may not be long enough for the
integrated signal transmitter to pick up the
signal during programming. Similar to this
Canadian law, some U.S. gate operators
are designed to “time-out” in the same
manner.iSome garage door openers (or other
rolling code equipped devices) may
require you to press, hold for 2 seconds
and release the same signal transmit-
ter button a third time to complete the
training process.
��
Page 358 of 481

357 Operation
Vehicle care
Headlamps, tail lamps, side makers,
turn signal lenses�
Use a mild car wash detergent, such as
Mercedes-Benz approved Car
Shampoo, with plenty of water.Cleaning the windows and the wiper
blades
�
Switch on the ignition (
�page 36).
�
Turn combination switch to wiper
settingII (
�page 56).
�
With wiper arms in vertical position,
switch off the ignition (
�page 36).
�
Fold the wiper arms forward until it
snaps into place.
�
Clean the wiper blade inserts with a
clean cloth and detergent solution.
�
Use a clean cloth and window cleaning
solution on all outside and inside glass
surfaces.
An automotive glass cleaner is recom-
mended.
!Only use window cleaners that are suit-
able for plastic lamp lenses. Window
cleaners which are not suitable may
damage the plastic lamp lenses of the
headlamps. Therefore, do not use abra-
sives, solvents or cleaners that contain
solvents.
Never apply strong force and use only a
soft, non-scratchy cloth when cleaning
the lenses. Do not attempt to wipe dirty
lenses with a dry cloth or sponge.
Otherwise you may scratch or damage
the lens surface.
!The windshield wipers must be in a ver-
tical position before folding them away
from the windshield. They could other-
wise damage the hood.
Never open the hood when the wiper
arms are folded forward.
Warning!
G
For safety reasons, switch off wipers and re-
move SmartKey from starter switch before
cleaning the windshield. Otherwise, the wip-
er motor could suddenly turn on and cause
injury.
��
Page 370 of 481
369 Practical hints
What to do if …
On the pages that follow, you will find
a compilation of the most important warn-
ing and malfunction messages that may
appear in the multifunction display.
For your convenience the messages are
divided into two sections:�
Text messages (
�page 370)
�
Symbol messages (
�page 374)
Warning!
G
No messages will be displayed if either the
instrument cluster or the multifunction dis-
play is inoperative.
Contact your nearest authorized
Mercedes-Benz Center.
iSwitching on ignition (
�page 36)
causes all instrument cluster lamps
(except high beam headlamp indicator
lamp and turn signal indicator lamps
unless activated) as well as the multi-
function display to come on. Make sure
the lamps and multifunction display are
in working order before starting your
journey.