Page 57 of 481

56 Getting startedDriving�
Press combination switch in direction
of arrow1 or2.
The corresponding turn signal indicator
lampKorL in the instrument
cluster flashes (
�page 24).
The combination switch resets auto-
matically after major directional chang-
es.
Windshield wipers
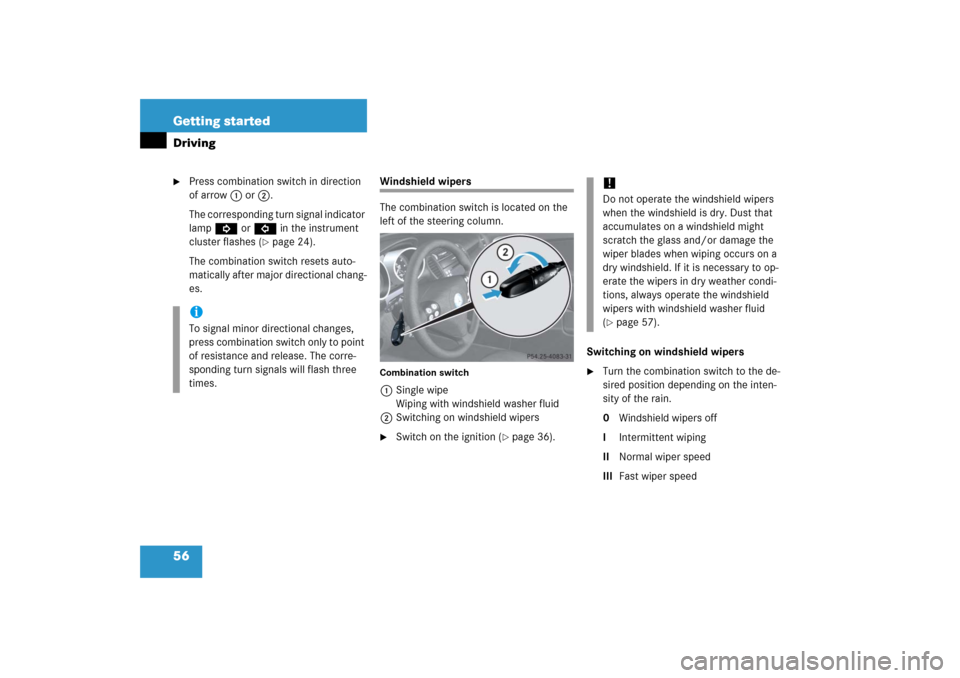
The combination switch is located on the
left of the steering column.Combination switch1Single wipe
Wiping with windshield washer fluid
2Switching on windshield wipers�
Switch on the ignition (
�page 36).Switching on windshield wipers
�
Turn the combination switch to the de-
sired position depending on the inten-
sity of the rain.
0Windshield wipers off
IIntermittent wiping
IINormal wiper speed
IIIFast wiper speed
iTo signal minor directional changes,
press combination switch only to point
of resistance and release. The corre-
sponding turn signals will flash three
times.
!Do not operate the windshield wipers
when the windshield is dry. Dust that
accumulates on a windshield might
scratch the glass and/or damage the
wiper blades when wiping occurs on a
dry windshield. If it is necessary to op-
erate the wipers in dry weather condi-
tions, always operate the windshield
wipers with windshield washer fluid
(�page 57).
Page 63 of 481

62 Getting startedParking and locking
Locking
�
Exit the vehicle and close all doors.
�
Press the lock button‹ on the
SmartKey (
�page 34).
With the trunk and all doors closed, all
turn signal lamps flash three times. The
locking knobs on the doors move
down.
The anti-theft alarm system is armed
now (
�page 87).
For more information, see “Locking and
unlocking” (�page 92).
iOpening a door causes the windows on
that side of the car to open slightly.
They will return to the up position when
the door is closed.!The side windows will not open or close
if the battery is discharged or the win-
dows are covered with ice. As a result,
you may no longer be able to properly
close the door. Do not attempt to force
the door shut. Doing so may damage
the door or the side window. Correct
the condition that prevents the
windows from operating before
attempting to close the door.
Warning!
G
To prevent possible personal injury, always
keep hands and fingers away from the door
openings when closing the doors. Be espe-
cially careful when small children are
around.
Before closing doors, make sure there is no
possibility of someone getting caught in a
door during closing.Warning!
G
When leaving the vehicle, always remove the
SmartKey from the starter switch, take it
with you, and lock the vehicle. Do not leave
children unattended in the vehicle, or with
access to an unlocked vehicle. Unsuper-
vised use of vehicle equipment may cause
an accident and/or serious personal injury.
iWithout the antenna on the left rear
side of the vehicle installed, the
SmartKey signaling range is consider-
ably reduced. Hold the SmartKey in
close proximity towards the antenna
base when locking or unlocking the
vehicle.
Page 89 of 481

88 Safety and SecurityAnti-theft systemsArming the alarm system�
Lock your vehicle with the SmartKey.
The turn signal lamps flash three times
to indicate that the alarm system is ac-
tivated.
The indicator lamp in the central lock-
ing switch starts flashing (
�page 102).Disarming the alarm system
�
Unlock your vehicle with the SmartKey.
The turn signal lamps flash once to in-
dicate that the alarm system is dis-
armed.
Canceling the alarm
To cancel the alarm:
�
Press theŒ or‹button on the
SmartKey.
or
�
Insert the SmartKey in the starter
switch.
Tow-away alarm
Once the tow-away alarm is armed, a visual
and audible alarm will be triggered when
someone attempts to raise the vehicle.
iIf the turn signal lamps do not flash
three times, one of the following ele-
ments may not be properly closed:�
a door
�
the trunk lid
�
the fuel filler flap
�
the glove box
�
the storage compartment under the
armrest
Close the respective element and lock
the vehicle again.
iThe tow-away protection alarm is trig-
gered, for example, if the vehicle is lift-
ed on one side.
If the alarm stays on for more than
30 seconds, a call to the Response
Center is initiated automatically by the
Tele Aid system (
�page 273), provided
Tele Aid service was subscribed to and
properly activated, and that necessary
cellular service and GPS coverage are
available (
�page 273).
Page 94 of 481

93 Controls in detail
Locking and unlocking
iOpening a door causes the windows on
that side of the car to open slightly.
They will return to the up position when
the door is closed.!The side windows will not open or close
if the battery is discharged or the win-
dows are covered with ice. As a result,
you may no longer be able to properly
close the door. Do not attempt to force
the door shut. Doing so may damage
the door or the side window. Correct
the condition that prevents the
windows from operating before
attempting to close the door.
iWithout the antenna on the left rear
side of the vehicle installed, the
SmartKey signaling range is consider-
ably reduced. Hold the SmartKey in
close proximity towards the antenna
base when locking or unlocking the
vehicle.
Warning!
G
When leaving the vehicle, always remove the
SmartKey from the starter switch, take it
with you, and lock the vehicle. Do not leave
children unattended in the vehicle, or with
access to an unlocked vehicle. It is possible
for children to open a locked door from the
inside, which could result in an accident
and/or serious injury.!To prevent possible malfunction, avoid
exposing the SmartKey to high levels of
electromagnetic radiation.
Page 95 of 481

94 Controls in detailLocking and unlocking
Factory setting
Global unlocking�
Press buttonŒ.
All turn signal lamps flash once.
The locking knobs on the doors move
up. The anti-theft alarm system is dis-
armed (
�page 87).
The vehicle will lock again automatically
and reactivate the anti-theft alarm system
within approximately 40 seconds of un-
locking if:
�
neither door nor trunk is opened
�
the SmartKey is not inserted in the
starter switch
�
the central locking switch is not
activated
iUSA only:
This device complies with Part 15 of
the FCC Rules. Operation is subject to
the following two conditions:
(1) This device may not cause harmful
interference, and
(2) this device must accept any inter-
ference received, including interfer-
ence that may cause undesired
operation.
Any unauthorized modification to this
device could void the user’s authority
to operate the equipment.
iCanada only:
This device complies with RSS-210 of
Industry Canada. Operation is subject
to the following two conditions:
(1) This device may not cause interfer-
ence, and
(2) this device must accept any inter-
ference received, including interfer-
ence that may cause undesired
operation of the device.
Any unauthorized modification to this
device could void the user’s authority
to operate the equipment.iYou can also open and close the
retractable hardtop using the
SmartKey* (
�page 257).
Page 96 of 481

95 Controls in detail
Locking and unlocking
Global locking�
Press button‹.
With the trunk and all doors closed, all
turn signal lamps flash three times. The
locking knobs on the doors move
down.
The anti-theft alarm system is armed
now (
�page 87).Selective setting
If you frequently travel alone, you may wish
to reprogram the SmartKey so that press-
ing buttonŒ only unlocks the driver’s
door, the storage compartment under the
armrest, the glove box, and the fuel filler
flap.
�
Press and hold buttonsŒand‹
simultaneously for about 6 seconds.
Battery check lamp5 flashes twice.
The SmartKey will then function as follows:
Unlocking driver’s door and fuel filler
flap
�
Press buttonΠonce.
All turn signal lamps flash once.
The locking knob on the driver’s door
move up. The anti-theft alarm system is
disarmed (
�page 87).Global unlocking
�
Press buttonΠtwice.
All turn signal lamps flash once.
The locking knobs on the doors move
up. The anti-theft alarm system is dis-
armed (
�page 87).
Global locking
�
Press button‹.
With the trunk and all doors closed, all
turn signal lamps flash three times. The
locking knobs on the doors move
down.
The anti-theft alarm system is armed
now (
�page 87).
iIf the turn signal lamps do not flash
three times, one of the following ele-
ments may not be properly closed:�
a door
�
the trunk lid
�
the fuel filler flap
�
the glove box
�
the storage compartment under the
armrest
Close the respective element and lock
the vehicle again.
Page 101 of 481

100 Controls in detailLocking and unlocking
Trunk lid emergency release
The emergency release button is located
on the inside of the trunk lid.
With the emergency release button, the
trunk can be opened from inside the trunk.
1Emergency release button�
Briefly press emergency release
button1.
The trunk lid unlocks and opens
slightly.
�
Push up the trunk lid to fully open.Illumination of the emergency release but-
ton:
�
The button flashes for 30 minutes after
opening the trunk.
�
The button flashes for 60 minutes after
closing the trunk.
Warning!
G
Only drive with the trunk lid closed as,
among other dangers such as blocked visi-
bility, exhaust fumes may enter the vehicle
interior.iDo not place the SmartKey in the open
trunk. You may lock yourself out.iIf the vehicle was previously centrally
locked, the trunk lid will lock automati-
cally when closed. The turn signal
lamps will flash three times to confirm
locking.
iThe emergency release button unlocks
the trunk while the vehicle is standing
still or in motion.iThe emergency release button does
not unlock the trunk if the vehicle bat-
tery is discharged or disconnected.
Page 111 of 481

110 Controls in detailLightingFor information on how to switch on the
headlamps and use the turn signals, see
“Switching on headlamps” (
�page 55)
and “Turn signals” (
�page 55).
Exterior lamp switch
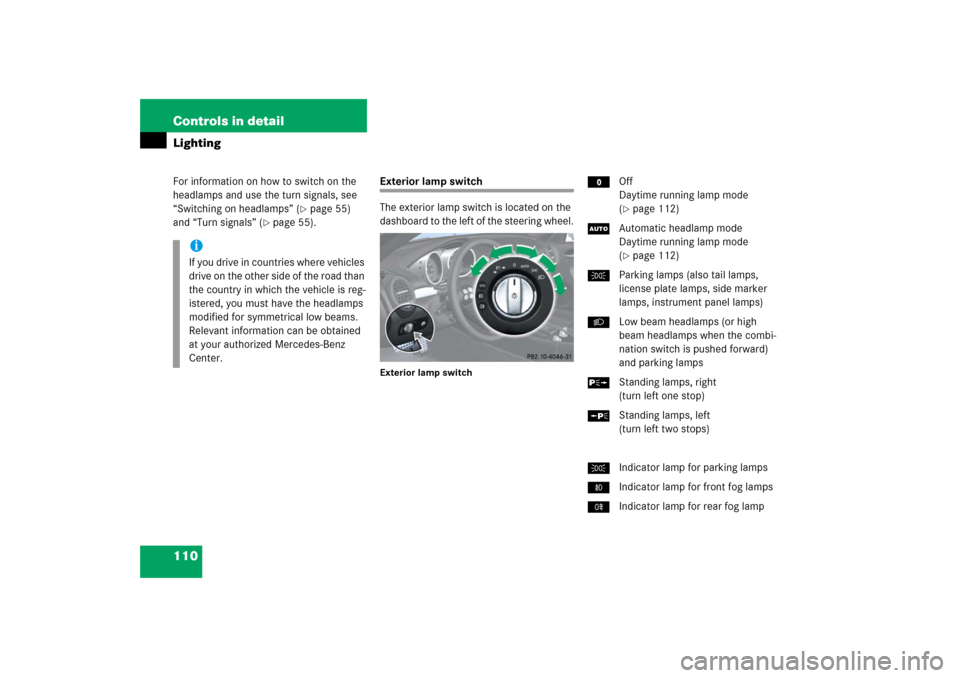
The exterior lamp switch is located on the
dashboard to the left of the steering wheel.Exterior lamp switch
MOff
Daytime running lamp mode
(
�page 112)
UAutomatic headlamp mode
Daytime running lamp mode
(�page 112)
CParking lamps (also tail lamps,
license plate lamps, side marker
lamps, instrument panel lamps)
BLow beam headlamps (or high
beam headlamps when the combi-
nation switch is pushed forward)
and parking lamps
ˆStanding lamps, right
(turn left one stop)
‚Standing lamps, left
(turn left two stops)
CIndicator lamp for parking lamps
‡Indicator lamp for front fog lamps
†Indicator lamp for rear fog lamp
iIf you drive in countries where vehicles
drive on the other side of the road than
the country in which the vehicle is reg-
istered, you must have the headlamps
modified for symmetrical low beams.
Relevant information can be obtained
at your authorized Mercedes-Benz
Center.