Page 38 of 481

37 Getting started
Unlocking
For information on starting the engine, see
(�page 50).
iWhen you switch on ignition, the indi-
cator and warning lamps (except high
beam headlamp indicator lamp and
turn signal indicator lamps unless acti-
vated) in the instrument cluster come
on. The indicator and warning lamps
(except high beam headlamp indicator
lamp and turn signal indicator lamps if
activated) will go out when the engine
is running. This indicates that the re-
spective systems are operational.iVehicles with automatic transmission*:
The SmartKey can only be removed
from the starter switch with the gear
selector lever in positionP.
!If the SmartKey cannot be turned in the
starter switch, the vehicle battery may
not be sufficiently charged.�
Check the vehicle battery and
charge it if necessary (
�page 421).
�
Get a jump start (
�page 424).
To prevent accelerated vehicle battery
discharge or a completely discharged
vehicle battery, always remove the
SmartKey from the starter switch when
the engine is not in operation.
Page 56 of 481
55 Getting started
Driving
Switching on headlamps
Low beam headlamps
The exterior lamp switch is located on the
dashboard to the left of the steering wheel.Exterior lamp switch1Off
2Low beam headlamps on�
Turn exterior lamp switch to
positionB.High beam
The combination switch is located on the
left of the steering column.
Combination switch1High beam
2High beam flasher�
Push combination switch in direction of
arrow1.
The high beam headlamp indicator
lampA in the instrument cluster
comes on (
�page 24).
For more information on headlamps, see
“Lighting” (
�page 110).
Turn signals
The combination switch is located on the
left of the steering column.Combination switch1Turn signals, right
2Turn signals, left
Page 57 of 481

56 Getting startedDriving�
Press combination switch in direction
of arrow1 or2.
The corresponding turn signal indicator
lampKorL in the instrument
cluster flashes (
�page 24).
The combination switch resets auto-
matically after major directional chang-
es.
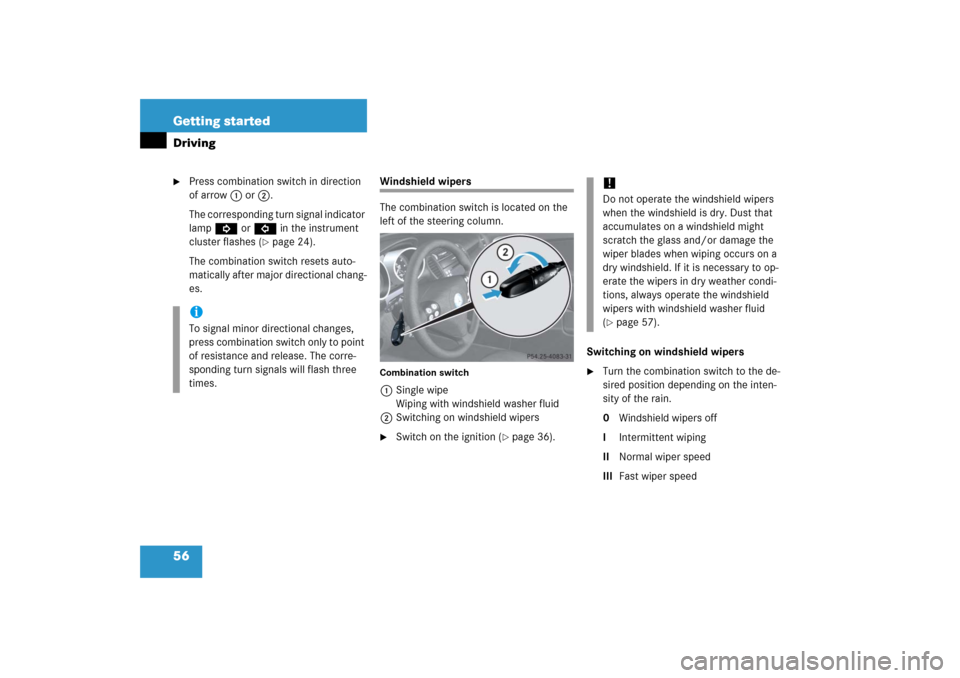
Windshield wipers
The combination switch is located on the
left of the steering column.Combination switch1Single wipe
Wiping with windshield washer fluid
2Switching on windshield wipers�
Switch on the ignition (
�page 36).Switching on windshield wipers
�
Turn the combination switch to the de-
sired position depending on the inten-
sity of the rain.
0Windshield wipers off
IIntermittent wiping
IINormal wiper speed
IIIFast wiper speed
iTo signal minor directional changes,
press combination switch only to point
of resistance and release. The corre-
sponding turn signals will flash three
times.
!Do not operate the windshield wipers
when the windshield is dry. Dust that
accumulates on a windshield might
scratch the glass and/or damage the
wiper blades when wiping occurs on a
dry windshield. If it is necessary to op-
erate the wipers in dry weather condi-
tions, always operate the windshield
wipers with windshield washer fluid
(�page 57).
Page 92 of 481
91 Controls in detail
Locking and unlocking
Seats
Memory function*
Lighting
Instrument cluster
Control system
Manual transmission
Automatic transmission*
Good visibility
Climate control
Automatic climate control*
Audio system
Power windows
Retractable hardtop
Driving systems
Useful features
Page 116 of 481

115 Controls in detail
Lighting
High beam�
Turn the exterior lamp switch to
positionBorU (
�page 110).
�
Push the combination switch in direc-
tion of arrow1 to switch on the high
beam.
The high beam headlamp indicator
lampA in the instrument cluster
comes on (
�page 24).
�
Pull the combination switch in direction
of arrow2 to its original position to
switch off the high beam.
The high beam headlamp indicator
lampA in the instrument cluster
goes out.
High beam flasher
�
Pull the combination switch briefly in
direction of arrow2.Corner-illuminating front fog lamps*
(SLK 280, SLK 350: with Bi-Xenon*
headlamps and without
Sport Package*)
The corner-illuminating front fog lamps im-
prove illumination of the road onto which
you are turning.
The corner-illuminating front fog lamps will
operate with the engine running and with�
the exterior lamp switch in
positionB (
�page 110)
or
�
the exterior lamp switch in
positionU (
�page 110)
or
�
the daytime running lamp mode
activated (
�page 112)Driving forward
Switching on corner-illuminating front
fog lamps
�
Depending on whether you are turning
left or right, switch on the left or right
turn signal (
�page 55).
The respective front fog lamp comes on
and illuminates the road onto which
you are turning.
iCorner-illuminating front fog lamps will
only come on in low ambient lighting
conditions.
The corner-illuminating front fog lamps
function is not available at a vehicle
speed above 25 mph (40 km/h).
��
Page 121 of 481

120 Controls in detailInstrument clusterA full view illustration of the instrument
cluster can be found in the “At a glance”
section (
�page 24).
The multifunction display in the instrument
cluster is activated when you
�
open a door
�
switch on exterior lighting
�
switch on ignition (
�page 36)
�
press reset buttonJ (
�page 24)
For information on changing the instru-
ment cluster settings, e.g. the language,
see “Instrument cluster submenu”
(
�page 137).
Instrument cluster illumination
Adjusting
The knobs for adjusting the instrument
cluster illumination are on the left side of
the instrument cluster (
�page 24).
1Brightening illumination (knob+)
2Dimming illumination (knob-)
3Reset buttonJ Brightening illumination
�
Press knob+ briefly.
The instrument cluster illumination
brightens.
Dimming illumination
�
Press knob- briefly.
The instrument cluster illumination
dims.
iOpening a door or pressing the reset
buttonJwithout switching on the ig-
nition or the exterior lighting activates
the multifunction display illumination
only for 30 seconds.
iThe instrument cluster illumination
automatically adjusts to the ambient
light.
You can only adjust the brightness of
the instrument cluster illumination
when it is dark outside.iWith the exterior lighting switched on,
the brightness of the switches in the
center console will be adjusted when
using knob+or-.
Page 122 of 481

121 Controls in detail
Instrument cluster
Tachometer
The red marking on the tachometer
(�page 24) denotes excessive engine
speed.
To help protect the engine, the fuel supply
is interrupted if the engine is operated
within the red marking.
Outside temperature indicator
The outside temperature is displayed in
the multifunction display (
�page 129).The temperature sensor is located in the
front bumper area. Due to its location, the
sensor can be affected by road or engine
heat during idling or slow driving. There-
fore, the accuracy of the displayed temper-
ature can only be verified by comparison to
a thermometer placed next the sensor, not
by comparison to external displays, e.g.
bank signs, etc.
When moving the vehicle into colder ambi-
ent temperatures (e.g. when leaving your
garage), you will notice a delay before the
lower temperature is displayed.
A delay also occurs when ambient temper-
atures rise. This prevents inaccurate tem-
perature displays caused by heat radiated
from the engine during idling or slow driv-
ing.
!Avoid driving at excessive engine
speeds, as it may result in serious en-
gine damage that is not covered by the
Mercedes-Benz Limited Warranty.
Warning!
G
The outside temperature indicator is not de-
s i g n e d t o s e r v e a s a n i c e - w a r n i n g d e v i c e a n d
is therefore unsuitable for that purpose.
Indicated temperatures just above the freez-
ing point do not guarantee that the road sur-
face is free of ice. The road may still be icy,
especially in wooded areas or on bridges.
Page 123 of 481
122 Controls in detailInstrument clusterTrip odometer�
Make sure you are viewing the stan-
dard display menu (
�page 128).
�
Press and hold reset buttonJuntil
the trip odometer is reset.
Clock
Vehicles with COMAND*:
The clock in the instrument cluster can be
synchronized with the time set in
COMAND using the time synchronization
with head unit feature (
�page 139), or set
independently from COMAND using the
control system (
�page 139) with the time
synchronization with head unit feature set
to
Off
.
For setting the time in COMAND, see sep-
arate COMAND operating instructions.
For setting the time with audio system,
(
�page 139).