Page 39 of 481
.Warning!
G
All")
38 Getting startedAdjustingSeats
The seats can be adjusted either manually
or electrically, depending on the vehicle’s
equipment.
For more information, see “Seats”
(�page 104).Warning!
G
All seat, head restraint, steering wheel, and
rear view mirror adjustments, as well as fas-
tening of seat belts, must be done before
the vehicle is put into motion.
Warning!
G
Do not adjust the driver seat while driving.
Adjusting the seat while driving could cause
the driver to lose control of the vehicle.
Never ride in a moving vehicle with the seat
back in an excessively reclined position as
this can be dangerous. You could slide un-
der the seat belt in a collision. If you slide
under it, the belt would apply force at the ab-
domen or neck. That could cause serious or
fatal injuries. The seat back and seat belts
provide the best restraint when the wearer
is in a nearly upright position and belts are
properly positioned on the body. Your seat
must be adjusted so that you can correctly
fasten your seat belt (
�page 47).
Never place hands under the seat or near
moving parts while the seat is being
adjusted.
Warning!
G
When leaving the vehicle, always remove the
SmartKey from the starter switch, take it
with you, and lock the vehicle.
Even with the SmartKey removed from the
starter switch, the power seats* can be op-
erated when the respective door is open.
Therefore, do not leave children unattended
in the vehicle, or with access to an unlocked
vehicle. Unsupervised use of vehicle equip-
ment may cause an accident and/or serious
personal injury.
Page 44 of 481
.
1Adjusting steering column")
43 Getting started
Adjusting
Steering wheel adjustment, electrical*
The lever for the electrical steering wheel
adjustment is located on the steering col-
umn (lower left).
1Adjusting steering column, in or out
2Adjusting steering column, up or down�
Switch on the ignition (
�page 36).
or
�
Open the driver’s door.Adjusting steering column in or out
�
Move the lever in direction of
arrows1 until a comfortable steering
wheel position is reached with your
arms slightly bent at the elbow.
Adjusting steering column up or down
�
Move the lever in direction of
arrows2.
Make sure your legs can move freely
and all the displays (including malfunc-
tion and indicator lamps) on the instru-
ment cluster are clearly visible.Easy-entry/exit feature*
This feature allows for easier entry into and
exit from the vehicle.
The easy-entry/exit feature can be activat-
ed or deactivated in the
Convenience
submenu of the control system
(
�page 147).
iThe memory function* (
�page 107)
lets you store the settings for the steer-
ing wheel together with the settings for
the exterior rear view mirrors and the
driver’s seat position.
Page 47 of 481

46 Getting startedAdjustingThe switches are located on the lower part
of the center console.
1Driver’s side exterior rear view mirror
2Adjustment switch
3Passenger-side exterior rear view
mirror
�
Switch on the ignition (
�page 36).
�
Press switch1 or3 to select the
respective exterior rear view mirror.
The indicator lamp in the respective
switch comes on. If you do not adjust
the selected exterior rear view mirror
by pressing adjustment switch2, the
indicator lamp in the switch will switch
off automatically after approximately
10 seconds.
�
Press adjustment switch2 forward,
rearward, left, or right according to the
desired setting.For more information, see “Storing exterior
rear view mirror parking position (parking
aid)” (
�page 108).
!If an exterior rear view mirror housing
is forcibly pushed forward (hit from the
rear) or rearward (hit from the front),
reposition it by applying firm pressure
until it snaps into place. The exterior
rear view mirror housing is now proper-
ly positioned and you can adjust the
mirror normally.
iThe memory function (
�page 107) lets
you store the settings for the exterior
rear view mirrors together with the set-
tings for the steering wheel and the
driver’s seat position.
iAt low ambient temperatures, the exte-
rior rear view mirrors will be heated au-
tomatically.!Before driving the vehicle through an
automatic car wash, fold the exterior
mirrors in. Otherwise they may get
damaged.
Page 67 of 481

66 Safety and SecurityOccupant safety�
Adjust the driver seat as far as possible
rearward, still permitting proper opera-
tion of vehicle controls. The distance
from the center of the driver’s breast-
bone to the center of the air bag cover
on the steering wheel must be at least
ten inches (25 cm) or more. You should
be able to accomplish this by a combina-
tion of adjustments to the seat and the
steering wheel. If you have any prob-
lems, please see an authorized
Mercedes-Benz Center.
�
Do not lean with your head or chest
close to the steering wheel or dash-
board.
�
Keep hands on the outside of the steer-
ing wheel rim. Placing hands and arms
inside the rim can increase the risk and
potential severity of hand/arm injury
when driver front air bag inflates.
�
Adjust the passenger seat as far as pos-
sible rearward from the dashboard when
the seat is occupied.
�
Occupants, especially children, should
never lean their heads in the area of the
door where the head-thorax air bag in-
flates. This could result in serious inju-
ries or death should the air bag be
triggered. Always sit nearly upright,
properly use the seat belts and appropri-
ately sized infant or child restraint sys-
tem.
�
Children 12 years old and under must
never ride in this vehicle, except in a
Mercedes-Benz authorized
BabySmart
TM compatible child seat,
which operates with the BabySmart
TM
system installed in the vehicle to deacti-
vate the passenger front air bag when it
is properly installed. Otherwise, they will
be struck by the air bag when it inflates
in a crash. If this happens, serious or fa-
tal injury will result.
Failure to follow these instructions can re-
sult in severe injuries to you or other occu-
pants.
If you sell your vehicle, it is important that
you make the buyer aware of this safety in-
formation. Be sure to give the buyer this
Operator’s Manual.
��
Page 105 of 481
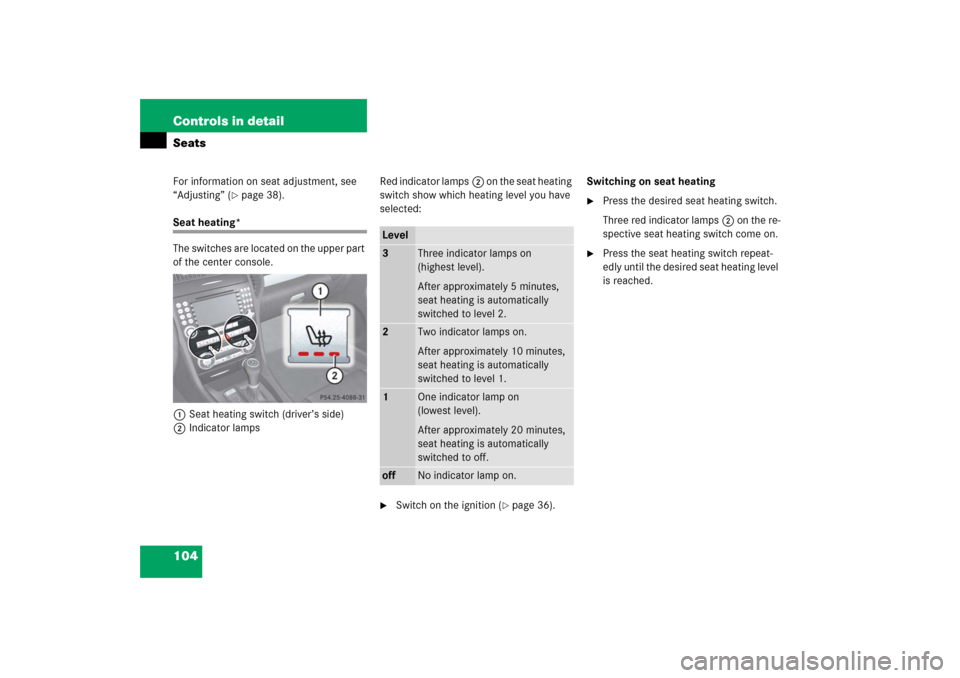
104 Controls in detailSeatsFor information on seat adjustment, see
“Adjusting” (
�page 38).
Seat heating*
The switches are located on the upper part
of the center console.
1Seat heating switch (driver’s side)
2Indicator lampsRed indicator lamps2 on the seat heating
switch show which heating level you have
selected:
�
Switch on the ignition (
�page 36).Switching on seat heating
�
Press the desired seat heating switch.
Three red indicator lamps2 on the re-
spective seat heating switch come on.
�
Press the seat heating switch repeat-
edly until the desired seat heating level
is reached.
Level3
Three indicator lamps on
(highest level).
After approximately 5 minutes,
seat heating is automatically
switched to level 2.
2
Two indicator lamps on.
After approximately 10 minutes,
seat heating is automatically
switched to level 1.
1
One indicator lamp on
(lowest level).
After approximately 20 minutes,
seat heating is automatically
switched to off.
off
No indicator lamp on.