Page 100 of 481
.
Closing the trunk
1Handle�
Lower the")
99 Controls in detail
Locking and unlocking
The trunk lid can also be opened from its
inside in an emergency, see “Trunk lid
emergency release” (
�page 100).
Closing the trunk
1Handle�
Lower the trunk lid using handle1.
�
Close the trunk lid with hands placed
flat on the trunk lid.
iThe vehicle or trunk lid must be
unlocked before the trunk lid can be
opened.
The trunk lid can only be opened when
the vehicle is not in motion and the re-
tractable hardtop is fully opened or
closed.
Warning!
G
To prevent possible personal injury, always
keep hands and fingers away from the trunk
lid opening when closing the trunk lid. Be es-
pecially careful when small children are
around.Warning!
G
When leaving the vehicle, always remove the
SmartKey from the starter switch, take it
with you, and lock the vehicle. Do not leave
children unattended in the vehicle, or with
access to an unlocked vehicle. It is possible
for children to open a locked door from the
inside, which could result in an accident
and/or serious injury.
Page 102 of 481
101 Controls in detail
Locking and unlocking
Automatic central locking
The doors and the trunk automatically lock
when the ignition is switched on and the
wheels are turning at vehicle speeds of
approximately 9 mph (15 km/h).
You can open a locked door from the in-
side. Open door only when conditions are
safe to do so.
You can deactivate the automatic locking
using the control system, see “Setting
automatic locking” (
�page 147).
iIf the vehicle has previously been cen-
trally locked with the SmartKey, open-
ing the trunk from the inside will trigger
the anti-theft alarm system.
To cancel the alarm, do one of the fol-
lowing:�
Press buttonŒor‹ on the
SmartKey.
�
Insert the SmartKey in the starter
switch.
iThe doors unlock automatically after an
accident if the force of the impact ex-
ceeds a preset threshold.
To prevent the vehicle door locks from
locking, deactivate the automatic cen-
tral locking when the vehicle�
is pushed or towed
�
is on a test stand
Page 105 of 481
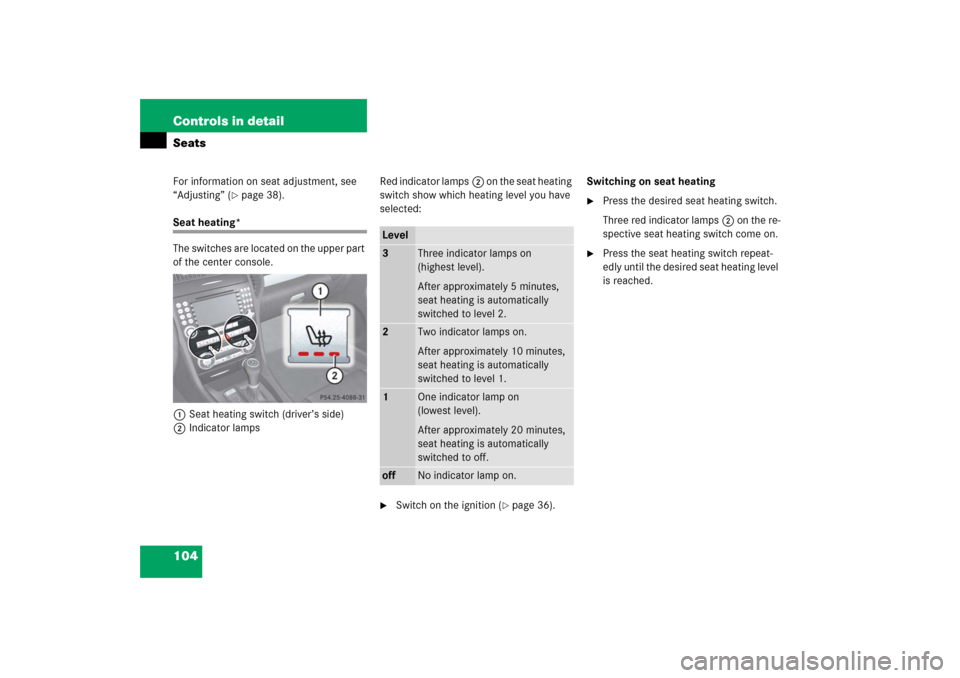
104 Controls in detailSeatsFor information on seat adjustment, see
“Adjusting” (
�page 38).
Seat heating*
The switches are located on the upper part
of the center console.
1Seat heating switch (driver’s side)
2Indicator lampsRed indicator lamps2 on the seat heating
switch show which heating level you have
selected:
�
Switch on the ignition (
�page 36).Switching on seat heating
�
Press the desired seat heating switch.
Three red indicator lamps2 on the re-
spective seat heating switch come on.
�
Press the seat heating switch repeat-
edly until the desired seat heating level
is reached.
Level3
Three indicator lamps on
(highest level).
After approximately 5 minutes,
seat heating is automatically
switched to level 2.
2
Two indicator lamps on.
After approximately 10 minutes,
seat heating is automatically
switched to level 1.
1
One indicator lamp on
(lowest level).
After approximately 20 minutes,
seat heating is automatically
switched to off.
off
No indicator lamp on.
Page 107 of 481
.Switching on
�
Press the respective AIRSCARF")
106 Controls in detailSeatsRed indicator lamps2 on the AIRSCARF
switches show which heating level you
have selected:�
Switch on the ignition (
�page 36).Switching on
�
Press the respective AIRSCARF switch
for the desired side.
All three indicator lamps on the respec-
tive AIRSCARF switch come on. After
a preheating time of approximately
7 seconds, the blower starts.
�
Press the respective AIRSCARF switch
repeatedly until the desired AIRSCARF
heating level for the corresponding
seat is reached.Switching off
�
Press the respective AIRSCARF switch
repeatedly until all indicator lamps on
the AIRSCARF switch go out.
Level3
Three indicator lamps on
(highest heating level).
2
Two indicator lamps on.
1
One indicator lamp on
(lowest heating level).
off
No indicator lamp on.
iAfter switching off the AIRSCARF
neck-level heating, the AIRSCARF fan
continues to operate for approximately
10 seconds to cool down the heater
elements.iIf one or more of indicator lamps2 on
the AIRSCARF switch are flashing,
there is insufficient voltage available
since too many electrical consumers
are turned on. The AIRSCARF neck-lev-
el heating switches off automatically.
The AIRSCARF neck-level heating will
switch back on again automatically as
soon as sufficient voltage is available.
Page 108 of 481

107 Controls in detail
Memory function*
�Memory function*
Prior to operating the vehicle, the driver
should check and adjust the seat height,
seat position fore and aft, and seat back-
rest angle if necessary, to ensure adequate
control, reach and comfort. The head re-
straint should also be adjusted for proper
height. See also the section on air bags for
proper seat positioning (
�page 65).
In addition, adjust the steering wheel to
ensure adequate control, reach, operation
and comfort. Both the interior and exterior
rear view mirrors should be adjusted for
adequate rear vision.
Fasten seat belts. Infants and small chil-
dren should be seated in a properly se-
cured restraint system that complies with
U.S. Federal Motor Vehicle Safety
Standards 213 and 255 and Canadian Mo-
tor Vehicle Safety Standards 213
and 210.2.The following settings are stored when
using the buttons on the outer side of the
respective seat:
Driver and passenger seat:
�
Seat and backrest position
Driver only:
�
Steering wheel position
�
Exterior rear view mirrorsThe memory button and memory position
switch are located on the outer side of
each seat.
1Memory buttonM
2Memory position switch
�
Switch on the ignition (
�page 36).
or
�
Open the respective door.
Warning!
G
Do not activate the memory function while
driving. Activating the memory function
while driving could cause the driver to lose
control of the vehicle.
Page 109 of 481

108 Controls in detailMemory function*Storing positions into memory�
Adjust the seat, on the driver’s side
also the steering wheel and exterior
rear view mirrors, to the desired posi-
tions (
�page 38).
�
Press memory buttonM1.
�
Release memory buttonM1 and
press a memory position switch2
within 3 seconds.
All settings are stored to the selected
position.
Recalling positions from memory�
Press and hold desired memory posi-
tion switch2 until the seat, on the
driver’s side also the steering wheel
and exterior rear view mirrors, have
completely moved to the stored posi-
tions.Storing exterior rear view mirror
parking position (parking aid)
For easier parking, you can adjust the
passenger-side exterior rear view mirror so
that you can see the right rear wheel as
soon as you engage reverse gearR.
You can switch the parking position fea-
ture on and off via the control system
(�page 148).
For information on activating the parking
position feature, see “Activating exterior
rear view mirror parking position*”
(�page 175).
!Do not operate the power seats using
the memory position switches if the
seat backrest is in an excessively re-
clined position. Doing so could cause
damage to the seats.iReleasing the memory position switch-
es immediately stops movement to the
stored positions.
Page 110 of 481
109 Controls in detail
Memory function*
The switches are located on the lower part
of the center console.
1Driver’s side exterior rear view mirror
switch
2Adjustment switch
3Passenger-side exterior rear view
mirror switch
�
Switch on the ignition (
�page 36).
�
Press switch3 to select the passen-
ger-side exterior rear view mirror.
�
Adjust the passenger-side exterior rear
view mirror with adjustment switch2
so that you see the rear wheel and the
road curb.
�
Press memory buttonM (
�page 107).
�
Within 3 seconds, press adjustment
switch2 forward, backward, left, or
right.
The parking position is stored if the
mirror does not move.iIf the mirror does move, repeat the
above steps. After the setting is stored,
you can move the mirror again.
Page 111 of 481

and “Turn signals” (
�page 55).
Exterior l")
110 Controls in detailLightingFor information on how to switch on the
headlamps and use the turn signals, see
“Switching on headlamps” (
�page 55)
and “Turn signals” (
�page 55).
Exterior lamp switch
The exterior lamp switch is located on the
dashboard to the left of the steering wheel.Exterior lamp switch
MOff
Daytime running lamp mode
(
�page 112)
UAutomatic headlamp mode
Daytime running lamp mode
(�page 112)
CParking lamps (also tail lamps,
license plate lamps, side marker
lamps, instrument panel lamps)
BLow beam headlamps (or high
beam headlamps when the combi-
nation switch is pushed forward)
and parking lamps
ˆStanding lamps, right
(turn left one stop)
‚Standing lamps, left
(turn left two stops)
CIndicator lamp for parking lamps
‡Indicator lamp for front fog lamps
†Indicator lamp for rear fog lamp
iIf you drive in countries where vehicles
drive on the other side of the road than
the country in which the vehicle is reg-
istered, you must have the headlamps
modified for symmetrical low beams.
Relevant information can be obtained
at your authorized Mercedes-Benz
Center.