Page 407 of 481
406 Practical hintsReplacing wiper bladesRemoving wiper blades
�
Turn the SmartKey in the starter switch
to position1.
�
Turn combination switch to wiper
settingII (
�page 56).
�
With wiper arms in vertical position,
turn the SmartKey in the starter switch
to position0.
�
Fold the wiper arms forward until they
engage.
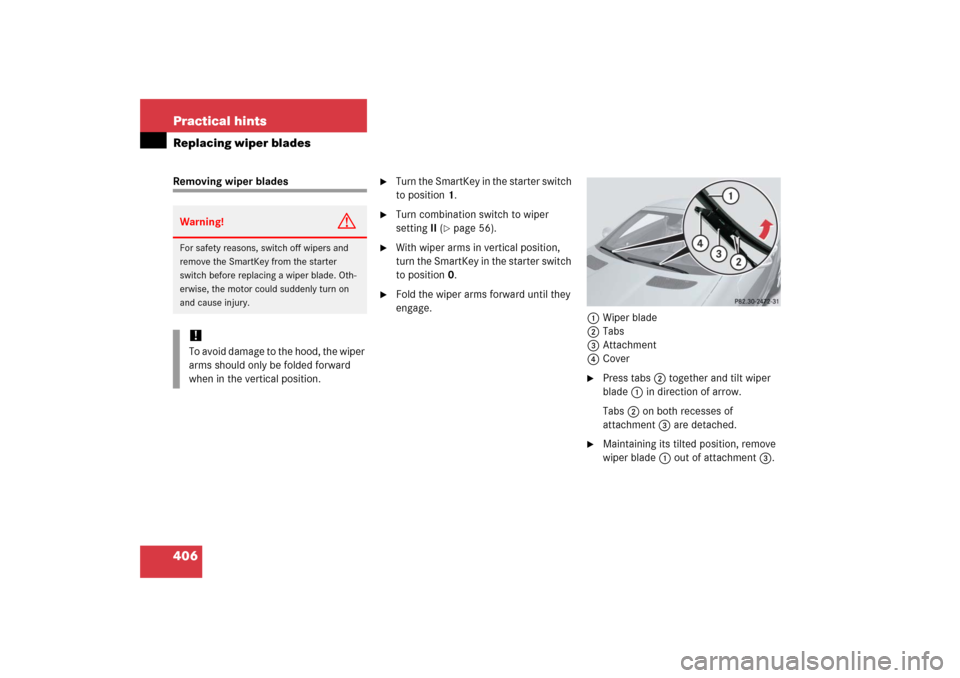
1Wiper blade
2Tabs
3Attachment
4Cover
�
Press tabs2 together and tilt wiper
blade1 in direction of arrow.
Tabs2 on both recesses of
attachment3 are detached.
�
Maintaining its tilted position, remove
wiper blade1 out of attachment3.
Warning!
G
For safety reasons, switch off wipers and
remove the SmartKey from the starter
switch before replacing a wiper blade. Oth-
erwise, the motor could suddenly turn on
and cause injury.!To avoid damage to the hood, the wiper
arms should only be folded forward
when in the vertical position.
Page 409 of 481
408 Practical hintsFlat tireThe SLK 55 AMG with Performance
Package* is equipped with a TIREFIT kit.Preparing the vehicle�
Park the vehicle as far as possible from
moving traffic on a hard surface.
�
Turn on the hazard warning flashers.
�
Turn the steering wheel so that the
front wheels are in a straight ahead po-
sition.
�
Set the parking brake (
�page 52).
�
Move the gear selector lever* toP
(manual transmission to first or reverse
gear).
�
Turn off the engine (
�page 61).
�
Remove the SmartKey from the starter
switch.
�
Have any passenger exit the vehicle at
a safe distance from the roadway.
Sealing tires with TIREFIT
Small tire punctures, particularly those in
the tread, can be sealed with TIREFIT.
TIREFIT can be used in ambient tempera-
tures down to -4°F (-20°C).
iOpen door only when conditions are
safe to do so.
iSLK 55 AMG with Performance
Package* only.Warning!
G
Keep TIREFIT away from sparks, open flame
or heat source.
Do not smoke.
Page 411 of 481

410 Practical hintsFlat tire�
Screw the air pump’s air hose5 onto
flange6 of the TIREFIT container.
�
Stick TIREFIT container1 upside
down into notch3 of the electric air
pump.
7Tire valve
8Electric air pump switch
9Pressure gauge and vent screw
aFiller hose
�
Unscrew the valve cap from tire
valve7.
�
Screw filler hosea onto tire valve7.
�
Close vent screw9 on air hose4.
�
Insert electrical plug4 into the power
outlet in the passenger footwell
(�page 271).
�
Turn the SmartKey in the starter switch
to position1 (
�page 36).
�
Press I on electric air pump switch8.
The electric air pump should now
switch on and inflate the tire.After 5 minutes, the pressure gauge must
display at least 26 psi (1.8 bar). The air
hose can become hot during inflation.
Please exercise appropriate caution.
�
If this tire inflation pressure is not at-
tained, turn off the electric air pump,
detach the filler hose from the tire
valve, and drive vehicle back and forth
very slowly approximately 30 ft (10 m).
This serves to better distribute the
TIREFIT sealant material inside the tire.
�
Unscrew the air pump’s air hose5
from flange6 of the TIREFIT contain-
er.
�
Screw air hose5onto tire valve7.
�
Inflate the tire again.
Warning!
G
Observe safety instructions on air pump la-
bel.
!The cigarette lighter (
�page 270) is
not designed for use with the electric
air pump. Use the power outlet in the
passenger footwell (
�page 271) for
electric air pump operation.
!Do not operate the electric air pump
longer than 6 minutes without interrup-
tion. Otherwise it may overheat.
You may operate the air pump again af-
ter it has cooled off.
��
Page 412 of 481
, press 0 on electric
air pump switch8.
The electric air pump should now be
switched off.
�
Turn the Sma")
411 Practical hints
Flat tire
�
After attaining a tire inflation pressure
of 26 psi (1.8 bar), press 0 on electric
air pump switch8.
The electric air pump should now be
switched off.
�
Turn the SmartKey in the ignition to
position0 (
�page 36).
�
Detach the electric air pump.
The air hose may still be hot. Please ex-
ercise appropriate caution.
�
Store the electrical plug and the air
hose behind the flap and place the
electrical air pump back in the trunk.
�
Close the trunk lid.
�
Drive off immediately.
The TIREFIT sealant will distribute itself
evenly inside the tire.
�
After driving the vehicle for an initial
10 minutes, check the tire inflation
pressure using pressure gauge 9 on
the air pump.
Warning!
G
If a tire inflation pressure of 26 psi (1.8 bar)
is not attained, tire is too severely damaged
for TIREFIT to provide a reliable tire repair.
In this case, TIREFIT cannot properly seal
the tire.
Do not drive the vehicle.
Contact the nearest Mercedes-Benz Center
or call Roadside Assistance.
Warning!
G
Do not exceed vehicle speed of
50 mph (80 km / h). A TIREFIT repair is not
designed to operate at higher speeds.
The sticker must be attached on the instru-
ment cluster where it will be easily seen by
the driver.
Vehicle handling characteristics may
change. Adapt your driving accordingly.
Warning!
G
If tire inflation pressure has fallen below
20 psi (1.3 bar) do not continue to drive the
vehicle.
Park your vehicle safely away from the road-
way and contact the nearest authorized
Mercedes-Benz Center or Roadside
Assistance.
If tire inflation pressure is at least
20 psi (1.3 bar), inflate tire to correct pres-
sure (see placard on the driver’s door
B-pillar), and drive vehicle to nearest tire re-
pair facility to have tire repaired or replaced.
Recommended duration of use:
300 miles (500 km) at 50 mph (80 km/h)
with the recommended tire inflation pres-
sure.
��
Page 414 of 481
.
�
Take the collapsible tire, wheel wrench,
wheel bolts, jack, and electric air pump
out of the trun")
413 Practical hints
Flat tire
Preparing the vehicle
Prepare the vehicle as described
(�page 408).
�
Take the collapsible tire, wheel wrench,
wheel bolts, jack, and electric air pump
out of the trunk (
�page 388).Lifting the vehicle
�
Prevent the vehicle from rolling away
by blocking wheels with wheel chocks
(not included) or other sizeable ob-
jects.
One wheel chock is included with the
vehicle tool kit (
�page 388).
When changing wheel on a level surface:
�
Place the wheel chock in front of and
another sizeable object behind the
wheel that is diagonally opposite to the
wheel being changed.
Always try lifting the vehicle using the jack
on a level surface. However, should cir-
cumstances require you to do so on a hill,
place the wheel chock and the other size-
able object as follows:
�
Place the wheel chock and another
sizeable object on the downhill side
blocking both wheels of the axle not
being worked on.
Drive to the nearest Mercedes-Benz Center
as soon as possible to have the spare wheel
with collapsible tire replaced with a regular
road wheel.
Never operate the vehicle with more than
one spare wheel with collapsible tire
mounted.
Do not switch off the ESP
® when a spare
wheel with collapsible tire is mounted.
Page 418 of 481
417 Practical hints
Flat tire
�
Unscrew the alignment bolt, install last
wheel bolt and tighten slightly.
�
Inflate the collapsible tire
(�page 417).Inflating the collapsible tire
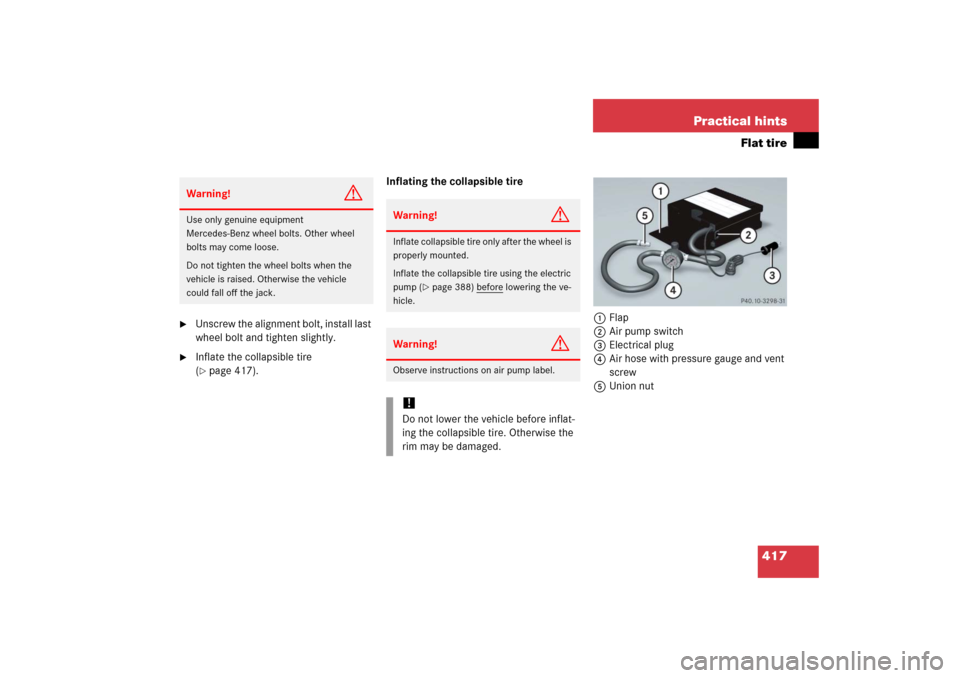
1Flap
2Air pump switch
3Electrical plug
4Air hose with pressure gauge and vent
screw
5Union nut
Warning!
G
Use only genuine equipment
Mercedes-Benz wheel bolts. Other wheel
bolts may come loose.
Do not tighten the wheel bolts when the
vehicle is raised. Otherwise the vehicle
could fall off the jack.
Warning!
G
Inflate collapsible tire only after the wheel is
properly mounted.
Inflate the collapsible tire using the electric
pump (
�page 388) before
lowering the ve-
hicle.
Warning!
G
Observe instructions on air pump label.!Do not lower the vehicle before inflat-
ing the collapsible tire. Otherwise the
rim may be damaged.
Page 419 of 481
.
�
Open flap1 on air pump.
�
Pull out electrical plug3 and air hose
with pressure gauge4.
�
Close vent screw on")
418 Practical hintsFlat tire�
Take the electric air pump out of the
trunk (
�page 388).
�
Open flap1 on air pump.
�
Pull out electrical plug3 and air hose
with pressure gauge4.
�
Close vent screw on air hose4.
�
Remove the valve cap from the tire
valve.
�
Screw air hose4 with union nut5
onto the collapsible tire valve.
�
Make sure electric air pump switch2
is set to0.
�
Insert electrical plug3 into the power
outlet in the passenger footwell
(�page 271).
�
Turn the SmartKey in the starter switch
to position1.
�
PressI on electric air pump switch2.
The electric air pump switches on and
inflates the collapsible tire.
�
Inflate the collapsible tire to approxi-
mately 51 psi (3.5 bar).
This takes about 5 minutes for the col-
lapsible tire. Air hose4 and union
nut5 can become hot during infla-
tion. Exercise proper caution to avoid
burning yourself when using the equip-
ment.
�
Press0 on electric air pump switch2.
�
Turn the SmartKey in the starter switch
to position0.
The electric air pump should now be
switched off.
�
If the tire inflation pressure is above
51 psi (3.5 bar), release excess tire in-
flation pressure using the vent screw
on air hose4.
!The cigarette lighter (
�page 270) is
not designed for use with the electric
air pump. Use the power outlet in the
passenger footwell (
�page 271) for
electric air pump operation.
!Do not operate the electric air pump
longer than 6 minutes without interrup-
tion. Otherwise it may overheat.
You may operate the electric air pump
again after it has cooled off.
Page 420 of 481

419 Practical hints
Flat tire
�
Detach the electric air pump.
�
Reinstall collapsible tire valve cap.
�
Store electrical plug3 and air
hose4 behind flap 1 and place the
electric air pump back in the trunk.
�
Lower the vehicle (
�page 419).Lowering the vehicle
�
Lower vehicle by turning the crank
counterclockwise until vehicle is rest-
ing fully on its own weight.
�
Remove the jack.
1-5 Wheel bolts
�
Tighten the five wheel bolts evenly in
the direction of the arrow, following the
diagonal sequence illustrated
(1to5), until all bolts are tight.
Observe a tightening torque of
80 lb-ft (110 Nm).
Warning!
G
Follow recommended tire inflation
pressures.
Do not underinflate tires. Underinflated tires
wear excessively and / or unevenly,
adversely affect handling and fuel economy,
and are more likely to fail from being over-
heated.
Do not overinflate tires. Overinflated tires
can adversely affect handling and ride
comfort, wear unevenly, increase stopping
distance, and result in sudden deflation
(blowout) because they are more likely to
become punctured or damaged by road
debris, potholes etc.
Warning!
G
Inflate the collapsible tire using the electric
pump (
�page 417) before
lowering the ve-
hicle.
��