Page 392 of 481

391 Practical hints
Where will I find...?
Spare wheel with collapsible tire
The spare wheel is stored in the storage
compartment underneath the trunk floor.
1Spare wheel, spare wheel bolts
(located under plastic cover on the
outside of spare wheel rim)
2Vehicle tool kit (under collapsible tire)
3Retaining screw�
Loosen retaining screw3by turning it
counterclockwise.
�
Remove spare wheel1.
�
Take off the wheel bolts for spare
wheel1.Storing the spare wheel with
collapsible tire
If you wish to store the spare wheel after
use, carry out the following steps. Other-
wise the spare wheel will not fit the storage
compartment.
�
Unscrew the valve cap from the valve
of the collapsible tire.
�
Take the valve extractor from the vehi-
cle tool kit (
�page 388).
�
Unscrew the valve insert from the valve
and allow the air to escape.
�
Screw the valve insert back into the
valve.
�
Screw the valve cap back on the valve.
�
Pull the protective wrap provided with
the vehicle tool kit over the spare
wheel.
�
Store the spare wheel and the valve ex-
tractor in the storage compartment un-
derneath the trunk floor.
�
Pierce the protective wrap with retain-
ing screw3.
�
Secure the spare wheel by turning re-
taining screw3 clockwise.
!Make sure the collapsible tire is dry
when storing it.iIt may take a few minutes for the col-
lapsible tire to deflate completely.
Page 393 of 481

392 Practical hintsWhere will I find...?
In case of a flat tire, you may temporarily
use the spare wheel with collapsible tire
when observing the following restrictions:�
Do not exceed a vehicle speed of
50 mph (80 km/h).
�
Drive to the nearest tire repair facility
to have the flat tire repaired or
replaced as appropriate.
�
Do not operate vehicle with more than
one spare wheel with collapsible tire
mounted.
For more information, see “Rims and tires”
(
�page 439).
Spare wheel bolts
1Wheel bolt for light alloy rims
2Wheel bolt for spare wheel with
collapsible tire (located under plastic
cover on the outside of spare wheel
rim)
Warning!
G
The dimensions of the spare wheel with col-
lapsible tire are different from those of the
road wheels. As a result, the vehicle han-
dling characteristics change when driving
with a spare wheel with collapsible tire
mounted.
The spare wheel with collapsible tire should
only be used temporarily, and should be re-
placed with a regular road wheel as quickly
as possible.
Page 396 of 481
 is required to open the
trunk lid.
The trunk lid lock is located")
395 Practical hints
Unlocking/locking in an emergency
Unlocking and opening the trunk
A minimum height clearance of
5.78 ft (1.76 m) is required to open the
trunk lid.
The trunk lid lock is located next to the
handle above the rear license plate recess.Trunk lid lock1Unlocking in an emergency
�
Fully insert the mechanical key into the
trunk lid lock.
�
Turn the mechanical key counterclock-
wise to position1 until it stops,
and simultaneously
�
pull the trunk lid handle and lift lid.
�
Turn the mechanical key back and re-
move it from the trunk lid lock.
Locking the vehicle
If you cannot lock the vehicle with the
SmartKey, do the following:�
Close the passenger door and the trunk
lid.
�
Press the central locking switch in the
upper part of the center console
(�page 102).
�
Check to see whether the locking knob
on the passenger door has moved
down.
�
If necessary, push it down manually.
The passenger door is locked.
�
Exit the vehicle and close the driver’s
door.
!Always make sure there is sufficient
overhead clearance.
��
Page 398 of 481

397 Practical hints
Opening/closing in an emergency
�Opening/closing in an emergency
Raising retractable hardtop manuallyWarning!
G
If the retractable hardtop does not com-
pletely open or close, the roof hydraulics will
lose pressure and the retractable hardtop is
lowered�
after approximately 7 minutes when the
ignition is switched on
�
after approximately 15 seconds when
the ignition is switched off
Shortly before the hardtop is lowered, a
warning will sound. In the multifunction dis-
play you will seeK and the message
Retractable roof being opened
.
�
Properly lock retractable hardtop before
continuing to drive (
�page 252).
Warning!
G
Manually closing the retractable hardtop is a
complicated and technically demanding pro-
cedure and should only be performed by an
authorized Mercedes-Benz Center or quali-
fied technician. Attempting to manually
close the retractable hardtop may cause
damage to the retractable hardtop and/or
personal injury.
Warning!
G
To prevent possible accidents, drive the ve-
hicle only with the retractable hardtop either
completely closed and locked, or fully low-
ered into its storage compartment.
Page 400 of 481
399 Practical hints
Replacing SmartKey batteries
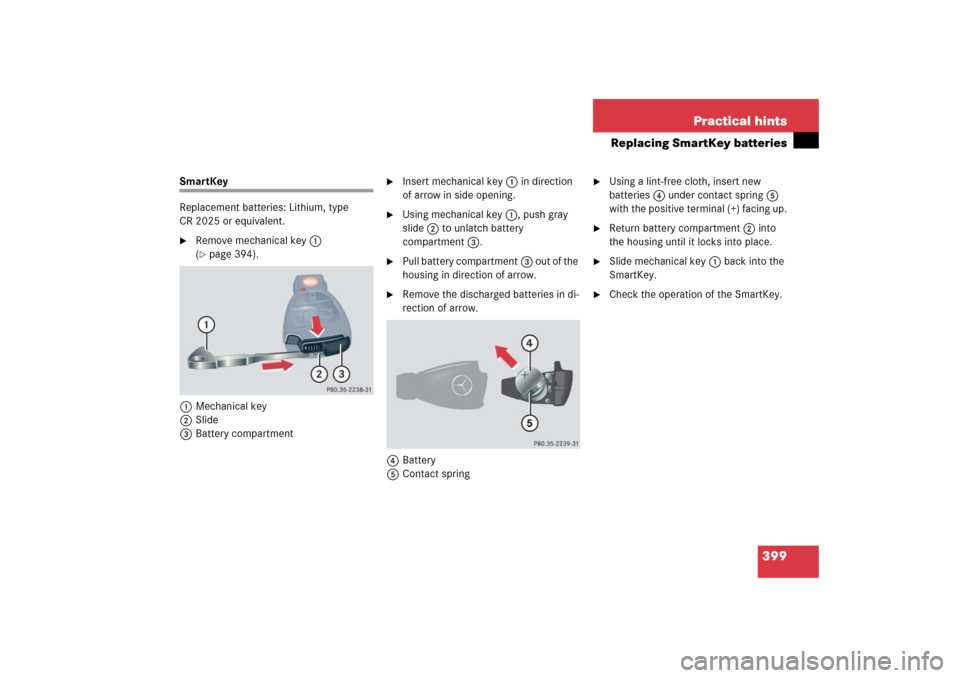
SmartKey
Replacement batteries: Lithium, type
CR 2025 or equivalent.�
Remove mechanical key1
(�page 394).
1Mechanical key
2Slide
3Battery compartment
�
Insert mechanical key1 in direction
of arrow in side opening.
�
Using mechanical key1, push gray
slide2 to unlatch battery
compartment3.
�
Pull battery compartment3 out of the
housing in direction of arrow.
�
Remove the discharged batteries in di-
rection of arrow.
4Battery
5Contact spring
�
Using a lint-free cloth, insert new
batteries4 under contact spring5
with the positive terminal (+) facing up.
�
Return battery compartment2 into
the housing until it locks into place.
�
Slide mechanical key1 back into the
SmartKey.
�
Check the operation of the SmartKey.
Page 401 of 481
400 Practical hintsReplacing bulbsSafe vehicle operation depends on proper
exterior lighting and signaling. It is there-
fore essential that all bulbs and lamp as-
semblies are in good working order at all
times.
Correct headlamp adjustment is extremely
important. Have headlamps checked and
readjusted at regular intervals and when a
bulb has been replaced. See an authorized
Mercedes-Benz Center for headlamp ad-
justment.
iIf the headlamps are fogged up on the
inside as a result of high humidity,
driving the vehicle a short distance with
the lights on should clear up the
fogging.
iBackup bulbs will be brought into use
when lamps malfunction. Observe the
messages in the multifunction display
(�page 382).
Page 404 of 481
403 Practical hints
Replacing bulbs
Replacing bulbs for front lamps
Before you start to replace a bulb for a
front lamp, do the following first:�
Turn the exterior lamp switch to
positionM (
�page 110).
�
Open the hood (
�page 307).
1Housing cover for low beam (halogen
headlamps only)
Housing cover for Bi-Xenon* head-
lamps. Do not remove.
2Bulb socket for turn signal lamp
3Bulb socket for high beam/high beam
flasher lamp
4Bulb socket for parking and standing
light lamp
5Bulb socket for low beam bulb
(Halogen headlamps only)
Warning!
G
Do not remove the cover1 for the
Bi-Xenon* headlamp. Because of high volt-
age in Bi-Xenon lamps, it is dangerous to re-
place the bulb or repair the lamp and its
components. We recommend that you have
such work done by a qualified technician.
Page 406 of 481
405 Practical hints
Replacing bulbs
Replacing bulbs for rear lamps
Before you start to replace a bulb for a rear
lamp, do the following first:�
Turn the exterior lamp switch to
positionM (
�page 110).
�
Open the trunk lid (
�page 98).
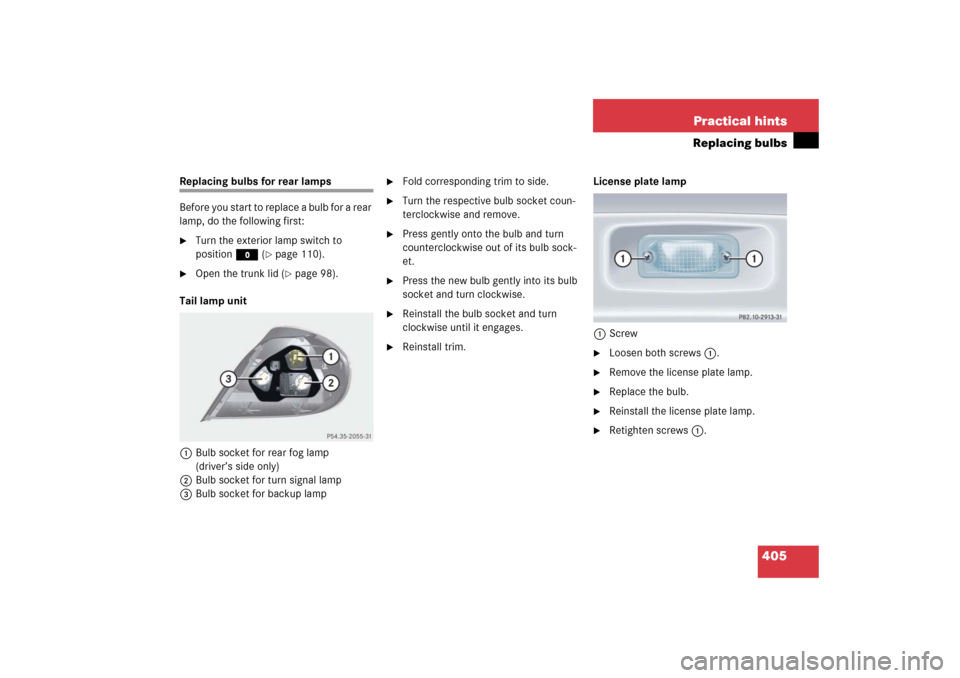
Tail lamp unit
1Bulb socket for rear fog lamp
(driver’s side only)
2Bulb socket for turn signal lamp
3Bulb socket for backup lamp
�
Fold corresponding trim to side.
�
Turn the respective bulb socket coun-
terclockwise and remove.
�
Press gently onto the bulb and turn
counterclockwise out of its bulb sock-
et.
�
Press the new bulb gently into its bulb
socket and turn clockwise.
�
Reinstall the bulb socket and turn
clockwise until it engages.
�
Reinstall trim.License plate lamp
1Screw
�
Loosen both screws1.
�
Remove the license plate lamp.
�
Replace the bulb.
�
Reinstall the license plate lamp.
�
Retighten screws1.