Page 389 of 481
388 Practical hintsWhere will I find...?First aid kit
The first aid kit is stored in a parcel net
behind the driver’s seat.Vehicle tool kit, vehicle jack
The vehicle tool kit is stored in a storage
compartment under the trunk floor.
The following is included:�
Collapsible chock
�
Vehicle jack
�
Protective wrap
�
Alignment bolt
�
Towing eye bolt
�
Wheel wrench
�
Spare fuses
�
Fuse extractor
�
Valve extractor
�
Electric air pump
�
TIREFIT kit*Removing the vehicle tool kit
Vehicles with spare wheel
1Spare wheel
2Vehicle tool kit (under collapsible tire,
together with wheel bolts for spare
wheel with collapsible tire)
3Retaining screw
�
Open the trunk (
�page 98).
�
Lift up trunk floor.
�
Loosen retaining screw3 by turning it
counter-clockwise.
�
Remove spare wheel1.
�
Remove vehicle tool kit2.1Collapsible wheel chock
2Vehicle jack
3Protective wrap
4Alignment bolt
5Towing eye bolt
6Wheel wrench
7Spare fuses, fuse extractor and valve
extractor
8Electric air pump
Page 390 of 481

389 Practical hints
Where will I find...?
Vehicles with TIREFIT*
1TIREFIT kit
2Vehicle jack
3Collapsible wheel chock
4Towing eye bolt
5Alignment bolt
6Wheel wrench
7Spare fuses, fuse extractor and valve
extractor
8Electric air pump�
Open the trunk (
�page 98).
�
Lift up trunk floor.Vehicle jackThe vehicle jack is located in the storage
compartment underneath the trunk floor.
Storage position�
Remove vehicle jack from its
compartment.
�
Turn crank handle in the direction of
arrow as far as it will go.
Warning!
G
The jack is designed exclusively for jacking
up the vehicle at the jack take-up brackets
built into both sides of the vehicle. To help
avoid personal injury, use the jack only to lift
the vehicle during a wheel change. Never
get beneath the vehicle while it is supported
by the jack. Keep hands and feet away from
the area under the lifted vehicle. Always
firmly set parking brake and block wheels
before raising vehicle with jack.
Do not disengage parking brake while the
vehicle is raised. Be certain that the jack is
always vertical (plumb line) when in use,
especially on hills. Always try to use the jack
on level surface. Make sure the jack arm is
fully seated in the jack take-up bracket. Al-
ways lower the vehicle onto sufficient
capacity jackstands before working under
the vehicle.
Page 416 of 481
415 Practical hints
Flat tire
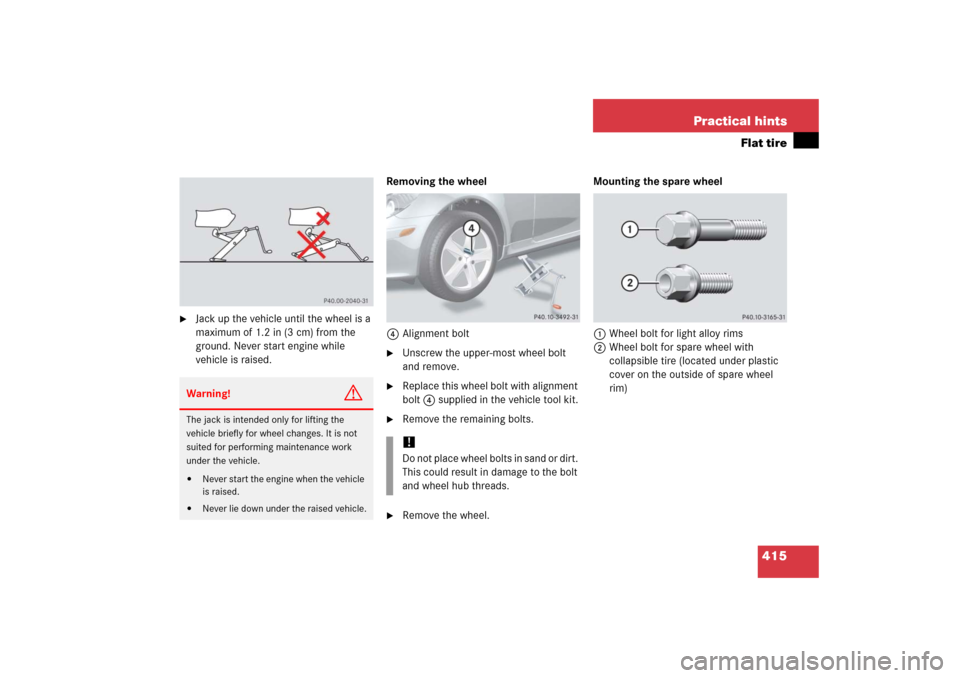
�
Jack up the vehicle until the wheel is a
maximum of 1.2 in (3 cm) from the
ground. Never start engine while
vehicle is raised.Removing the wheel
4Alignment bolt
�
Unscrew the upper-most wheel bolt
and remove.
�
Replace this wheel bolt with alignment
bolt4 supplied in the vehicle tool kit.
�
Remove the remaining bolts.
�
Remove the wheel.Mounting the spare wheel
1Wheel bolt for light alloy rims
2Wheel bolt for spare wheel with
collapsible tire (located under plastic
cover on the outside of spare wheel
rim)
Warning!
G
The jack is intended only for lifting the
vehicle briefly for wheel changes. It is not
suited for performing maintenance work
under the vehicle.�
Never start the engine when the vehicle
is raised.
�
Never lie down under the raised vehicle.
!Do not place wheel bolts in sand or dirt.
This could result in damage to the bolt
and wheel hub threads.
Page 418 of 481
417 Practical hints
Flat tire
�
Unscrew the alignment bolt, install last
wheel bolt and tighten slightly.
�
Inflate the collapsible tire
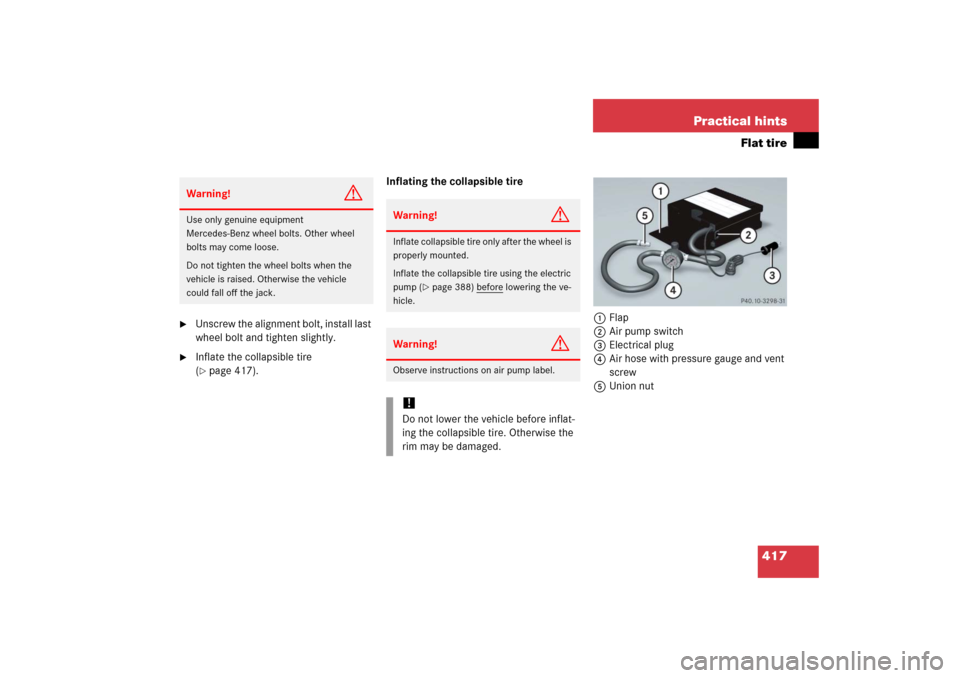
(�page 417).Inflating the collapsible tire
1Flap
2Air pump switch
3Electrical plug
4Air hose with pressure gauge and vent
screw
5Union nut
Warning!
G
Use only genuine equipment
Mercedes-Benz wheel bolts. Other wheel
bolts may come loose.
Do not tighten the wheel bolts when the
vehicle is raised. Otherwise the vehicle
could fall off the jack.
Warning!
G
Inflate collapsible tire only after the wheel is
properly mounted.
Inflate the collapsible tire using the electric
pump (
�page 388) before
lowering the ve-
hicle.
Warning!
G
Observe instructions on air pump label.!Do not lower the vehicle before inflat-
ing the collapsible tire. Otherwise the
rim may be damaged.
Page 458 of 481

Prevents the wheels from locking up
during braking so that the vehicle can
continue to be steered.
Accessory weight
(
�page 344)
Air pressure
(�pag")
457 Technical terms
ABS
(A
ntilock B
rake S
ystem)
Prevents the wheels from locking up
during braking so that the vehicle can
continue to be steered.
Accessory weight
(
�page 344)
Air pressure
(�page 344)
AIRSCARF neck-level heating*
AIRSCARF neck-level heating provides
the surrounding area of the occupants’
necks with a heated air stream flowing
from openings in the head restraints.
Alignment bolt
Metal pin with thread. The centering
pin is an aid used when changing a tire
to align the wheel with the wheel hub.
Aspect ratio
(�page 344)BabySmart
TM air bag deactivation
system
This system detects if a special
system-compatible child restraint seat
is installed on the passenger seat.
The system will automatically
deactivate the passenger front air bag
when such a seat is properly installed
(the 75indicator lamp
located in the center console comes on
and remains illuminated).
BabySmartTM compatible child seats
Special restraint system for children.
The sensor system for the passenger
seat prevents deployment of the pas-
senger front air bag if a BabySmart
TM
compatible child seat is installed. See
an authorized Mercedes-Benz Center
for availability.
Bar
(
�page 344)BAS
(B
rake A
ssist S
ystem)
System for potentially reducing braking
distances in emergency braking situa-
tions. The system is activated when it
senses an emergency based on how
fast the brake is applied.
Bead
(
�page 344)
Bi-Xenon headlamps*
Headlamps which use an electric arc as
the light source and produce a more in-
tense light than filament headlamps.
Bi-Xenon headlamps produce low
beam and high beam.
CAC
(Customer A
ssistance C
enter)
Mercedes-Benz customer service cen-
ter, which can help you with any ques-
tions about your vehicle and provide
assistance in the event of a break-
down.