Page 111 of 480

110 Controls in detailLocking and unlocking�
Close trunk lid with hands placed flat
on trunk lid.
Valet locking
The lock is located next to the handle
above the rear license plate recess.
Warning!
G
Only drive with the trunk closed. Among oth-
er dangers, such as blocked visibility, ex-
haust fumes may enter the vehicle interior.iIf the vehicle was previously centrally
locked, the trunk lid will lock automati-
cally when closed (
�page 109). The
turn signals will flash three times to
confirm locking.
iTo prevent an inadvertent lockout, do
not place the SmartKey in the trunk.
Vehicles with KEYLESS-GO*: To pre-
vent a possible inadvertent lockout, the
trunk lid will open automatically if a
SmartKey with KEYLESS-GO is recog-
nized inside the trunk.
When the hardtop is retracted, it must
be completely lowered in the trunk be-
fore the trunk lid can be closed
(�page 236).
iTo deny any unauthorized person ac-
cess to the trunk, e.g. when you valet
park the vehicle, lock it separately with
the mechanical key. Leave only the
SmartKey or SmartKey with
KEYLESS-GO* less its mechanical key
with the vehicle.
��
Page 112 of 480
.
�
Pull the mechanical key out of the
SmartKey (
�page 385).
�
Insert the mechanical key in the tr")
111 Controls in detail
Locking and unlocking
1Neutral position
2Locked�
Close the trunk (
�page 109).
�
Pull the mechanical key out of the
SmartKey (
�page 385).
�
Insert the mechanical key in the trunk
lid lock.
�
Turn the mechanical key clockwise to
position2 and remove the mechani-
cal key in that position to lock the
trunk.
The trunk remains locked even when the
vehicle is centrally unlocked.
�
Insert the mechanical key in the trunk
lid lock.
�
Turn the mechanical key counterclock-
wise to neutral position1 and remove
the mechanical key in that position to
unlock the trunk.
You can now open the trunk
(�page 108).
Trunk lid emergency release
With the trunk lid emergency release but-
ton, the trunk can be opened from inside
the trunk.
The emergency release button is located
on the left side of the trunk.
1Emergency release button�
Briefly press emergency release
button1.
The trunk unlocks and the trunk lid
opens slightly.
�
Push up the trunk lid to fully open.
iYou can only cancel the separate trunk
locking mode by means of the
mechanical key.
��
Page 113 of 480

112 Controls in detailLocking and unlockingIllumination of the emergency release but-
ton:�
The button flashes for 30 minutes after
opening the trunk.
�
The button flashes for 60 minutes after
closing the trunk.
Automatic central locking
The doors and the trunk lid lock automati-
cally when the vehicle is set into motion.
You can open a locked door from the in-
side. Open door only when conditions are
safe to do so.
You can deactivate the automatic locking
using the control system (
�page 155).
iThe emergency release button unlocks
the trunk while the vehicle is standing
still or in motion.iThe emergency release button does
not open the trunk lid if the vehicle bat-
tery is discharged or disconnected.
iIf the vehicle has previously been
locked with the SmartKey or
KEYLESS-GO*, opening the trunk from
the inside using the emergency release
button will trigger the alarm system.
To cancel the alarm, do one of the fol-
lowing:�
Press buttonŒ or‹ on the
SmartKey.
�
Insert the SmartKey in the starter
switch.
Vehicles with KEYLESS-GO*
�
Grasp an outside door handle.
The SmartKey with KEYLESS-GO
must be within 3 ft. (1 m) of the
vehicle.
�
Press the KEYLESS-GO* start/stop
button (
�page 37).
The SmartKey with KEYLESS-GO
must be inside the vehicle.
iThe doors unlock automatically after an
accident if the force of the impact ex-
ceeds a preset threshold.
The vehicle locks automatically when
the ignition is switched on and the
wheels are turning at vehicle speeds of
approximately 9 mph (15 km/h) or
more. You could therefore lock yourself
out when the vehicle �
is pushed
�
is on a test stand
��
Page 116 of 480
115 Controls in detailSeats
�Seats
For more information on seat adjustment,
see “Seat adjustment” (
�page 40).
Moving the seats forward and
backward
You can move the seats forward and back
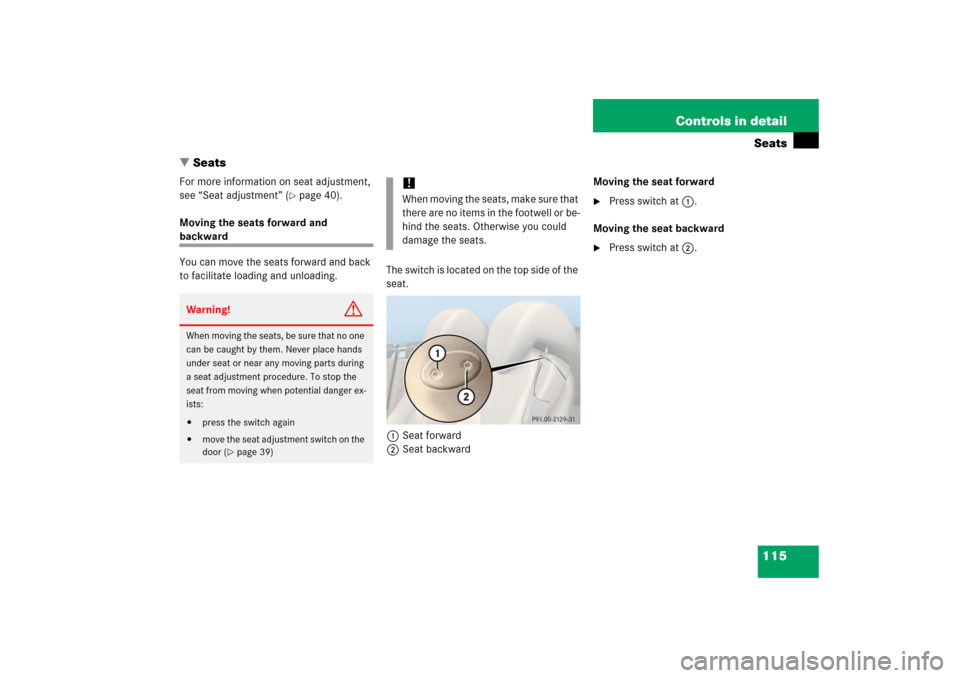
to facilitate loading and unloading.The switch is located on the top side of the
seat.
1Seat forward
2Seat backwardMoving the seat forward
�
Press switch at1.
Moving the seat backward
�
Press switch at2.
Warning!
G
When moving the seats, be sure that no one
can be caught by them. Never place hands
under seat or near any moving parts during
a seat adjustment procedure. To stop the
seat from moving when potential danger ex-
ists:�
press the switch again
�
move the seat adjustment switch on the
door (
�page 39)
!When moving the seats, make sure that
there are no items in the footwell or be-
hind the seats. Otherwise you could
damage the seats.
Page 117 of 480

116 Controls in detailSeatsLumbar support
You can adjust the contour of the seat’s
lumbar support to help enhance support to
your spine.
The thumbwheel is located on the lower
side of the seat.
1Thumb wheel�
Switch on the ignition (
�page 36).
�
Set the lumbar support between 0
and 5.
Multicontour backrest*
The multicontour backrest has inflatable
air cushions built into the seat backrest to
provide additional lumbar and side sup-
port.
The seat backrest cushion height and cur-
vature can be continuously varied with
switches on the lower side of the seat
when the ignition is switched on.
1Shoulder region support
2Side bolsters adjustment
3Massage function (PULSE)
4Lumbar region support�
Switch on the ignition (
�page 36).Shoulder region support
�
Press æ or ç on switch1.
The air cushion inflates or deflates.
Lumbar region support
�
Press k or j on rocker
switch4.
This selects the air cushion you wish to
adjust.
�
Press æ or ç on rocker
switch4.
The air cushion inflates or deflates.
Side bolsters adjustment
�
Press switch2 to the right or left.
The lateral support increases or de-
creases.
Page 118 of 480
117 Controls in detailSeats
Massage function (PULSE)
You can reduce muscle tension during long
trips by periodically using the massage
function. �
Press button3.
The indicator lamp on button3 comes
on. The air cushions in the lumbar re-
gion inflate and deflate rhythmically.
Seat heating
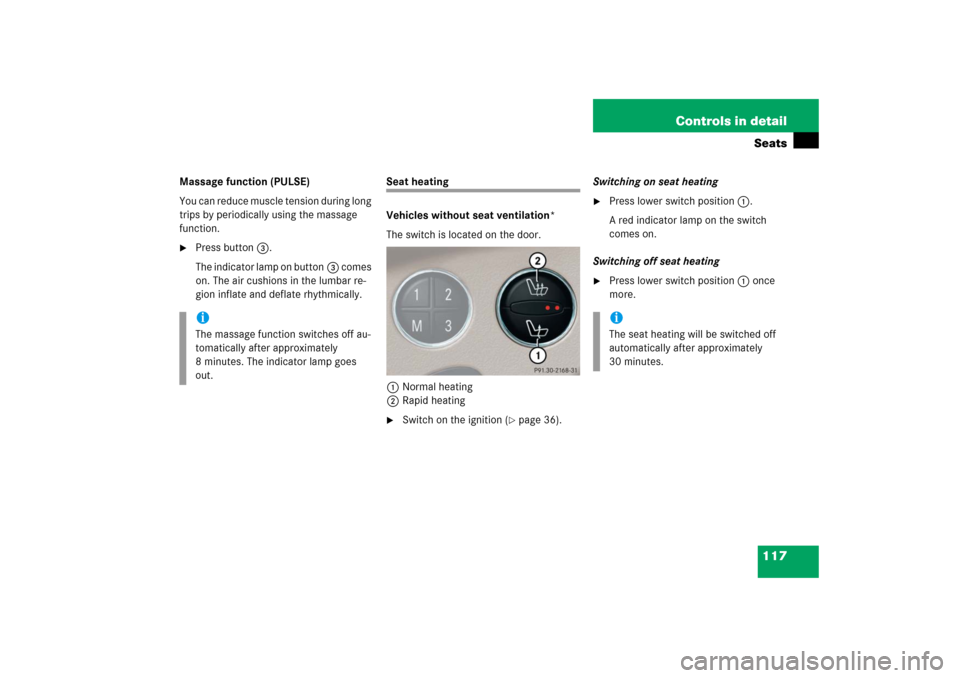
Vehicles without seat ventilation*
The switch is located on the door.
1Normal heating
2Rapid heating�
Switch on the ignition (
�page 36).Switching on seat heating
�
Press lower switch position1.
A red indicator lamp on the switch
comes on.
Switching off seat heating
�
Press lower switch position1 once
more.
iThe massage function switches off au-
tomatically after approximately
8 minutes. The indicator lamp goes
out.
iThe seat heating will be switched off
automatically after approximately
30 minutes.
Page 119 of 480
118 Controls in detailSeatsSwitching on rapid seat heating�
Press upper switch position2.
Both red indicator lamps on the switch
come on. Switching off rapid seat heating
�
Press upper switch position2 again. Vehicles with seat ventilation*
The switch is located on the door. The red
indicator lamps on the switch indicate the
selected heating level:
1Seat heating switch
�
Switch on the ignition (
�page 36).
iThe system switches to normal heating
mode after approximately 5 minutes.
Only the right-hand indicator lamp re-
mains lit.
iIf one or both of the lamps on the seat
heating switch are flashing, there is in-
sufficient voltage available since too
many electrical consumers are turned
on. The seat heating switches off auto-
matically.
The seat heating will switch back on
again automatically as soon as suffi-
cient voltage is available.
Leveloff
No indicator lamp on
1
One indicator lamp on
2
Two indicator lamps on
Page 121 of 480
120 Controls in detailSeatsSeat ventilation*
The switch is located on the door. The blue
indicator lamps on the switch indicate the
selected ventilation level:
1Seat ventilation switch
�
Switch on the ignition (
�page 36).Switching on seat ventilation
�
Press switch1.
Three blue indicator lamps on the
switch come on.
�
Continue pressing switch 1 until the
desired seat ventilation level is
reached.
Switching off seat ventilation
�
Press switch1 repeatedly until all in-
dicator lamps go out.
Level3
Three indicator lamps on
(highest level)
2
Two indicator lamps on
1
One indicator lamp on
(lowest level)
off
No indicator lamp on
iIf one or all of the lamps on the seat
ventilation switch are flashing, there is
insufficient voltage available since too
many electrical consumers are turned
on. The seat ventilation switches off au-
tomatically.
The seat ventilation will switch back on
again automatically as soon as suffi-
cient voltage is available.