Page 270 of 480

269 Operation
At the gas station
�At the gas station
Refuelling
The fuel filler flap is located on the
right-hand side of the vehicle towards the
rear. Locking/unlocking the vehicle with
the SmartKey or the SmartKey with
KEYLESS-GO* automatically locks/un-
locks the fuel filler flap.
�
Turn off the engine�
by turning the SmartKey to
position0. Remove the SmartKey
from the starter switch.
�
by pressing the KEYLESS-GO*
start/stop button. Open the driv-
er’s door (with the driver’s door
open, starter switch is in position 0,
same as SmartKey removed from
starter switch).
�
Open the fuel filler flap by pushing at
the point indicated by the arrow.
The fuel filler flap springs open.
�
Turn the fuel cap to the left and hold on
to it until possible pressure is released.
�
Take off the cap and set it in the recess
on the fuel filler flap.
�
Only fill your tank until the filler nozzle
unit cuts out – do not top up or over-
fill.
Warning!
G
Gasoline is highly flammable and poisonous.
It burns violently and can cause serious
injury. Whenever you are around gasoline,
avoid inhaling fumes and skin contact,
extinguish all smoking materials. Never
allow sparks, flame or smoking materials
near gasoline!
��
Page 322 of 480

321 Operation
Vehicle care
�Vehicle care
Cleaning and care of the vehicle
While in operation, even while parked, your
vehicle is subjected to varying external in-
fluences which, if gone unchecked, can at-
tack the paintwork as well as the
underbody and cause lasting damage.Such damage is caused not only by ex-
treme and varying climatic conditions, but
also by:
�
Air pollution
�
Road salt
�
Tar
�
Gravel and stone chipping
To avoid paint damage, you should imme-
diately remove:
�
Grease and oil
�
Fuel
�
Coolant
�
Brake fluid
�
Bird droppings
�
Insects
�
Tree resins, etc.
Frequent washing reduces and/or elimi-
nates the aggressiveness and potency of
the above adverse influences.More frequent washings are necessary to
deal with unfavorable conditions:
�
near the ocean
�
in industrial areas (smoke, exhaust
emissions)
�
during winter operation
You should check your vehicle from time to
time for stone chipping or other damage.
Any damage should be repaired as soon as
possible to prevent corrosion.
In doing so, do not neglect the underbody
of the vehicle. A prerequisite for a thor-
ough check is a washing of the underbody
followed by a thorough inspection. Dam-
aged areas need to be re-undercoated.
Your vehicle has been treated at the facto-
ry with a wax-base rustproofing in the body
cavities which will last for the lifetime of
the vehicle. Post-production treatment is
neither necessary nor recommended by
Mercedes-Benz because of the possibility
of incompatibility between materials used
in the production process and others ap-
plied later.
Warning!
G
Many cleaning products can be hazardous.
Some are poisonous, others are flammable.
Always follow the instructions on the partic-
ular container. Always open your vehicle’s
doors or windows when cleaning the inside.
Never use fluids or solvents that are not de-
signed for cleaning your vehicle.
Always lock away cleaning products and
keep them out of reach of children.
Page 323 of 480

322 OperationVehicle careWe have selected car-care products and
compiled recommendations which are
specially matched to our vehicles and
which always reflect the latest technology.
You can obtain Mercedes-Benz approved
car-care products at an authorized
Mercedes-Benz Center.
Scratches, corrosive deposits, corrosion or
damage due to negligent or incorrect care
cannot always be removed or repaired with
the car-care products recommended here.
In such cases it is best to seek aid at an
authorized Mercedes-Benz Center.
The following topics deal with the cleaning
and care of your vehicle and give important
“how-to” information as well as references
to Mercedes-Benz approved car-care
products.Power washer
Tar stains
Quickly remove tar stains before they dry
and become more difficult to remove. A tar
remover is recommended.
!Follow the instructions provided by the
power washer manufacturer on main-
taining a distance between the vehicle
and the nozzle of the power washer.
Never use a round nozzle to
power-wash tires. The intense jet of
water can result in damage to the tire.
Always replace a damaged tire.
Always keep the jet of water moving
across the surface. Do not aim directly
at electrical parts, electrical connec-
tors, seals, or other rubber parts.
iVehicles with KEYLESS-GO*:
If a door handle is hit by a strong jet of
water, and a SmartKey with
KEYLESS-GO* is in close proximity, i.e.
within approximately 3 ft (1 m), the ve-
hicle could be inadvertently locked or
unlocked.
Page 324 of 480

323 Operation
Vehicle care
Paintwork, painted body components
Mercedes-Benz approved Paint Care
should be applied when water drops on the
paint surface do not “bead up”. This should
normally be done every 3 to 5 months,
depending on climate and washing deter-
gent used.
Mercedes-Benz approved Paint Cleaner
should be applied if the paint surface
shows signs of embedded dirt (i.e. loss of
gloss).
Do not apply any of these products or wax
if your vehicle is parked in the sun or if the
hood is still hot.�
Use the appropriate MB-Touch-Up
Stick for quick and provisional repairs
of minor paint damage (i.e. chips from
stones, vehicle doors, etc.).Engine cleaning
Prior to cleaning the engine compartment,
make sure to protect electrical compo-
nents and connectors from contact with
water and cleaning agents.
Corrosion protection, such as MB Anticor-
rosion Wax, should be applied to the en-
gine compartment after every engine
cleaning. Before applying, all control link-
age bushings and joints should be lubricat-
ed. The poly-V-belt and all pulleys should
be protected from any wax.Vehicle washing
In the winter, thoroughly remove all traces
of road salt as soon as possible.
When washing the underbody, do not for-
get to clean the inner sides of the wheels.!Affixing stickers, adhesive tape or sim-
ilar materials to painted body compo-
nents may damage the paintwork.
iVehicles with KEYLESS-GO*:
If a door handle is hit by a strong jet of
water, and a SmartKey with
KEYLESS-GO* is in close proximity, i.e.
within approximately 3 ft (1 m), the ve-
hicle could be inadvertently locked or
unlocked.
Page 386 of 480
385 Practical hints
Locking/unlocking in an emergency
�Locking/unlocking in an emergency
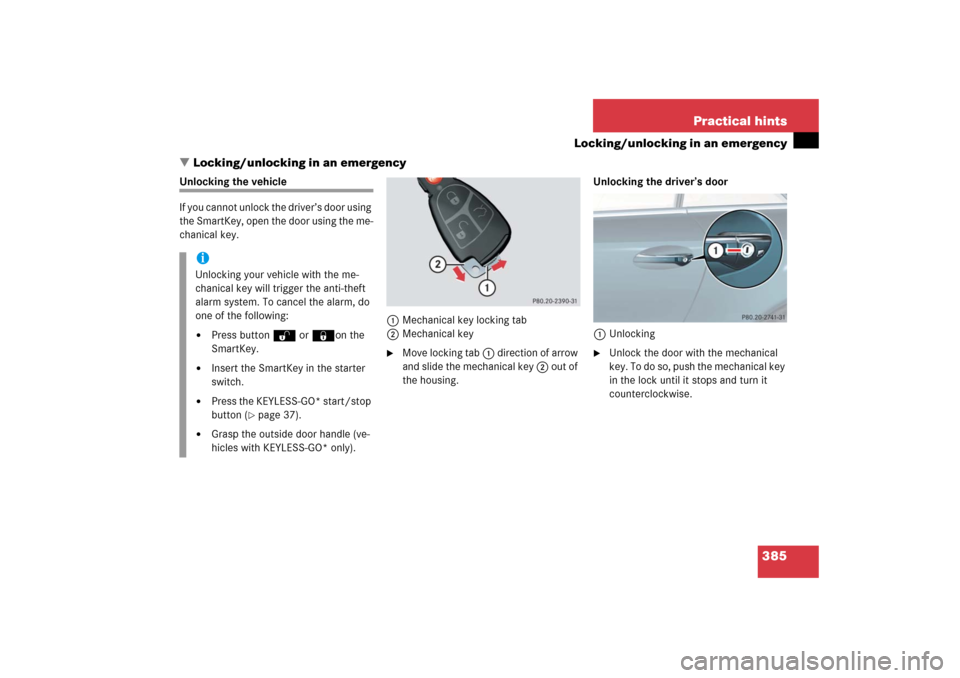
Unlocking the vehicle
If you cannot unlock the driver’s door using
the SmartKey, open the door using the me-
chanical key.
1Mechanical key locking tab
2Mechanical key
�
Move locking tab 1 direction of arrow
and slide the mechanical key 2 out of
the housing.Unlocking the driver’s door
1Unlocking
�
Unlock the door with the mechanical
key. To do so, push the mechanical key
in the lock until it stops and turn it
counterclockwise.
iUnlocking your vehicle with the me-
chanical key will trigger the anti-theft
alarm system. To cancel the alarm, do
one of the following:�
Press button Œ or ‹on the
SmartKey.
�
Insert the SmartKey in the starter
switch.
�
Press the KEYLESS-GO* start/stop
button (
�page 37).
�
Grasp the outside door handle (ve-
hicles with KEYLESS-GO* only).
Page 387 of 480
 is required to open the
trunk lid.
If you are unable to unlock the trunk with
t")
386 Practical hintsLocking/unlocking in an emergencyUnlocking the trunk
A minimum height clearance of
6.2 ft (1.89 m) is required to open the
trunk lid.
If you are unable to unlock the trunk with
the SmartKey, open the trunk with the me-
chanical key.
The handle is located above the rear li-
cense plate recess.Trunk lid lock1Unlocking
2Handle
�
Insert the mechanical key into the
trunk lid lock.
�
Turn the mechanical key counterclock-
wise to position 1 and hold it in this
position.
�
Pull the trunk lid handle 2 and lift lid.Unlocking the glove box
Lockable storage areas in the passenger
compartment include:
�
the glove box
�
the storage compartment under the
armrest
�
the rear storage compartments
If these cannot be unlocked by means of
the SmartKey or the SmartKey with
KEYLESS-GO*, use the mechanical key to
unlock the glove box.
iUnlocking your vehicle with the me-
chanical key will trigger the anti-theft
alarm system. To cancel the alarm, do
one of the following:�
Press button Œ or ‹ on the
SmartKey.
�
Insert the SmartKey in the starter
switch.
�
Press the KEYLESS-GO* start/stop
button (
�page 37).
�
Grasp the outside door handle (ve-
hicles with KEYLESS-GO* only).
iTo unlock the remaining storage com-
partments, the cause for the malfunc-
tion of the SmartKey or the SmartKey
with KEYLESS-GO* must be deter-
mined and corrected, see (
�page 99)
and (
�page 104).
Page 388 of 480
.
�
Insert the mechanical key into the
glove box l")
387 Practical hints
Locking/unlocking in an emergency
1Separately unlocking the glove box�
Slide mechanical key out of SmartKey
housing (
�page 385).
�
Insert the mechanical key into the
glove box lock and turn it to
position1.
Locking the vehicle
If you cannot lock the vehicle with the
SmartKey, lock it with the mechanical key
as follows:�
Close the passenger door and the
trunk.
�
Press the central locking switch in the
center console (
�page 113).
�
Check whether the locking knob on the
passenger door has moved down.
�
If necessary push it down manually.
�
Remove the mechanical key from of
the SmartKey (
�page 385).
�
Check whether the trunk is locked.
�
If necessary, lock the trunk with the
mechanical key (
�page 110).
Except for the driver’s door, the vehicle
should now be locked.
iUnlocking the glove box with the me-
chanical key will trigger the anti-theft
alarm system. To cancel the alarm, do
one of the following:�
Press button Œ or ‹ on the
SmartKey.
�
Insert the SmartKey in the starter
switch.
�
Press the KEYLESS-GO* start/stop
button (
�page 37).
�
Grasp the outside door handle (ve-
hicles with KEYLESS-GO* only).
��
Page 389 of 480

388 Practical hintsLocking/unlocking in an emergency1Locking�
Insert the mechanical key into the driv-
er’s door lock until it stops.
�
Turn the mechanical key clockwise to
position1.
The driver’s door is locked.
Lowering the load assist manually
If the load assist feature does not fully low-
er the retractable hardtop into the trunk
compartment and you are unable to close
the trunk lid, follow the instructions below.
1Hex-socket wrench
2Locking screw�
Remove the trunk floor from the trunk.
�
Lift up the lid located at the lower left
side of the trunk.
�
Have a second person lift and hold the
retracted hardtop.
�
Using the hex-socket wrench provided
in the vehicle tool kit, carefully turn the
locking screw 2 approximately one
quarter of a turn.
�
Hook luggage cover into holders
(�page 196).
�
Let go of the hardtop.
It should gradually lower into the trunk.
�
When top is completely lowered, return
locking screw 2 to its original posi-
tion.
�
Close the lid.
�
Replace the trunk floor.
�
Visit an authorized Mercedes-Benz
Center as soon as possible.!Do not overtighten the screw.
��