Page 220 of 480

The ABC system automatically selects the
optimum suspension tuning and ride
height for your vehicle.
Suspension tuning
The suspension")
219 Controls in detail
Driving systems
Active Body Control (ABC)
The ABC system automatically selects the
optimum suspension tuning and ride
height for your vehicle.
Suspension tuning
The suspension tuning is set according to:�
Your driving style
�
Road surface conditions
�
The vehicle loading
�
Your choice of suspension style
You can set the following suspension
styles:
�
Regular (Comfort)
�
SportyThe ABC button with the indicator lamp is
located in the lower section of the center
console.
1ABC button
2Indicator lamp
�
Start the engine (
�page 49).Suspension for sporty driving style
The setting for sporty driving is selected
when indicator lamp2 is illuminated.
�
Press button1.
Indicator lamp2 comes on.
The message
ABC Active Body Con-
trol SPORT appears in the multifunc-
tion display for a short time.
Suspension for regular driving style
The setting for regular driving is selected
when the indicator lamp2 is off.
�
Press button1.
Indicator lamp2 goes out.
The message
ABC Active Body Con-
trol COMFORT appears in the multifunc-
tion display for a short time.
iThe selected setting is stored, even if
the engine is turned off.
Page 223 of 480
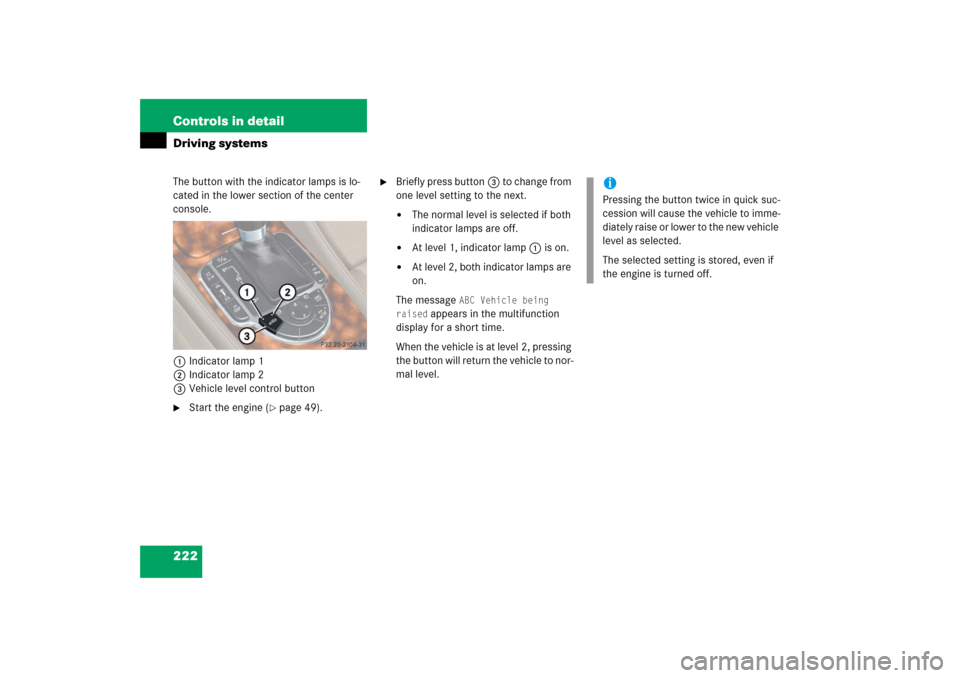
222 Controls in detailDriving systemsThe button with the indicator lamps is lo-
cated in the lower section of the center
console.
1Indicator lamp 1
2Indicator lamp 2
3Vehicle level control button�
Start the engine (
�page 49).
�
Briefly press button3 to change from
one level setting to the next.�
The normal level is selected if both
indicator lamps are off.
�
At level 1, indicator lamp1 is on.
�
At level 2, both indicator lamps are
on.
The message
ABC Vehicle being
raised
appears in the multifunction
display for a short time.
When the vehicle is at level 2, pressing
the button will return the vehicle to nor-
mal level.
iPressing the button twice in quick suc-
cession will cause the vehicle to imme-
diately raise or lower to the new vehicle
level as selected.
The selected setting is stored, even if
the engine is turned off.
Page 234 of 480

233 Controls in detail
Useful features
1Left cup holder
2Right cup holder
Opening�
Briefly press cup holder cover.
The cup holder opens automatically.
Ashtray
1Cover plate
2Sliding knob
Opening ashtray�
Briefly touch cover plate1.
The ashtray opens automatically.
Closing ashtray
�
Press cover plate1 down until it
latches.Removing the ashtray insert
�
Secure vehicle from movement by set-
ting the parking brake. Move the gear
selector lever to positionN.
Now you have more room to take out
the insert.
�
Press sliding knob2 to the right.
The insert will eject a short distance.
Replacing the ashtray insert
�
Press the insert into the frame until it
snaps into place.
Keep in mind that objects placed in the cup
holder may come lose during braking, vehi-
cle maneuvers, or in an accident and be
thrown around in the vehicle interior. Ob-
jects thrown around in the vehicle interior
may cause an accident and/or serious per-
sonal injury.
Warning!
G
Remove ashtray only with vehicle standing
still. Set the parking brake to secure vehicle
from movement. Move gear selector lever to
positionN. With gear selector lever in
positionN, turn off the engine.
Page 238 of 480
.
�
Flip up cover and insert electrical plug
(c")
237 Controls in detail
Useful features
Power outlet
An electrical outlet is located on the right
side of the trunk.�
Switch on the ignition (
�page 36).
�
Flip up cover and insert electrical plug
(cigar lighter type).
Telephone*
Radio transmitters, such as a portable tele-
phone or a citizens band unit, should only
be used inside the vehicle if they are con-
nected to an antenna that is installed on
the outside of the vehicle.
The external antenna must be approved by
Mercedes-Benz. Please contact an autho-
rized Mercedes-Benz Center for informa-
tion on the installation of an approved
external antenna. Refer to the radio trans-
mitter operation instructions regarding use
of an external antenna.
iThe electrical outlet can be used to ac-
commodate electrical consumers (e.g.
air pump, auxiliary lamps) up to a max-
imum of 180 W.
Warning!
G
Never operate radio transmitters equipped
with a built-in or attached antenna (i.e. with-
out being connected to an external antenna)
from inside the vehicle while the engine is
running. Doing so could lead to a malfunc-
tion of the vehicle’s electronic system, pos-
sibly resulting in an accident and/or serious
personal injury.
Warning!
G
Please do not forget that your primary re-
sponsibility is to drive the vehicle. A driver’s
attention to the road must always be
his /her primary focus when driving. For
your safety and the safety of others, we rec-
ommend that you pull over to a safe location
and stop before placing or taking a tele-
phone call.
If you choose to use the telephone
1 while
driving, please use the hands-free device
and only use the telephone when road,
weather, and traffic conditions permit.
Some jurisdictions prohibit the driver from
using a cellular telephone while driving a ve-
hicle.
Only operate the COMAND (Cockpit Man-
agement and Data System)
1 if road, weath-
er, and traffic conditions permit.
1Observe all legal requirements.
��
Page 249 of 480
.Step 2:
�
If you have previously programmed an
signal transmitter button an")
248 Controls in detailUseful featuresProgramming the integrated remote
control
Step 1:�
Switch on the ignition (
�page 36).Step 2:
�
If you have previously programmed an
signal transmitter button and wish to
retain its programming, proceed to
step 3.
If you are programming the integrated
remote control for the first time, press
and hold the two outer signal transmit-
ter buttons2 and4 and release
them only when the indicator lamp1
begins to flash after approximately
20 seconds (do not hold the button for
longer than 30 seconds). This proce-
dure erases any previous settings for
all three channels and initializes the
memory.
If you later wish to program a second
and/or third hand-held transmitter to
the remaining two signal transmitter
buttons, do not repeat this step and be-
gin directly with step 3.Step 3:
�
Hold the end of the hand-held remote
control5 of the device you wish to
train approximately 2 to 5 in
(5 to12 cm) away from the signal trans-
mitter button (2, 3 or4) to be pro-
grammed, while keeping the indicator
lamp1 in view.
Step 4:
�
Using both hands, simultaneously
press the hand-held remote control
button6 and the desired signal trans-
mitter button (2, 3 or4). Do not
release the buttons until step 5 is com-
pleted.
The indicator lamp1 will flash, first
slowly and then rapidly.
When programming a garage door opener, it
is advised to park outside the garage.
Do not run the engine while programming
the integrated remote control. Inhalation of
exhaust gas is hazardous to your health. All
exhaust gas contains carbon monoxide, and
inhaling it can cause unconsciousness and
possible death.
��
Page 256 of 480
255 Operation
The first 1000 miles (1500 km)
Driving instructions
At the gas station
Engine compartment
Tires and wheels
Winter driving
Maintenance
Vehicle care
Page 257 of 480

The more cautiously you treat y")
256 OperationIn the “Operation” section you will find de-
tailed information on operating, maintain-
ing and caring for your vehicle. The first 1000 miles (1500 km)
The more cautiously you treat your vehicle
during the break-in period, the more satis-
fied you will be with its performance later
on. �
Drive your vehicle during the first
1000 miles (1500 km) at varying but
moderate vehicle and engine speeds.
�
During this period, avoid heavy loads
(full throttle driving) and excessive en-
gine speeds (no more than
2/3 of max-
imum rpm in each gear).
�
Avoid accelerating by kickdown.
�
Do not attempt to slow the vehicle
down by shifting to a lower gear using
the gear selector lever.
�
Select positions3, 2 or1 only when
driving at moderate speeds (for hill
driving).
�
Select C as the preferred shift program
(�page 163) for the first 1 000 miles
(1500 km).After 1000 miles (1500 km), you may
gradually increase vehicle and engine
speeds to the permissible maximum.
All of the above instructions, as may apply
to your vehicle type, also apply when driv-
ing the first 1000 miles (1500 km) after
the engine or the rear differential has been
replaced.
!Additional instructions for AMG vehi-
cles:�
During the first 1000 miles
(1500 km), do not exceed a speed
of 85 mph (140 km/h).
�
During this period, avoid engine
speeds above 4500 rpm
(SL 55 AMG) or 4000 rpm
(SL 65 AMG) in each gear.
iAlways obey applicable speed limits.
Page 258 of 480

257 Operation
Driving instructions
�Driving instructions
Drive sensibly – save fuel
Fuel consumption, to a great extent, de-
pends on driving habits and operating con-
ditions.
To save fuel you should:�
Keep tires at the recommended infla-
tion pressures.
�
Remove unnecessary loads.
�
Allow engine to warm up under low
load use.
�
Avoid frequent acceleration and decel-
eration.
�
Have all maintenance work performed
at the intervals specified in the
Maintenance Booklet and as required
by the maintenance system. Contact
an authorized Mercedes-Benz Center.
Fuel consumption is also increased by driv-
ing in cold weather, in stop-and-go traffic,
on short trips and in hilly area.
Drinking and driving
Pedals
Warning!
G
Drinking and driving and/or taking drugs
and driving are a very dangerous combina-
tion. Even a small amount of alcohol or
drugs can affect your reflexes, perceptions
and judgment.
The possibility of a serious or even fatal ac-
cident are greatly increased when you drink
or take drugs and drive.
Do not drink or take drugs and drive or allow
anyone to drive who has been drinking or
taking drugs.
Warning!
G
Keep driver’s foot area clear at all times. Ob-
jects stored in this area may impair pedal
movement.

Driving instructions
At the gas station
Engine compartment
Tires and wheels
Winter driving
Maintenance
Vehicle care")