Page 177 of 480

176 Controls in detailAutomatic transmissionDownshifting�
Briefly press the gear selector lever to
the left in theD-direction.
or
�
Briefly press button1 on the left side
of the steering wheel (
�page 172).
The transmission shifts to the next
lower gear.Kickdown
Using the kickdown when driving in the
MANUAL program mode is not possible.
Deactivating manual shift program
�
Press the program mode selector
switch (
�page 174) repeatedly
until
Cor
S appears in the right
multifunction display.
or
�
Restart the engine.
The transmission will go to the
automatic program mode (C orS).
The MANUAL program mode is not
stored.Emergency operation
(Limp Home Mode)
If vehicle acceleration worsens or the
transmission no longer shifts, the trans-
mission is most likely operating in limp
home (emergency operation) mode. In this
mode only second gear and reverse gear
can be activated.�
Stop the vehicle in a safe location.
�
Move gear selector lever toP.
�
Turn off the engine.
�
Wait at least 10 seconds before
restarting.
�
Restart the engine.
�
Move gear selector lever to positionD
(for second gear) orR.
�
Have the transmission checked at an
authorized Mercedes-Benz Center as
soon as possible.
Warning!
G
On slippery road surfaces, never downshift
in order to obtain braking action. This could
result in drive wheel slip and reduced
vehicle control. Your vehicle’s ABS will not
prevent this type of loss of control.iWhen you brake or stop, the transmis-
sion shifts down to a gear from which
you can easily accelerate or take off.
Page 203 of 480
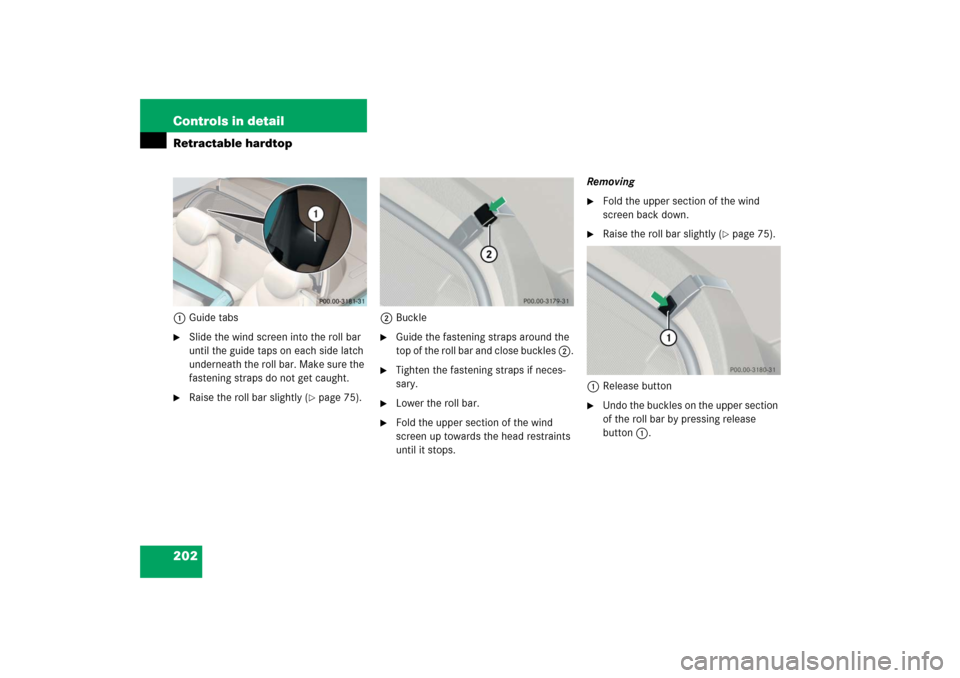
202 Controls in detailRetractable hardtop1Guide tabs�
Slide the wind screen into the roll bar
until the guide taps on each side latch
underneath the roll bar. Make sure the
fastening straps do not get caught.
�
Raise the roll bar slightly (
�page 75).2Buckle
�
Guide the fastening straps around the
top of the roll bar and close buckles 2.
�
Tighten the fastening straps if neces-
sary.
�
Lower the roll bar.
�
Fold the upper section of the wind
screen up towards the head restraints
until it stops.Removing
�
Fold the upper section of the wind
screen back down.
�
Raise the roll bar slightly (
�page 75).
1Release button
�
Undo the buckles on the upper section
of the roll bar by pressing release
button1.
Page 204 of 480
203 Controls in detail
Retractable hardtop
�
Lower the roll bar. Make sure the fas-
tening straps do not get caught.
�
Pull the wind screen out towards the
front of the vehicle. Be careful not to
damage interior trim with the guide
tabs.
�
Place the wind screen back into the
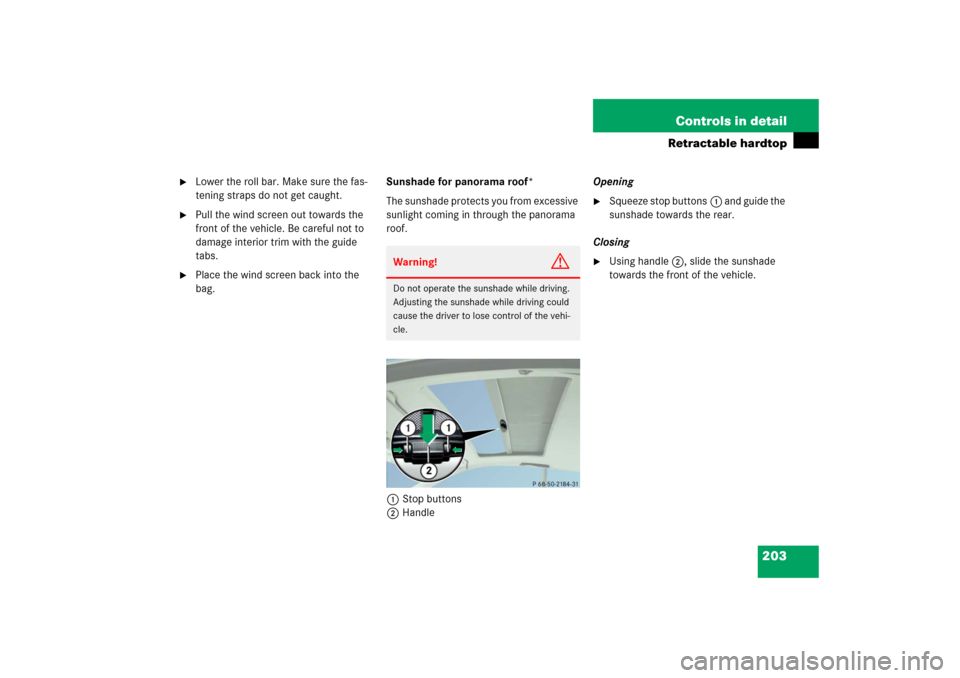
bag.Sunshade for panorama roof*
The sunshade protects you from excessive
sunlight coming in through the panorama
roof.
1Stop buttons
2HandleOpening
�
Squeeze stop buttons1 and guide the
sunshade towards the rear.
Closing
�
Using handle2, slide the sunshade
towards the front of the vehicle.
Warning!
G
Do not operate the sunshade while driving.
Adjusting the sunshade while driving could
cause the driver to lose control of the vehi-
cle.
Page 205 of 480

204 Controls in detailDriving systemsThe driving systems of your vehicle are de-
scribed on the following pages:�
Cruise control and Distronic*, with
which the vehicle can maintain a preset
speed
�
ABC with vehicle level control systems,
with which you can change vehicle sus-
pension characteristics
�
Parktronic*, which assists the driver
during parking maneuvers
For information on the BAS, ABS, and
ESP®, see “Driving safety systems”
(
�page 82).
Cruise control
The cruise control automatically maintains
the speed you set for your vehicle.
Use of cruise control is recommended for
driving at a constant speed for extended
periods of time. Cruise control can be set
at any speed above 20 mph (30 km/h).
The cruise control function is operated by
means of the cruise control lever.
The cruise control lever is the uppermost
lever found on the left-hand side of the
steering column (
�page 22).
Warning!
G
The cruise control is a convenience system
designed to assist the driver during vehicle
operation. The driver is and must remain at
all times responsible for the vehicle speed
and for safe brake operation.
Only use the cruise control if the road,
traffic, and weather conditions make it ad-
visable to travel at a steady speed.�
The use of cruise control can be danger-
ous on winding roads or in heavy traffic
because conditions do not allow safe
driving at a steady speed.
�
The use of cruise control can be danger-
ous on slippery roads. Rapid changes in
tire traction can result in wheel spin and
loss of control.
�
Deactivate the cruise control when driv-
ing in fog.
The “Resume” function should only be oper-
ated if the driver is fully aware of the previ-
ously set speed and wishes to resume this
particular preset speed.
Page 265 of 480
.
An electronic speed l")
264 OperationDriving instructionsSL 500
SL 500 with Sport Package*
Your vehicle is factory equipped with
“W”-rated tires, which have a speed rating
of 168 mph (270 km / h).
An electronic speed limiter prevents your
vehicle from exceeding a speed of
155 mph (250 km / h).
SL 600
SL 600 with Sport Package*
SL 55 AMG
SL 65 AMG
Your vehicle is factory equipped with
“Y”-rated tires, which have a speed rating
of 186 mph (300 km / h).
An electronic speed limiter prevents your
vehicle from exceeding a speed of
155 mph (250 km / h).SL 55 AMG
with Performance Package*
Your vehicle is factory equipped with
“Y”-rated tires, which have a speed rating
of 186 mph (300 km / h).
An electronic speed limiter prevents your
vehicle from exceeding a speed of
186 mph (300 km / h).
Winter driving instructions
The most important rule for slippery or icy
roads is to drive sensibly and to avoid
abrupt acceleration, braking and steering
maneuvers. Do not use the cruise control
system under such conditions.
When the vehicle is in danger of skidding,
move gear selector lever to positionN. Try
to keep the vehicle under control by cor-
rective steering action.
iFor information on tire speed rating for
winter tires, see “All-season and winter
tires” (
�page 304).
For additional general information on
tire speed markings on tire sidewall,
see “Tire speed rating” (
�page 303).
iFor information on driving with snow
chains, see “Snow chains”
(�page 317).
Warning!
G
On slippery road surfaces, never downshift
in order to obtain braking action. This could
result in drive wheel slip and reduced vehi-
cle control. Your vehicle’s ABS will not pre-
vent this type of control loss.
Page 306 of 480
.
N")
305 Operation
Tires and wheels
In addition to tire load rating, special load
information may be molded into the tire
sidewall following the letter designating
the tire speed rating1 (
�page 304).
No specification given: absence of any text
(like in above example) indicates a
standard load (SL) tire.
XL or Extra Load: designates an extra load
(or reinforced) tire.
Light Load: designates a light load tire.
C, D, E: designates load range associated
with the maximum load a tire can carry at
a specified pressure.
DOT, Tire Identification Number (TIN)
U.S. tire regulations require each new tire
manufacturer or tire retreader to mold a
TIN into or onto a sidewall of each tire
produced.
The TIN is a unique identifier which facili-
tates efforts by tire manufactures to notify
purchasers in recall situations or other
safety matters concerning tires and gives
purchasers the means to easily identify
such tires.
The TIN is comprised of “Manufacturer’s
identification mark”, “Tire size”, “Tire type
code” and “Date of manufacture”.1DOT
2Manufacturer’s identification mark
3Tire size
4Tire type code (at the option of the tire
manufacturer)
5Date of manufacture
iFor illustration purposes only. Actual
data on tires are specific to each vehi-
cle and may vary from data shown in
above illustration.
Page 316 of 480

315 Operation
Winter driving
�Winter driving
Before the onset of winter, have your vehi-
cle winterized at an authorized
Mercedes-Benz Center. This service in-
cludes:�
Check of anticorrosion and antifreeze
concentration.
�
Addition of cleaning concentrate to the
water of the windshield and headlamp
cleaning system. Add MB Concentrate
“S” to a pre-mixed windshield washer
solvent / antifreeze which is formulated
for temperatures below freezing point
(�page 451).
�
Battery test. Battery capacity drops
with decreasing ambient temperature.
A well charged battery helps to ensure
that the engine can be started and the
electro-hydraulic brake system will be
fully operational even at low ambient
temperatures.
�
Tire change.
Winter tires
Always use winter tires at temperatures
below 45°F (7°C) and whenever wintry
road conditions prevail. Not all M+S rated
tires provide special winter performance.
Make sure the tires you use show M+S and
the mountain/snowflake sym-
bol.marking on the tire sidewall.
These tires meet specific snow traction
performance requirements of the Rubber
Manufacturers Association (RMA) and the
Rubber Association of Canada (RAC) and
have been designed specifically for use in
snow conditions. Use of winter tires is the
only way to achieve the maximum effec-
tiveness of the ABS and ESP
® in winter op-
eration.
For safe handling, make sure all winter
tires mounted are of the same make and
have the same tread design.
!When scraping ice or snow from the
rear window, be careful not to damage
the sealing strip or apertures along the
side of the window.
Page 333 of 480

332 Practical hintsWhat to do if …Lamps in the instrument clusterGeneral information:
If any of the following lamps in the instru-
ment cluster fails to come on during thebulb self-check when switching on the igni-
tion, have the respective bulb checked and
replaced if necessary.Problem
Possible cause/consequence
Suggested solution
v
The yellow ABS/ESP
® warning
lamp comes on while driving.
The ESP
® is deactivated.
Risk of accident!
Adapt your speed and driving to the prevail-
ing road and weather conditions.
�
Switch the ESP
® back on (
�page 87).
If the ESP
® cannot be switched back on,
have the system checked at an autho-
rized Mercedes-Benz Center as soon as
possible.
v
The yellow ABS/ESP
® warning
lamp flashes while driving.
The ESP
®, ABS, or traction control has come
into operation because of detected traction
loss in at least one tire.
Distronic* is deactivated.
�
When driving off, apply as little throt-
tle as possible.
�
While driving, ease up on the acceler-
ator.
�
Adapt your speed and driving to the
prevailing road and weather condi-
tions.
�
Do not deactivate the ESP
®.
Exceptions: (
�page 86).
Failure to follow these instructions in-
creases the risk of an accident.