Page 334 of 480

333 Practical hints
What to do if …
Problem
Possible cause/consequence
Suggested solution
-
The yellow ABS indicator lamp
comes on while driving.
The ABS has detected a malfunction and has
switched off. The BAS and the ESP
® are also
switched off (see messages in display).
The electro-hydraulic brake system is still
functioning normally but without ABS avail-
able.
If the ABS control unit is malfunctioning, oth-
er systems such as Parktronic*, Distronic*,
or the automatic transmission may also be
malfunctioning.
�
Continue driving with added caution.
Wheels may lock during hard braking,
reducing steering capability.
�
Have the system checked at an autho-
rized Mercedes-Benz Center as soon
as possible.
Failure to follow these instructions in-
creases the risk of an accident.
�
Read and observe messages in the
display (
�page 345).
The charging voltage has fallen below
10 volts and the ABS was switched off.
The battery may not be sufficiently charged.
�
Switch off electrical consumers that
are currently not needed, e.g. seat
heating.
�
If necessary, have the generator and
battery checked.
When the voltage is above this value
again, the ABS is operational again.
Page 350 of 480

349 Practical hints
What to do if …
Left display
Right display
Possible cause/consequence
Possible solution
ABS
Malfunction!
Visit
workshop!
The ABS has detected a malfunction
and has switched off.
The ESP
® and the BAS are also deacti-
vated.
The electro-hydraulic brake system is
still functioning normally but without
the ABS available.
�
Continue driving with added caution.
Wheels may lock during hard braking,
reducing steering capability.
�
Have the system checked at an authorized
Mercedes-Benz Center as soon as
possible.
Failure to follow these instructions increases
the risk of an accident.
Display malfunction
Visit
workshop!
The ABS or the ABS display is malfunc-
tioning.
�
Continue driving with added caution.
Wheels may lock during hard braking,
reducing steering capability.
�
Have the system checked at an authorized
Mercedes-Benz Center as soon as
possible.
Failure to follow these instructions increases
the risk of an accident.
Cruise control
Visit
workshop
Cruise control or Distronic* is mal-
functioning.
�
Have the cruise control or Distronic*
checked at an authorized Mercedes-Benz
Center as soon as possible.
Page 354 of 480
353 Practical hints
What to do if …
Left display
Right display
Possible cause/consequence
Possible solution
ESP
Malfunction
Visit
workshop
The ESP
® has detected a malfunction
and switched off.
The ABS may not be operational.
The electro-hydraulic brake system is
still functioning normally but without
the ESP® available.
�
Continue driving with added caution.
�
Have the system checked at an authorized
Mercedes-Benz Center as soon as
possible.
Failure to follow these instructions increases
the risk of an accident.
Display malfunction
Visit
workshop
The ESP
® or the ESP
® display is mal-
functioning.
�
Continue driving with added caution.
�
Have the system checked at an authorized
Mercedes-Benz Center as soon as
possible.
Failure to follow these instructions increases
the risk of accident.
Page 401 of 480

should not be removed from the tire.
�
Take TIREFIT, the sticker, and the elec-
tric air pump out of the trunk.
�
Attach the stick")
400 Practical hintsFlat tire�
Foreign objects (e.g. screws or nails)
should not be removed from the tire.
�
Take TIREFIT, the sticker, and the elec-
tric air pump out of the trunk.
�
Attach the sticker where it will be easily
seen by the driver on the instrument
cluster.1TIREFIT container
2Flap
3Notch
4Electrical plug
5Air hose
6Flange
�
Open flap2 on the electric air pump.
�
Pull plug4 and air hose5 out of the
pump housing.
Warning!
G
TIREFIT is a limited repair device. TIREFIT
cannot be used for cuts or punctures larger
than approx. 0.16 in (4 mm) and tire dam-
age caused by driving with extremely low
tire inflation pressure, or on a flat tire, or a
damaged wheel.
Do not drive the vehicle under such circum-
stances.
Contact your nearest Mercedes-Benz
Center for assistance or call Roadside
Assistance.
Warning!
G
Take care not to allow the contents of
TIREFIT to come in contact with hair, eyes or
clothing. TIREFIT is harmful if inhaled, swal-
lowed or absorbed through the skin - causes
skin, eye and respiratory irritation.
Any contact with eyes or skin should be
flushed immediately with plenty of water.
If clothing comes in contact with TIREFIT,
change clothing as soon as possible.
In case of allergic reaction or rash, consult a
physician immediately.Warning!
G
Keep TIREFIT out of reach of children.
If swallowed, rinse mouth immediately with
plenty of water and drink plenty of water.
Do not induce vomiting!
Consult a physician immediately.
Keep away from open flame or heat source.
iIf sealant has leaked out, let it dry. You
can then peel it off.
Page 407 of 480
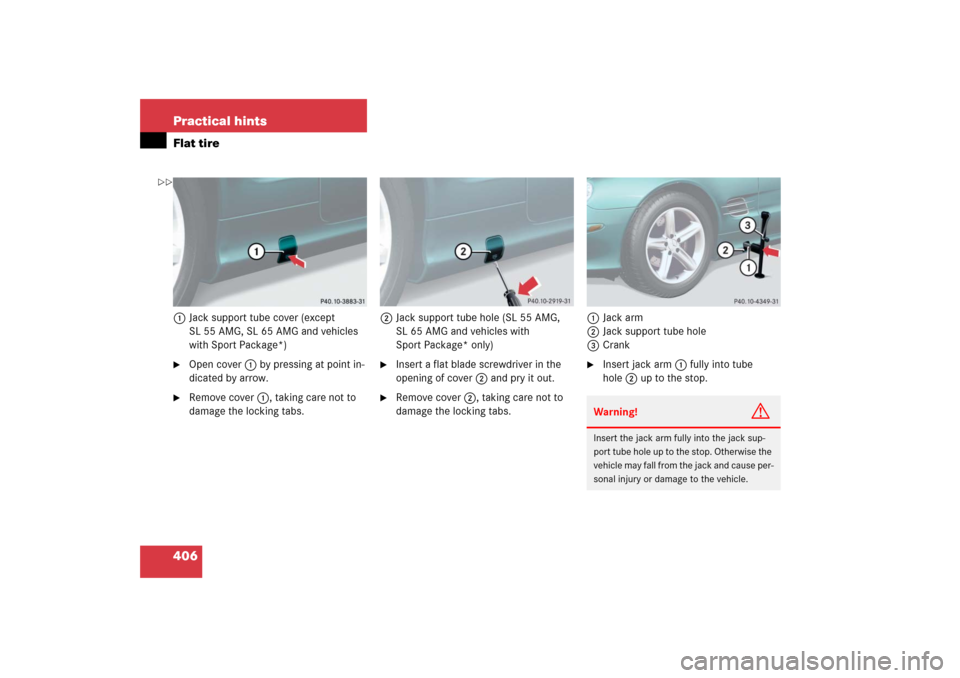
406 Practical hintsFlat tire1Jack support tube cover (except
SL 55 AMG, SL 65 AMG and vehicles
with Sport Package*)�
Open cover1 by pressing at point in-
dicated by arrow.
�
Remove cover1, taking care not to
damage the locking tabs.2Jack support tube hole (SL 55 AMG,
SL 65 AMG and vehicles with
Sport Package* only)
�
Insert a flat blade screwdriver in the
opening of cover2 and pry it out.
�
Remove cover2, taking care not to
damage the locking tabs.1Jack arm
2Jack support tube hole
3Crank
�
Insert jack arm1 fully into tube
hole2 up to the stop.Warning!
G
Insert the jack arm fully into the jack sup-
port tube hole up to the stop. Otherwise the
vehicle may fall from the jack and cause per-
sonal injury or damage to the vehicle.
��
Page 412 of 480

411 Practical hints
Flat tire
�
Before storing the jack in the trunk,
crank back to storage position and fold
in the arm.Replacing jack support tube cover
�
Slide tongue of cover under the upper
edge of the tube opening.
�
Applying even pressure, press cover
until it snaps into place.
Be careful not to damage the locking
tabs or clamp the plastic retaining
strap.
MOExtended system*
The MOExtended system allows you to
continue driving your vehicle even if there
is a total loss of pressure in one or more
tires.
You may only use the MOExtended system
in conjunction with the Run Flat Indicator*
(Canada vehicles) (
�page 293) or TPMS
(U.S. vehicles) (
�page 296).
Warning!
G
Have the tightening torque checked after
changing a wheel. The wheels could come
loose if they are not tightened to a torque of
96 lb-ft (130 Nm).Warning!
G
When turning the wheel wrench to tighten
the wheel bolts, make sure you position
hands on the wrench in such a way that you
avoid injury to yourself, such as scraping
your hands against the wheel. Make sure
turning the wheel wrench will not scratch or
damage the wheel rim.
!The maximum distance in emergency
mode depends on the vehicle’s load. It
is 30 miles (50 km) if the vehicle is par-
tially loaded and 18 miles (30 km) if the
vehicle is fully loaded.
The point at which the maximum driv-
ing distance begins in emergency
mode is when the warning message
appears in the multifunction display
indicating that there is a loss of tire
inflation pressure.
Do not exceed the maximum speed of
50 mph (80 km/h).
Page 425 of 480
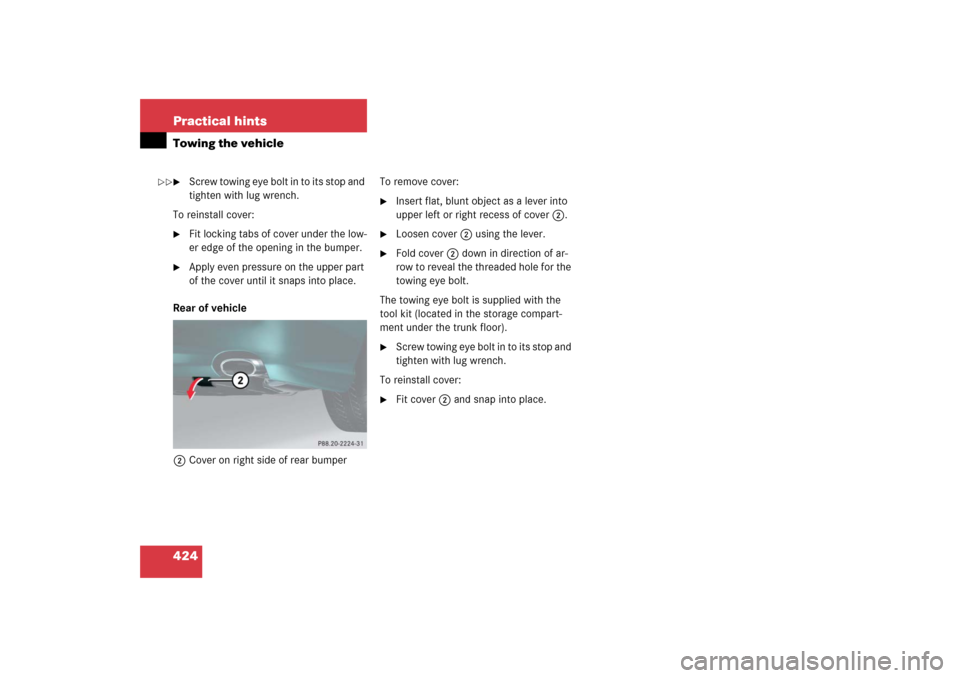
424 Practical hintsTowing the vehicle�
Screw towing eye bolt in to its stop and
tighten with lug wrench.
To reinstall cover:
�
Fit locking tabs of cover under the low-
er edge of the opening in the bumper.
�
Apply even pressure on the upper part
of the cover until it snaps into place.
Rear of vehicle
2Cover on right side of rear bumperTo remove cover:
�
Insert flat, blunt object as a lever into
upper left or right recess of cover 2.
�
Loosen cover 2 using the lever.
�
Fold cover 2 down in direction of ar-
row to reveal the threaded hole for the
towing eye bolt.
The towing eye bolt is supplied with the
tool kit (located in the storage compart-
ment under the trunk floor).
�
Screw towing eye bolt in to its stop and
tighten with lug wrench.
To reinstall cover:
�
Fit cover 2 and snap into place.
��
Page 427 of 480
426 Practical hintsFusesOpening�
Open the hood (
�page 272).
�
Move slide to position 3 and lift
cover1.
Closing
�
Hook cover 1 onto tabs and close it.
�
Move slide to position 2.
Emergency engine shut-down
If the engine cannot be turned off as de-
scribed, you may use the following backup
procedure.�
Open the main fuse box (
�page 425).
�
Pull out the two fuses labeled “ENGINE
EMERGENCY STOP”.
!The fuse box cover must be properly
positioned with the slide at the ‹
symbol to prevent moisture or dirt from
entering the fuse box and possibly im-
pairing fuse operation.