Page 24 of 480
23 At a glance
Cockpit
Item
Page
1
Parking brake pedal
51
2
Hood lock release
272
3
Parking brake release han-
dle
59
4
Door control panel
32
5
Exterior lamp switch
53, 123
6
Headlamp washer button
177
7
Combination switch�
Turn signals
�
Windshield wipers
�
High beam
53
54
129
Item
Page
8
Steering wheel gearshift
control
(SL 55 AMG, SL 65 AMG,
and vehicles with
Sport Package* only)
170
9
Cruise control lever�
Cruise control
�
Distronic*
204
207
a
Instrument cluster
24, 132
b
Multifunction steering
wheel
28, 136
c
Lever for voice control sys-
tem*, see separate
operating instructions
d
Front Parktronic* warning
indicator
225
Item
Page
e
Digital clock
150
f
Overhead control panel
31
g
Interior storage compart-
ments (locking/unlocking)
230
h
7 indicator lamp
78
j
Glove box
228
k
Center console
29, 30
l
Starter switch
38
m
Horn
n
Steering wheel adjustment
stalk
Heated steering wheel*
42
235
Page 112 of 480
.
�
Pull the mechanical key out of the
SmartKey (
�page 385).
�
Insert the mechanical key in the tr")
111 Controls in detail
Locking and unlocking
1Neutral position
2Locked�
Close the trunk (
�page 109).
�
Pull the mechanical key out of the
SmartKey (
�page 385).
�
Insert the mechanical key in the trunk
lid lock.
�
Turn the mechanical key clockwise to
position2 and remove the mechani-
cal key in that position to lock the
trunk.
The trunk remains locked even when the
vehicle is centrally unlocked.
�
Insert the mechanical key in the trunk
lid lock.
�
Turn the mechanical key counterclock-
wise to neutral position1 and remove
the mechanical key in that position to
unlock the trunk.
You can now open the trunk
(�page 108).
Trunk lid emergency release
With the trunk lid emergency release but-
ton, the trunk can be opened from inside
the trunk.
The emergency release button is located
on the left side of the trunk.
1Emergency release button�
Briefly press emergency release
button1.
The trunk unlocks and the trunk lid
opens slightly.
�
Push up the trunk lid to fully open.
iYou can only cancel the separate trunk
locking mode by means of the
mechanical key.
��
Page 133 of 480
.
The instrument cluster is activated when
you
�
open a door
�")
132 Controls in detailInstrument clusterFor a full view illustration of the instrument
cluster, see “Instrument cluster”
(�page 24).
The instrument cluster is activated when
you
�
open a door
�
switch on the ignition
�
press the reset button (
�page 24)
�
switch on the exterior lamps
Opening a door will activate the instrument
cluster only for about 30 seconds.
You can change the instrument cluster set-
tings in the Instrument cluster submenu of
the control system (
�page 149).
Instrument cluster illumination
Use the reset button to adjust the illumina-
tion brightness for the instrument cluster
and the switches on the center console.
1Reset buttonTo brighten illumination
�
Turn reset button 1 in the instrument
cluster clockwise.
The instrument cluster illumination will
brighten.
To dim illumination
�
Turn reset button 1 in the instrument
cluster counterclockwise.
The instrument cluster illumination will
dim.
iThe instrument cluster illumination is
dimmed or brightened to suit ambient
light conditions.
Page 185 of 480

184 Controls in detailAutomatic climate controlAir distribution in automatic mode
You can separately adjust the air distribu-
tion for each side of the passenger com-
partment.
Activating�
Press control button2 or 6
(�page 181).
The control button is engaged. The
U symbol on the control button
comes on. Air distribution for the re-
spective side of the passenger com-
partment is adjusted automatically.
Deactivating
�
Press control button 2 or 6
(�page 181) once more.
The control button sticks up slightly.
The U symbol on the control button
goes out. Automatic air distribution for
the respective side of the passenger
compartment is switched off. Adjust
the air distribution manually
(�page 185).Air volume in automatic mode
The air volume settings are the same for
the entire passenger compartment.
Activating
�
Press control button a (
�page 181).
The control button is engaged. The
U symbol on the control button
comes on.
Deactivating
�
Press control button a (
�page 181)
again.
The control button sticks up slightly.
The U symbol on the control button
goes out. Adjust the air volume manu-
ally (
�page 186).
Setting the temperature
Use temperature controls1 and7
(�page 181) to separately adjust the air
temperature on each side of the passenger
compartment. You should raise or lower
the temperature setting in small incre-
ments, preferably starting at 72°F (22°C).
The automatic climate control will adjust
to the set temperature as fast as possible.
Increasing
�
Turn temperature control1 and/or
7 (
�page 181) slightly clockwise.
The automatic climate control system
will correspondingly adjust the interior
air temperature.
Decreasing
�
Turn temperature control1 and/or
7 (
�page 181) slightly counterclock-
wise.
The automatic climate control system
will correspondingly adjust the interior
air temperature.
Page 271 of 480
270 OperationAt the gas station�
Replace the fuel cap by turning it clock-
wise until it audibly engages.
�
Close the fuel filler flap.
You should hear the latch close shut.Warning!
G
Overfilling of the fuel tank may create pres-
sure in the system which could cause a gas
discharge. This could cause the gas to spray
back out when removing the fuel pump noz-
zle, which could cause personal injury.
iOnly use premium unleaded gasoline
with a minimum Posted Octane Rating
of 91 (average of 96 RON / 86 MON).
Information on gasoline quality can
normally be found on the fuel pump.
For more information on gasoline, see
“Premium unleaded gasoline”
(�page 448) or the Factory Approved
Service Pamphlet.
iLeaving the engine running and the fuel
cap open can cause the engine mal-
function indicator lamp ú (USA
only) or the engine malfunction indica-
tor lamp ± (Canada only) to illumi-
nate.
For more information, see the “Practi-
cal hints” section (
�page 335).
��
Page 386 of 480
385 Practical hints
Locking/unlocking in an emergency
�Locking/unlocking in an emergency
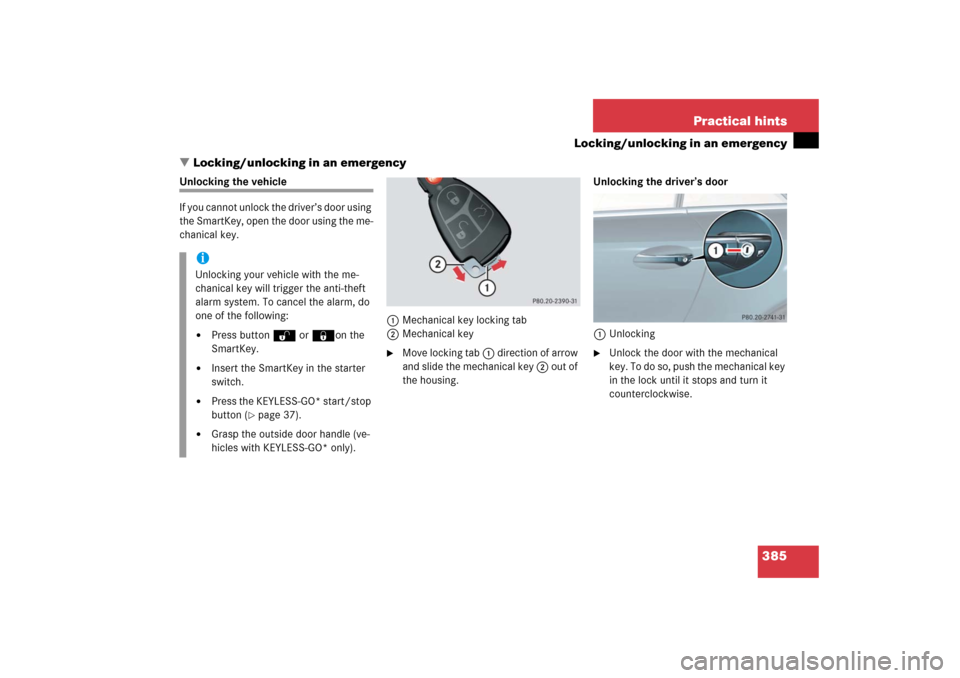
Unlocking the vehicle
If you cannot unlock the driver’s door using
the SmartKey, open the door using the me-
chanical key.
1Mechanical key locking tab
2Mechanical key
�
Move locking tab 1 direction of arrow
and slide the mechanical key 2 out of
the housing.Unlocking the driver’s door
1Unlocking
�
Unlock the door with the mechanical
key. To do so, push the mechanical key
in the lock until it stops and turn it
counterclockwise.
iUnlocking your vehicle with the me-
chanical key will trigger the anti-theft
alarm system. To cancel the alarm, do
one of the following:�
Press button Œ or ‹on the
SmartKey.
�
Insert the SmartKey in the starter
switch.
�
Press the KEYLESS-GO* start/stop
button (
�page 37).
�
Grasp the outside door handle (ve-
hicles with KEYLESS-GO* only).
Page 387 of 480
 is required to open the
trunk lid.
If you are unable to unlock the trunk with
t")
386 Practical hintsLocking/unlocking in an emergencyUnlocking the trunk
A minimum height clearance of
6.2 ft (1.89 m) is required to open the
trunk lid.
If you are unable to unlock the trunk with
the SmartKey, open the trunk with the me-
chanical key.
The handle is located above the rear li-
cense plate recess.Trunk lid lock1Unlocking
2Handle
�
Insert the mechanical key into the
trunk lid lock.
�
Turn the mechanical key counterclock-
wise to position 1 and hold it in this
position.
�
Pull the trunk lid handle 2 and lift lid.Unlocking the glove box
Lockable storage areas in the passenger
compartment include:
�
the glove box
�
the storage compartment under the
armrest
�
the rear storage compartments
If these cannot be unlocked by means of
the SmartKey or the SmartKey with
KEYLESS-GO*, use the mechanical key to
unlock the glove box.
iUnlocking your vehicle with the me-
chanical key will trigger the anti-theft
alarm system. To cancel the alarm, do
one of the following:�
Press button Œ or ‹ on the
SmartKey.
�
Insert the SmartKey in the starter
switch.
�
Press the KEYLESS-GO* start/stop
button (
�page 37).
�
Grasp the outside door handle (ve-
hicles with KEYLESS-GO* only).
iTo unlock the remaining storage com-
partments, the cause for the malfunc-
tion of the SmartKey or the SmartKey
with KEYLESS-GO* must be deter-
mined and corrected, see (
�page 99)
and (
�page 104).
Page 389 of 480

388 Practical hintsLocking/unlocking in an emergency1Locking�
Insert the mechanical key into the driv-
er’s door lock until it stops.
�
Turn the mechanical key clockwise to
position1.
The driver’s door is locked.
Lowering the load assist manually
If the load assist feature does not fully low-
er the retractable hardtop into the trunk
compartment and you are unable to close
the trunk lid, follow the instructions below.
1Hex-socket wrench
2Locking screw�
Remove the trunk floor from the trunk.
�
Lift up the lid located at the lower left
side of the trunk.
�
Have a second person lift and hold the
retracted hardtop.
�
Using the hex-socket wrench provided
in the vehicle tool kit, carefully turn the
locking screw 2 approximately one
quarter of a turn.
�
Hook luggage cover into holders
(�page 196).
�
Let go of the hardtop.
It should gradually lower into the trunk.
�
When top is completely lowered, return
locking screw 2 to its original posi-
tion.
�
Close the lid.
�
Replace the trunk floor.
�
Visit an authorized Mercedes-Benz
Center as soon as possible.!Do not overtighten the screw.
��