Page 28 of 480
27 At a glance
Instrument cluster
Item
Page
5
Tachometer with:
133
AHigh beam head-
lamp indicator
129
úEngine malfunction
indicator lamp, USA
only
±Engine malfunction
indicator lamp,
Canada only
335
CRoll bar warning
lamp
339
-Antilock Brake Sys-
tem (ABS) indicator
lamp
333
Item
Page
1Supplemental
Restraint System
(SRS) indicator lamp
341
340
XCombination low tire
pressure/TPMS mal-
function telltale*
342
6
Right multifunction
display with:�
Gear selector lever
position
164
�
Outside temperature
display
134
�
Program mode
163
7
Fuel gauge with:AFuel reserve warning
lamp
338
Page 37 of 480

36 Getting startedUnlockingStarter switch positions SmartKey
Starter switch0For removing SmartKey
1Power supply for some electrical con-
sumers, such as seat adjustment
2Ignition (power supply for all electrical
consumers) and driving position
All lamps (except high beam headlamp
indicator lamp and turn signal indicator
lamps unless activated) in the instru-
ment cluster come on. If a lamp in the
instrument cluster fails to come on
when the ignition is switched on, have
it checked and replaced if necessary.If a lamp in the instrument cluster re-
mains on after starting the engine or
comes on while driving, refer to “Lamps
in the instrument cluster”
(
�page 332).
3Starting position
Warning!
G
When leaving the vehicle, always remove the
SmartKey or the SmartKey with
KEYLESS-GO* from the starter switch, take
it with you, and lock the vehicle. Do not
leave children unattended in the vehicle, or
with access to an unlocked vehicle. Unsu-
pervised use of vehicle equipment may
cause an accident and/or serious personal
injury.
iWhen you switch on the ignition, the in-
dicator and warning lamps (except high
beam headlamp indicator lamp and
turn signal indicator lamps unless acti-
vated) in the instrument cluster come
on. The indicator and warning lamps
(except high beam headlamp indicator
lamp and turn signal indicator lamps if
activated) should go out when the en-
gine is running. This indicates that the
respective systems are operational.iThe SmartKey can only be removed
from the starter switch with the gear
selector lever in position P.
Page 39 of 480

38 Getting startedUnlockingIgnition (or Position 2)�
Press the KEYLESS-GO start/stop but-
ton twice.
This supplies power for all electrical
consumers. All lamps (except high
beam headlamp indicator lamp and
turn signal indicator lamps unless acti-
vated) in the instrument cluster come
on.
For more information, see “SmartKey with
KEYLESS-GO*” (
�page 100).
For information on starting the engine us-
ing the KEYLESS-GO start/stop button,
see “Starting with KEYLESS-GO*”
(
�page 50).
iIf you now press the KEYLESS-GO
start/stop button once, the power sup-
ply is again switched off.
iWhen you switch on the ignition, the in-
dicator and warning lamps (except high
beam headlamp indicator lamp and
turn signal indicator lamps unless acti-
vated) in the instrument cluster come
on. The indicator and warning lamps
(except high beam headlamp indicator
lamp and turn signal indicator lamps if
activated) should go out when the en-
gine is running. This indicates that the
respective systems are operational.
Page 52 of 480
51 Getting started
Driving
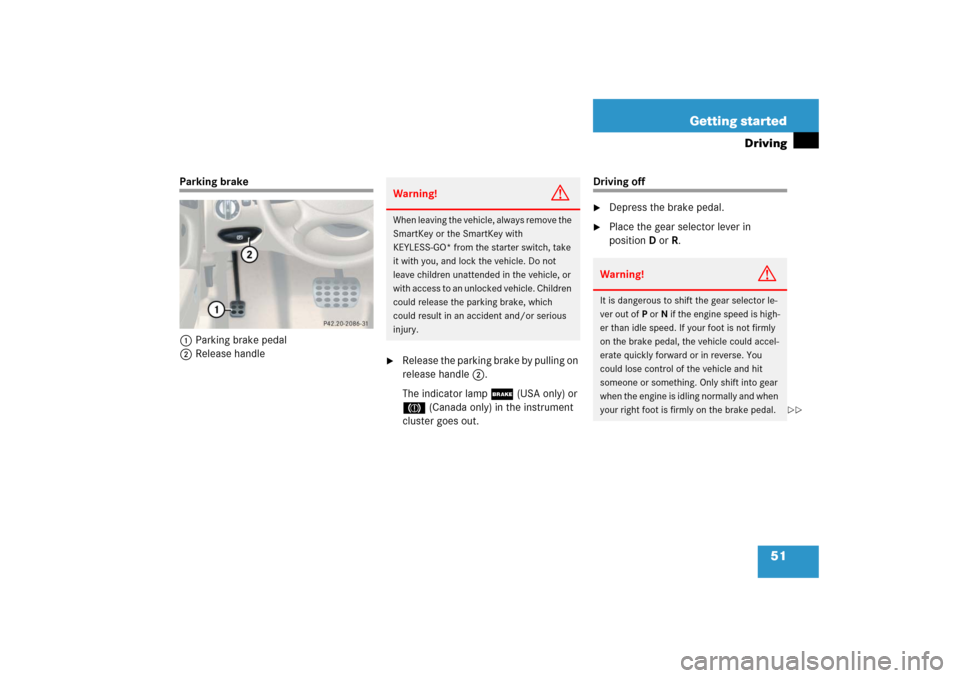
Parking brake
1Parking brake pedal
2Release handle
�
Release the parking brake by pulling on
release handle2.
The indicator lamp;(USA only) or
3 (Canada only) in the instrument
cluster goes out.
Driving off�
Depress the brake pedal.
�
Place the gear selector lever in
positionD orR.
Warning!
G
When leaving the vehicle, always remove the
SmartKey or the SmartKey with
KEYLESS-GO* from the starter switch, take
it with you, and lock the vehicle. Do not
leave children unattended in the vehicle, or
with access to an unlocked vehicle. Children
could release the parking brake, which
could result in an accident and/or serious
injury.
Warning!
G
It is dangerous to shift the gear selector le-
ver out ofP orN if the engine speed is high-
er than idle speed. If your foot is not firmly
on the brake pedal, the vehicle could accel-
erate quickly forward or in reverse. You
could lose control of the vehicle and hit
someone or something. Only shift into gear
when the engine is idling normally and when
your right foot is firmly on the brake pedal.
��
Page 54 of 480
53 Getting started
Driving
Switching on headlamps
Low beam headlamps
The exterior lamp switch is located on the
dashboard to the left of the steering wheel.Exterior lamp switch1Off
2Low beam headlamps on�
Turn the exterior lamp switch to
position B.
The low beam headlamps come on.High beam
The combination switch is located on the
left of the steering column.
Combination switch1High beam
2High beam flasher�
Push the combination switch in direc-
tion of arrow 1.
The high beam headlamps come on.
The high beam headlamp indicator
A in the instrument cluster comes
on (
�page 27).
For more information, see “Lighting”
(
�page 123).
Turn signals
The combination switch is located on the
left of the steering column.Combination switch1Turn signals, right
2Turn signals, left�
Press the combination switch in direc-
tion of arrow1 or2.
The corresponding turn signal indicator
lampKorLin the instrument
cluster flashes (
�page 25).
Page 60 of 480

59 Getting started
Parking and locking
Parking brake
1Parking brake pedal
2Release handle�
Step firmly on parking brake pedal1.
When the engine is running, the indica-
tor lamp;(USA only) or3
(Canada only) in the instrument cluster
will be illuminated.
Switching off headlamps�
Turn the exterior lamp switch to posi-
tion M (
�page 53).
For more information, see “Exterior lamp
switch” (
�page 123).
Warning!
G
When leaving the vehicle, always remove the
SmartKey or the SmartKey with
KEYLESS-GO* from the starter switch, take
it with you, and lock the vehicle. Do not
leave children unattended in the vehicle, or
with access to an unlocked vehicle. Children
could release the parking brake and/or
move the gear selector lever from
positionP, either of which could result in an
accident and/or serious injury.
Warning!
G
Getting out of your vehicle with the gear se-
lector lever not fully engaged in positionP is
dangerous. Also, when parked on an incline,
positionP alone may not prevent your vehi-
cle from moving, possibly hitting people or
objects.
Always set the parking brake in addition to
shifting to positionP (
�page 164).
When parked on an incline, also turn front
wheels towards the road curb.
Page 65 of 480

64 Safety and SecurityOccupant safetyIn this section you will learn the most im-
portant facts about the restraint systems
of the vehicle.
The restraint systems are�
Seat belts
�
Emergency tensioning device
�
Airbags
�
Child seats
�
Child seat recognition
As independent systems, their protective
effects work in conjunction with each oth-
er.The 1 indicator lamp in the instrument
cluster comes on
�
for about 4 seconds when you turn the
SmartKey in the starter switch to posi-
tion 1 or press the KEYLESS-GO*
start/stop button once. It then goes
out briefly, comes on again and re-
mains lit until you start the engine, turn
the SmartKey to position 2 or press the
KEYLESS-GO start/stop button once
more (
�page 37).
�
for about 4 seconds when you turn the
SmartKey in the starter switch to
position 2 or press the KEYLESS-GO*
start/stop button twice (
�page 37).
�
for about 4 seconds when you start the
engine by turning the SmartKey in the
starter switch or by pressing the
KEYLESS-GO* start/stop button once
with the brake pedal depressed
(�page 49).
The 1 indicator lamp goes out shortly
after you start the engine. This shows that
the restraint systems are operational.A malfunction in the system has been de-
tected if the 1 indicator lamp
�
fails to go out after approximately
4 seconds
�
does not come on at all
�
comes on after the engine was started
or while driving
For more information, see the “Practical
hints” section (
�page 341).
iFor information on infants and children
traveling with you in the vehicle and re-
straint systems for infants and chil-
dren, see “Children in the vehicle”
(�page 76).
Page 70 of 480

69 Safety and Security
Occupant safety
Safety guidelines for the seat belt,
emergency tensioning device and
airbag
When you sell your vehicle, we strongly
urge you to give notice to the subsequent
owner that it is equipped with an SRS by
alerting them to the applicable section in
the Operator’s Manual.Warning!
G
�
Damaged seat belts or belts that were
highly stressed in an accident must be
replaced and their anchoring points
must also be checked. Only use belts in-
stalled or supplied by an authorized
Mercedes-Benz Center.
�
Airbags and ETDs (Emergency Tension-
ing Devices) are designed to function on
a one-time-only basis. An airbag or ETD
that was activated must be replaced.
�
No modifications of any kind may be
made to any components or wiring of
the SRS. This includes changing or re-
moving any component or part of the
SRS, the installation of additional trim
material, badges, etc. over the steering
wheel hub, passenger front airbag cov-
er, outboard sides of the front seat
backrests, door trim panels, or door
frame trims, and installation of
additional electrical /electronic equip-
ment on or near SRS components and
wiring. Keep area between airbags and
occupants free from objects (e.g. pack-
ages, purses, umbrellas, etc.).
�
Do not pass belts over sharp edges.
They could tear.
�
Do not make any modification that could
change the effectiveness of the belts.
�
Do not bleach or dye seat belts as this
may severely weaken them. In a crash,
they may not be able to provide ade-
quate protection.
�
Airbag system components will be hot
after an airbag has inflated. Do not
touch.
�
Never place your feet on the instrument
panel, dashboard, or on the seat. Always
keep both feet on the floor in front of the
seat.
�
In addition, improper repair work on the
SRS creates a risk of rendering the SRS
inoperative or causing unintended air-
bag deployment. Work on the SRS must
therefore only be performed by qualified
technicians. Contact an authorized
Mercedes-Benz Center.
�
For your protection and the protection
of others, when scrapping the airbag
unit or emergency tensioning device,
our safety instructions must be fol-
lowed. These instructions are available
from your authorized Mercedes-Benz
Center.
�
Given the considerable deployment
speed and the textile structure of the
airbags, there is the possibility of abra-
sions or other injuries resulting from air-
bag deployment.

