Page 150 of 481

149 Controls in detail
Control system
Select radio station�
Turn on COMAND and select radio.
Refer to separate COMAND operating
instructions.
�
Press buttonè orÿ repeatedly
until you see the currently tuned sta-
tion in the multifunction display.
1Waveband
2Station frequency
�
Press buttonk orj repeatedly
until the desired station is found.Select satellite radio* station
(USA only)
The satellite radio is treated as a radio ap-
plication.
�
Turn on COMAND and select satellite
radio with the corresponding key on
the COMAND control panel (SAT).
�
Press buttonè orÿ repeatedly
until you see the currently tuned sta-
tion in the multifunction display.1SAT mode and preset number
2Channel name or number
�
Press buttonk orj repeatedly
until the desired channel is found.
iYou can only store new stations using
the corresponding feature on the radio.
Refer to separate COMAND operating
instructions.
You can also operate the radio in the
usual manner.
iAdditional optional satellite radio
equipment and a subscription to satel-
lite radio service provider are required
for satellite radio operation. Contact an
authorized Mercedes-Benz Center for
details and availability for your vehicle.
For more information, refer to separate
COMAND operating instructions.
Page 151 of 481
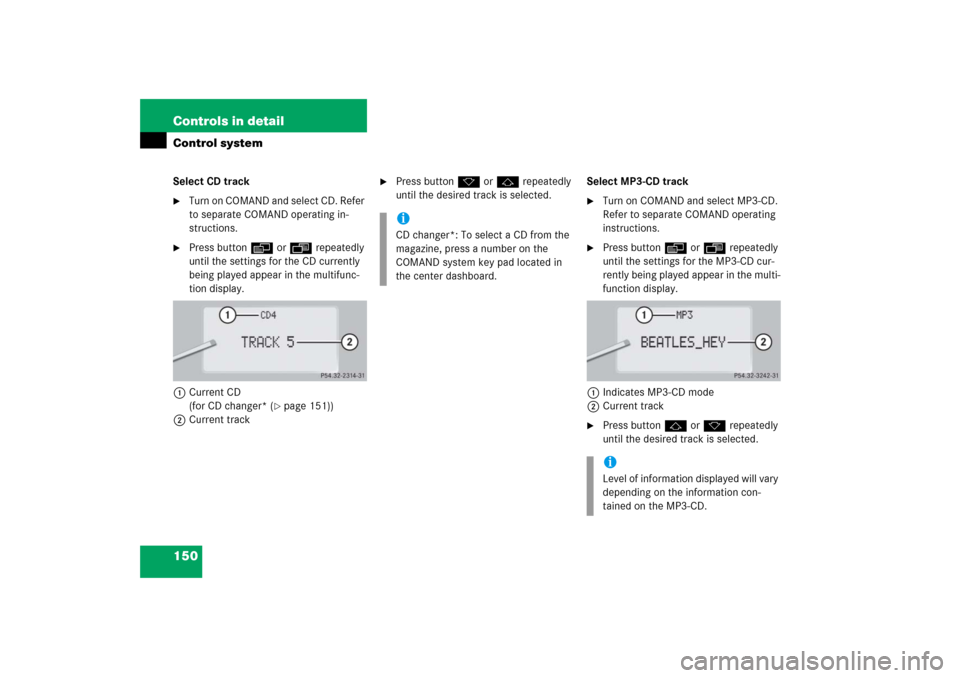
150 Controls in detailControl systemSelect CD track�
Turn on COMAND and select CD. Refer
to separate COMAND operating in-
structions.
�
Press buttonè orÿ repeatedly
until the settings for the CD currently
being played appear in the multifunc-
tion display.
1Current CD
(for CD changer* (
�page 151))
2Current track
�
Press buttonk orj repeatedly
until the desired track is selected.Select MP3-CD track
�
Turn on COMAND and select MP3-CD.
Refer to separate COMAND operating
instructions.
�
Press buttonè orÿ repeatedly
until the settings for the MP3-CD cur-
rently being played appear in the multi-
function display.
1Indicates MP3-CD mode
2Current track
�
Press buttonj ork repeatedly
until the desired track is selected.
iCD changer*: To select a CD from the
magazine, press a number on the
COMAND system key pad located in
the center dashboard.
iLevel of information displayed will vary
depending on the information con-
tained on the MP3-CD.
Page 153 of 481

152 Controls in detailControl systemOperational readiness of CD changer
If a CD changer has been installed in the
system, it can be operated from the
COMAND system key pad located in the
center dashboard. A loaded magazine
must be installed for CD playing.Loading/unloading the CD magazine
The CD changer is located behind the cov-
er on the left hand side in the trunk.
�
Remove the CD changer cover.
�
Slide the CD changer door to the right
and press the eject button g.
�
The magazine is ejected.
1CD
2CD changer
3CD tray
4CD magazine
�
Remove the magazine 4 and com-
pletely pull out the CD tray 3.
�
Place the CD 1 in the recess of the
tray 3, label side up.
�
Push the tray 3 into the magazine 4
in the direction shown by the arrow.
�
Push the magazine 4 into the CD
changer2 in the direction shown by
the arrow and close the CD changer
door.
Warning!
G
The CD changer is a Class 1 laser product.
There is a danger of invisible laser radiation
if the cover is opened or damaged.
Do not remove the cover. The CD changer
does not contain any parts which can be ser-
viced by the user. For safety reasons, have
any service work which may be necessary
performed only by qualified personnel.
iCDs which have been inserted improp-
erly or are unreadable will not be
played.
Page 160 of 481

159 Controls in detail
Control system
Vehicle status message memory menu
Use the vehicle status message memory
menu to scan malfunction and warning
messages that may be stored in the sys-
tem. Such messages appear in the multi-
function display and are based on
conditions or system status the vehicle’s
system has recorded.
�
Press buttonè orÿ repeatedly
until the vehicle status message mem-
ory appears in the multifunction dis-
play.
No vehicle status messages
If no conditions are recorded in the memo-
ry, the message in the multifunction dis-
play is:
NO MESSAGESVehicle status messages have been re-
corded
If conditions have occurred causing status
messages to be recorded, the number of
messages appears in the multifunction dis-
play:
1Number of messages
�
Press buttonk orj.
The stored messages will now be dis-
played in the order in which the mal-
functions have occurred. See the
“Practical hints” section for malfunc-
tion and warning messages
(�page 349).
Should the vehicle’s system record any
conditions while driving, the number of
messages will reappear in the multifunc-
tion display when the SmartKey in the
starter switch is turned to position0 or re-
moved from the starter switch. If you press
the reset buttonJ(
�page 140), the next
message will be displayed immediately.
Warning!
G
Malfunction and warning messages are only
indicated for certain systems and are inten-
tionally not very detailed. The malfunction
and warning messages are simply a remind-
er with respect to the operation of certain
systems and do not replace the owner’s
and/or driver’s responsibility to maintain
the vehicle’s operating safety by having all
required maintenance and safety checks
performed on the vehicle and by bringing
the vehicle to an authorized Mercedes-Benz
Center to address the malfunction and
warning messages (
�page 349).
iThe vehicle status message memory
will be cleared when you switch on the
ignition. You will then only see high-pri-
ority messages in the multifunction dis-
play. These are highlighted in red color
(�page 349).
Page 163 of 481
162 Controls in detailControl systemThe table below shows what settings can
be changed within the various menus. De-
tailed instructions on making individual
settings can be found on the following pag-
es.INSTRUMENT CLUSTER
LIGHTING
VEHICLE
CONVENIENCE
Select temperature display
mode
Set daytime running lamp mode
(USA only)
Set automatic locking
Set key-dependency
Select multifunction display
mode
Set locator lighting
Limiting opening height of trunk
lid*
Activate easy-entry/exit feature
Select language
Exterior lamps delayed shut-off
Set parking position for exterior
rear view mirror
Select tire inflation pressure
unit
Interior lighting delayed shut-off
Set fold-in function for exterior
rear view mirrorsAdjusting the drive-dynamic
seat
Page 167 of 481

166 Controls in detailControl systemSetting locator lighting
With the locator lighting feature activated
and the exterior lamp switch in position
U, the following lamps will switch on
during darkness when the vehicle is un-
locked with the SmartKey:�
Parking lamps
�
Tail lamps
�
License plate lamps
�
Front fog lamps
To activate locator lighting:
�
Make sure the function
LOCATOR
LIGHTING
is set.
�
Turn the exterior lamp switch to
positionU when exiting the vehicle.
If you do not open a door after unlocking
the vehicle with the SmartKey, the lamps
will switch off automatically after approxi-
mately 40 seconds.
�
Move the selection marker with
theæ orç button to the
LIGHT-
ING
submenu.
�
Press buttonj ork repeatedly
until you see this message in the multi-
function display:
LOCATOR LIGHTING
.
The selection marker is on the current
setting.
�
Pressæ orç to select the de-
sired setting.
The locator lighting will be switched
ON
or
OFF
.Setting night security illumination
(Exterior lamps delayed switch-off)
Use the
HEADLAMPS DELAYED SWITCH-OFF
function to set whether and for how long
you would like the exterior lamps to illumi-
nate during darkness after all doors are
closed. When the delayed switch-off fea-
ture is activated and the exterior lamp
switch is in position U before the en-
gine is turned off, the following lamps will
remain lit when the engine is turned off:
�
Parking lamps
�
Tail lamps
�
License plate lamps
�
Front fog lamps
Page 168 of 481
.
�
Turn the exterior lamp switch to
positionU before turning off the en-")
167 Controls in detail
Control system
To activate night security illumination:�
Select delayed switch-off period (see
below).
�
Turn the exterior lamp switch to
positionU before turning off the en-
gine.
To select delayed switch-off period:
�
Move the selection marker with
theæ orç button to the
LIGHT-
ING
submenu.
�
Press buttonj ork repeatedly
until you see this message in the multi-
function display:
HEADLAMPS DELAYED
SWITCH-OFF
.The selection marker is on the current
setting.
�
Pressæ orç to select the de-
sired lamp-on period.
You can select:�
0 SEC.
, the delayed switch-off fea-
ture is deactivated
�
15 SEC.
, 30 SEC.
, 45 SEC.
, or
60 SEC.
, the delayed switch-off fea-
ture is activated
You can temporarily deactivate the de-
layed switch-off feature:
�
Before leaving the vehicle, turn the
SmartKey in the starter switch to
position0.
�
Turn the SmartKey in the starter switch
to position2 and back to0.
The delayed switch-off feature is deac-
tivated. It will reactivate as soon as you
reinsert the SmartKey in the starter
switch.
Vehicles with KEYLESS-GO*:
�
Press the KEYLESS-GO start/stop
button (
�page 35) on the gear selec-
tor lever.
Interior lighting delayed switch-off
Use this function to set whether and for
how long you would like the interior light-
ing to remain lit during darkness after the
SmartKey is removed from the starter
switch.
�
Move the selection marker with
theæ orç button to the
LIGHT-
ING
submenu.
iYou can reactivate this function within
ten minutes by opening a door.
If after turning off the engine you do not
open a door or do not close an opened
door, the lamps will automatically
switch off after 60 seconds.
��
Page 170 of 481

169 Controls in detail
Control system
Limiting opening height of trunk lid*
This function is available in vehicles with
the trunk lid opening/closing system*.
Use this function to activate or deactivate
the limiting opening height of trunk lid.�
Move the selection marker with
theæ orç button to
VEHICLE
submenu.
�
Press buttonj ork repeatedly
until you see this message in the multi-
function display:OPENING LIMITER
TRUNK LIDThe selection marker is on the current
setting.
�
Press buttonæ orç to switch
the opening limiter for trunk lid
ON
or
OFF
.Convenience submenu
Access the
CONVENIENCE
submenu via the
SETTINGS
menu. Use the
CONVENIENCE
sub-
menu to change the settings for a number
of convenience features. The following
functions are available:Setting key-dependency
Use this function to set whether the mem-
ory settings for the seats, the steering
wheel, the mirrors, and the automatic cli-
mate control should be stored separately
for each SmartKey (
�page 128).
�
Move the selection marker with
theæ orç button to
the
CONVENIENCE
submenu.
�
Press buttonj ork repeatedly
until you see this message in the multi-
function display:
SETTINGS KEY-DEPEN-
DENT
.
The selection marker is on the current
setting.
�
Pressæ orç to set key-depen-
dency to
ON or
OFF
.
Function
Page
Setting key-dependency
169
Activating easy-entry/exit fea-
ture
170
Setting parking position for exte-
rior rear view mirror
170
Adjusting the drive-dynamic seat
171
Setting fold-in function for exteri-
or rear view mirrors
172