Page 211 of 481

210 Controls in detailPower windowsStopping windows during Express-op-
eration�
Briefly press the respective power win-
dow switch again.
Synchronizing the power windows
The power windows must be synchronized�
after the battery has been disconnect-
ed
�
if the power windows cannot be fully
opened (Express-open) or closed
(Express-close)
Each power window must be synchronized.
�
Close all doors.
�
Switch on the ignition (
�page 34).
�
Press and hold switch1 to 4 at the
symbolj until the windows are
completely closed.
�
Hold on to switches1 to 4 for ap-
proximately one second.
The power windows are synchronized.
Summer opening feature
If the weather is warm, you can ventilate
the vehicle before driving off by simulta-
neously: �
opening the side windows
�
opening the tilt/sliding sunroof
�
turning on the seat ventilation* for the
driver’s seat
�
Aim transmitter eye of the SmartKey or
SmartKey with KEYLESS-GO* at the
driver’s outside door handle. The
SmartKey or SmartKey with
KEYLESS-GO* must be in close proxim-
ity to the driver’s door handle.
�
Press and hold button Πuntil the
side windows and tilt/sliding sunroof
have reached the desired position.
�
Release button Πto interrupt pro-
cedure. still does not close when there is no ob-
struction, press and hold the respec-
tive power window switch at the
symbolj. The side window will
then close without the obstruction sen-
sor function.
iThe seat ventilation* for the driver’s
seat is automatically set to the highest
level if activated via summer opening
feature.
��
Page 212 of 481

211 Controls in detail
Power windows
Convenience closing feature
When you lock the vehicle, you can close
the side windows and tilt/sliding sunroof
simultaneously. �
Aim transmitter eye of the SmartKey or
SmartKey with KEYLESS-GO* at the
driver’s outside door handle
(�page 210). The SmartKey or
SmartKey with KEYLESS-GO* must be
in close proximity to the driver’s door
handle.
�
Press and hold button ‹ until the
side windows and tilt/sliding sunroof
are completely closed.
�
Release button ‹ to interrupt pro-
cedure.Vehicles with KEYLESS-GO*:
�
Press and hold the lock button on an
outside door handle (
�page 58) until
the side windows and the tilt/sliding
sunroof are completely closed.
�
Release the lock button on the outside
door handle to interrupt procedure.
Warning!
G
When closing the side windows and the
tilt/sliding sunroof, make sure that there is
no danger of anyone being harmed by the
closing procedure.
If potential danger exists, proceed as fol-
lows:�
Release button ‹to stop the closing
procedure. To open, press and hold but-
ton Œ. To continue the closing after
making sure that there is no danger of
anyone being harmed by the closing pro-
cedure, press and hold button‹.
Vehicles with KEYLESS-GO*:
�
Release the lock button on the outside
door handle (
�page 58) to stop the
closing procedure.
�
Pull on the outside door handle and hold
firmly. The side windows and the
tilt/sliding sunroof will open for as long
as the outside door handle is held but
the door is not opened.
Page 214 of 481
.
Opening and closing the power
tilt/sliding sunroof
�
To open, close, raise or lower the
tilt/sliding sunroof,")
213 Controls in detail
Power tilt/sliding sunroof
�
Switch on the ignition (
�page 34).
Opening and closing the power
tilt/sliding sunroof
�
To open, close, raise or lower the
tilt/sliding sunroof, move the switch to
resistance point in the required
direction1to4.
�
Release the sunroof switch when the
tilt/sliding sunroof has reached the de-
sired position.
Fully opening (Express-open) and clos-
ing (Express-close) the power the
tilt/sliding sunroof
�
To open, close, raise or lower the
tilt/sliding sunroof, move the switch
past the resistance point in the re-
quired direction1to4 and release.
The tilt/sliding sunroof opens or closes
completely.
When leaving the vehicle, always remove the
SmartKey or SmartKey with KEYLESS-GO*
from the starter switch, take it with you, and
lock the vehicle. Do not leave children unat-
tended in the vehicle, or with access to an
unlocked vehicle. Unsupervised use of vehi-
cle equipment can cause an accident
and/or serious personal injury.!To avoid damaging the seals, do not
transport any objects with sharp edges
which can stick out of the tilt/sliding
sunroof.
Do not open the tilt/sliding sunroof if
there is snow or ice on the roof, as this
could result in malfunctions.
The tilt/sliding sunroof can be opened
or closed manually should an electrical
malfunction occur (
�page 391).
iYou can also open or close the tilt/slid-
ing sunroof using the SmartKey, see
“Summer opening feature”
(�page 210) and “Convenience clos-
ing feature” (
�page 211).
You can close and reopen the tilt/slid-
ing sunroof using the air recirculation
button, or the charcoal filter
buttone in the climate control pan-
el (
�page 193).
iWith the SmartKey in starter switch po-
sition 0 or removed from the starter
switch, the tilt/sliding sunroof can be
operated�
until you open the driver’s or pas-
senger door
�
for up to approximately five min-
utes
��
Page 231 of 481

230 Controls in detailDriving systems1Indicator lamps
2Damping button�
Start the engine.
�
Press the damping button2 until the
desired suspension style is set.�
If both indicator lamps are out, you
have chosen the automatic mode
for soft damping. The message:AIRMATIC
CONVENIENCEfor Comfort suspension tuning ap-
pears in the multifunction display.
�
If one indicator lamp is on, the con-
trol system supports a primarily dy-
namic style of driving. The
message:AIRMATIC
SPORTS 1for Sporty 1 suspension tuning ap-
pears in the multifunction display.
�
If both indicator lamps are on, the
system is set for a dynamic style of
driving. The message:AIRMATIC
SPORTS 2for Sporty 2 suspension tuning ap-
pears in the multifunction display.Vehicle level control with Airmatic
Your vehicle automatically adjusts its ride
height to:
�
reduce fuel consumption
�
increase vehicle safety
The vehicle chassis ride height is raised or
lowered according to the selected level
setting and to the vehicle speed:
�
With increasing speed, ride height is re-
duced by up to approximately 0.8 in
(20 mm).
�
With decreasing speed, the ride height
is again raised to the selected vehicle
level.
iThe selected suspension style is stored
in memory, even after the SmartKey is
removed from the starter switch.
iThese height adjustments are so small
that you may not notice any change.
Page 243 of 481

242 Controls in detailUseful featuresVanity mirror in the rear
The vanity mirrors are located in the roof
lining for the rear seat passengers.
Opening the vanity mirror�
Press the cover of the vanity mirror.
The vanity mirror folds down and the
mirror lamp comes on.
Closing the vanity mirror
�
Push the vanity mirror up until it engag-
es in place.
Storage compartmentsGlove box
1Unlocked
2Locked
3Glove box lid release
Locking the glove box
�
Insert mechanical key (
�page 388)
into the glove box lock.
�
Turn the mechanical key to
position2.
!Before tilting a front seat backrest from
the reclined position to an upright posi-
tion, close the respective vanity mirror
in the rear. Otherwise the vanity mirror
may get damaged.Warning!
G
To help avoid personal injury during a colli-
sion or sudden maneuver, exercise care
when storing objects in the vehicle. Put lug-
gage or cargo in the trunk if possible. Do not
pile luggage or cargo higher than the seat
backs.
Luggage nets cannot secure hard or heavy
objects.
Keep compartment lids closed. This will help
to prevent stored objects from being thrown
about and injuring vehicle occupants during
an accident.
Page 244 of 481
243 Controls in detail
Useful features
Unlocking the glove box�
Insert mechanical key (
�page 388)
into the glove box lock.
�
Turn the mechanical key to
position1.
Opening the glove box
�
Press glove box lid release3.
The glove box lid opens downward.
Closing the glove box
�
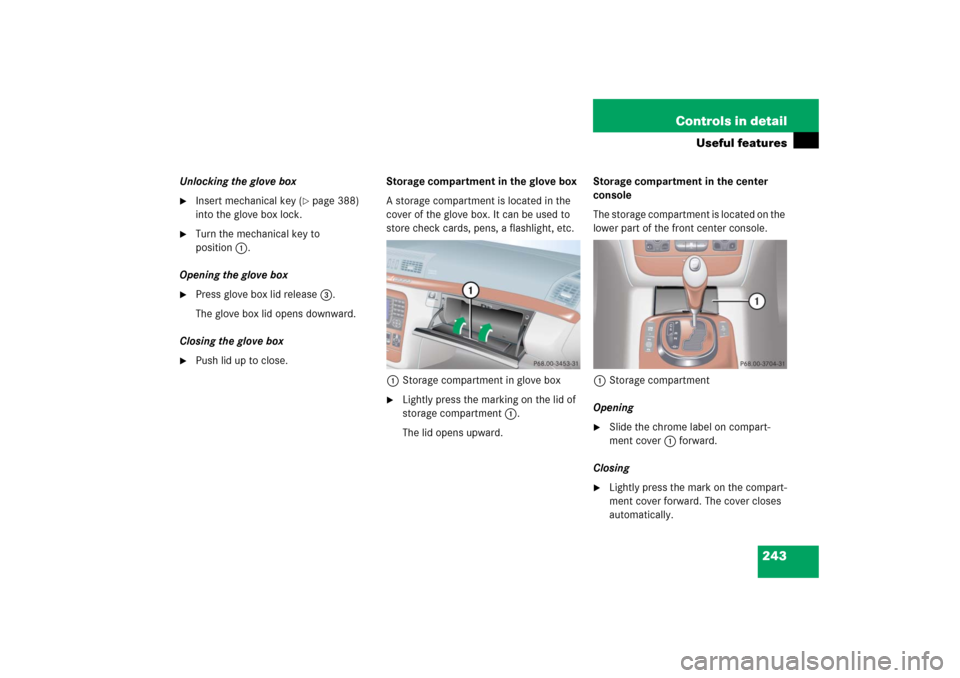
Push lid up to close.Storage compartment in the glove box
A storage compartment is located in the
cover of the glove box. It can be used to
store check cards, pens, a flashlight, etc.
1Storage compartment in glove box
�
Lightly press the marking on the lid of
storage compartment1.
The lid opens upward.Storage compartment in the center
console
The storage compartment is located on the
lower part of the front center console.
1Storage compartment
Opening
�
Slide the chrome label on compart-
ment cover 1 forward.
Closing
�
Lightly press the mark on the compart-
ment cover forward. The cover closes
automatically.
Page 251 of 481

250 Controls in detailUseful featuresRemoving ashtray insert�
Secure vehicle from movement by set-
ting the parking brake. Move the gear
selector lever to positionN.
Now you have more room to take out
the insert.
�
Push sliding button2 to the right.
The ashtray is disengaged and slides
out a short way.
�
Remove insert from ashtray frame.
Reinstalling the ashtray insert
�
Install insert by pushing it back into the
frame until it engages.Rear door ashtray
Opening ashtray
�
Lightly touch the back of the ashtray.
Removing ashtray insert
�
Pull the ashtray back slightly and re-
move the insert (see arrows).
Reinstalling the ashtray insert
�
Position the insert and press down
while sliding forward.
Cigarette lighters
Center console lighter
Warning!
G
Remove front ashtray only with vehicle
standing still. Set the parking brake to se-
cure vehicle from movement. Move gear se-
lector lever to positionN. With gear selector
lever in positionN turn off the engine.
Warning!
G
Never touch the heating element or sides of
the lighter; they are extremely hot. Hold the
knob only.
When leaving the vehicle, always remove the
SmartKey or SmartKey with KEYLESS-GO*
from the starter switch, take it with you, and
lock the vehicle. Do not leave children unat-
tended in the vehicle, or with access to an
unlocked vehicle. Unsupervised use of vehi-
cle equipment may cause an accident
and/or serious personal injury.
Page 252 of 481
.
�
Push in cigarette lighter1.
The lighter will pop out automatically
when hot.Rear door")
251 Controls in detail
Useful features
1Center console cigarette lighter�
Switch on the ignition (
�page 34).
�
Push in cigarette lighter1.
The lighter will pop out automatically
when hot.Rear door lighter
1Rear door lighters
�
Switch on the ignition (
�page 34).
�
Lightly touch the back of the ashtray to
open it (
�page 250).
�
Push in cigarette lighter1.
The lighter will pop out automatically
when hot.
iThe lighter socket can be used to ac-
commodate electrical accessories up
to a maximum 180 W.
Warning!
G
Never touch the heating element or sides of
the lighter; they are extremely hot. Hold the
knob only.
To avoid possible injury to children sitting in
the rear seat, deactivate the operation of
the rear door windows, see (
�page 77). De-
activation of the rear windows also deacti-
vates the lighters.
When leaving the vehicle, always remove the
SmartKey or SmartKey with KEYLESS-GO*
from the starter switch, take it with you, and
lock the vehicle. Do not leave children unat-
tended in the vehicle, or with access to an
unlocked vehicle. Unsupervised use of vehi-
cle equipment may cause an accident
and/or serious personal injury.
iOperation of the rear door lighters is
only possible, if the override switch
(�page 77) is deactivated.