Page 327 of 481

326 OperationTires and wheelsRotating tires
Tire rotation can be performed on vehicles
with tires of the same dimension all
around. If your vehicle is equipped with
tires of the same dimension all around,
tires can be rotated, observing a
front-to-rear rotation pattern that will
maintain the intended rotation (spinning)
direction of the tire (
�page 300).
In some cases, such as when your vehicle
is equipped with mixed-size tires (different
tire dimension front vs. rear), tire rotation
is not possible.If applicable to your vehicle’s tire configu-
ration, tires can be rotated according to
the tire manufacturer’s recommended in-
tervals in the tire manufacturer’s warranty
pamphlet located in your vehicle literature
portfolio. If none is available, tires should
be rotated every 3 000 to 6 000 miles
(5 000 to 10 000 km), or sooner if neces-
sary, according to the degree of tire wear.
The same rotation (spinning) direction
must be maintained (
�page 300).
Rotate tires before the characteristic tire
wear pattern becomes visible (shoulder
wear on front tires and tread center wear
on rear tires).
Thoroughly clean the mounting face of
wheels and brake disks, i.e. the inner side
of the wheels/tires, during each rotation.
Check for and ensure proper tire inflation
pressure.For information on wheel change, see the
“Practical hints” section (
�page 403).
Warning!
G
Rotate front and rear wheels only if the tires
are of the same dimension.
If your vehicle is equipped with mixed-size
tires (different tire dimensions front vs.
rear), tire rotation is not possible.
Warning!
G
Have the tightening torque checked after
changing a wheel. Wheels could become
loose if not tightened with a torque of
110 lb-ft (150 Nm).
Only use genuine Mercedes-Benz wheel
bolts specified for your vehicle’s rims.
Page 408 of 481

407 Practical hints
Flat tire
�
Guide the spare wheel onto the align-
ment bolt and push it on.
�
Insert wheel bolts and tighten them
slightly.
�
Unscrew the alignment bolt, install last
wheel bolt and tighten slightly.
Lowering the vehicle
�
Lower vehicle by turning crank coun-
terclockwise until vehicle is resting ful-
ly on its own weight.
�
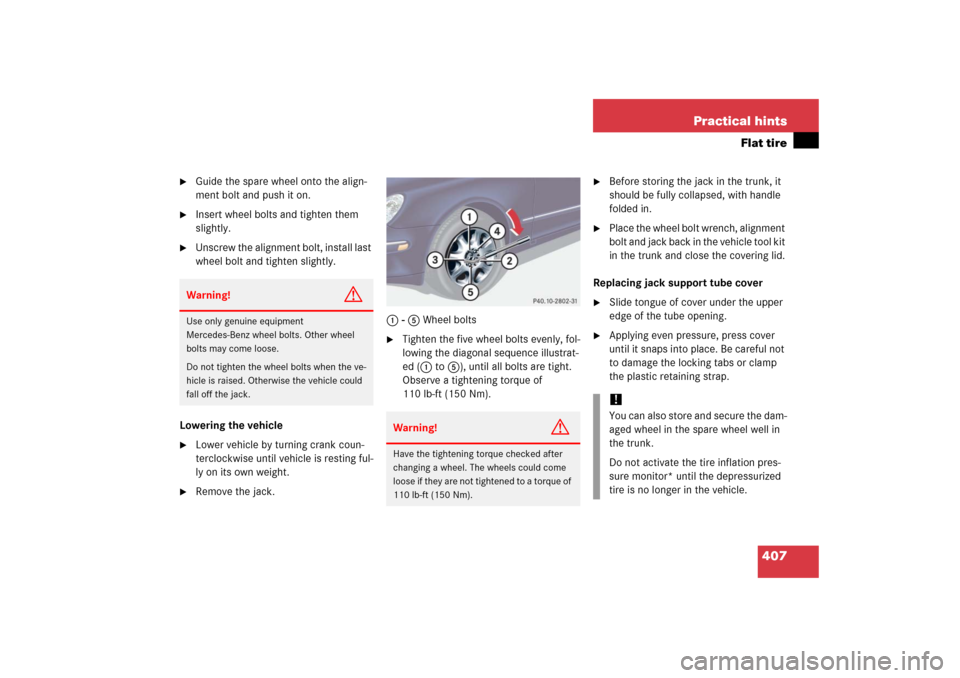
Remove the jack.1 - 5 Wheel bolts
�
Tighten the five wheel bolts evenly, fol-
lowing the diagonal sequence illustrat-
ed (1 to 5), until all bolts are tight.
Observe a tightening torque of
110 lb-ft (150 Nm).
�
Before storing the jack in the trunk, it
should be fully collapsed, with handle
folded in.
�
Place the wheel bolt wrench, alignment
bolt and jack back in the vehicle tool kit
in the trunk and close the covering lid.
Replacing jack support tube cover
�
Slide tongue of cover under the upper
edge of the tube opening.
�
Applying even pressure, press cover
until it snaps into place. Be careful not
to damage the locking tabs or clamp
the plastic retaining strap.
Warning!
G
Use only genuine equipment
Mercedes-Benz wheel bolts. Other wheel
bolts may come loose.
Do not tighten the wheel bolts when the ve-
hicle is raised. Otherwise the vehicle could
fall off the jack.
Warning!
G
Have the tightening torque checked after
changing a wheel. The wheels could come
loose if they are not tightened to a torque of
110 lb-ft (150 Nm).
!You can also store and secure the dam-
aged wheel in the spare wheel well in
the trunk.
Do not activate the tire inflation pres-
sure monitor* until the depressurized
tire is no longer in the vehicle.
Page 450 of 481

449 Technical terms
Telematics*
A combination of the terms “telecom-
munications” and “informatics.”
Tightening torque
Force times lever arm (e.g. a lug
wrench) with which threaded fasteners
such as wheel bolts are tightened.
TIN
(T
ire I
dentification N
umber)
(
�page 325)
Tire load rating
(�page 325)
Tire ply composition and material used
(�page 325)
Tire speed rating
(�page 325)
Traction
(�page 325)
Tread
(�page 325)
Treadwear indicators
(�page 325)Uniform Tire Quality Grading Standards
(
�page 325)
Vehicle capacity weight
(�page 325)
Vehicle level control
The ground clearance of the vehicle is
automatically controlled according to a
selected setting and speed. The driver
can choose manually within a range of
ground clearance, for example on very
rough roads.
Vehicle maximum load on the tire
(�page 325)
VIN
(Vehicle I
dentification N
umber)
The number set by the manufacturer
and stamped on the body to uniquely
identify each vehicle produced.
Voice control system*
Voice control system for car phones,
portable cell phones and audio sys-
tems (radio, CD, etc.).
Page 475 of 481

474 IndexTemperature
Display mode 163
Setting units in display 163
Tires 307
Tie-down hooks (Trunk) 240
Tightening torque 449
Tightening torque (Wheel bolts) 407
Tilt/sliding sunroof
Stopping 214
Synchronizing 214
TIN 325
Tire
Vehicle maximum load on 325
Tire and Loading Information 301
Tire and loading terminology 323
Tire care and maintenance 298
Tire Identification Number see TIN
Tire inflation pressure
Checking 286, 306, 308
Setting units 164
Tire inflation pressure see the placard on
the fuel filler flapTire inspection 298
Tire load rating 325
Tire ply composition and material
used 325
Tire speed rating 278, 315, 325
Tire terminology 323
Tire traction 278
Tires 297
Direction of rotation 300
Driving instructions 277
Messages in display 376–383
Retreads 297
Rotating 326
Service life 298
Temperature 307, 322
Tire inflation pressure monitor warning
lamp 346
Tread depth 299, 327
Wear pattern 326
Winter 327
Tools 384Tow-away alarm 88
Arming 88
Canceling alarm 89
Disarming 88
Disarming for transport 88
Towing eye bolt (vehicle tool kit) 385
Installing 415
Towing the vehicle 413
Traction 179, 325
Transmission see Automatic
transmission 293
Tread 325
Tread depth 299
Tread depth (tires) 327
Treadwear indicators 325
Trip computer 157
Trip odometer
Resetting 141