Page 168 of 561
167 Controls in detail
Control system
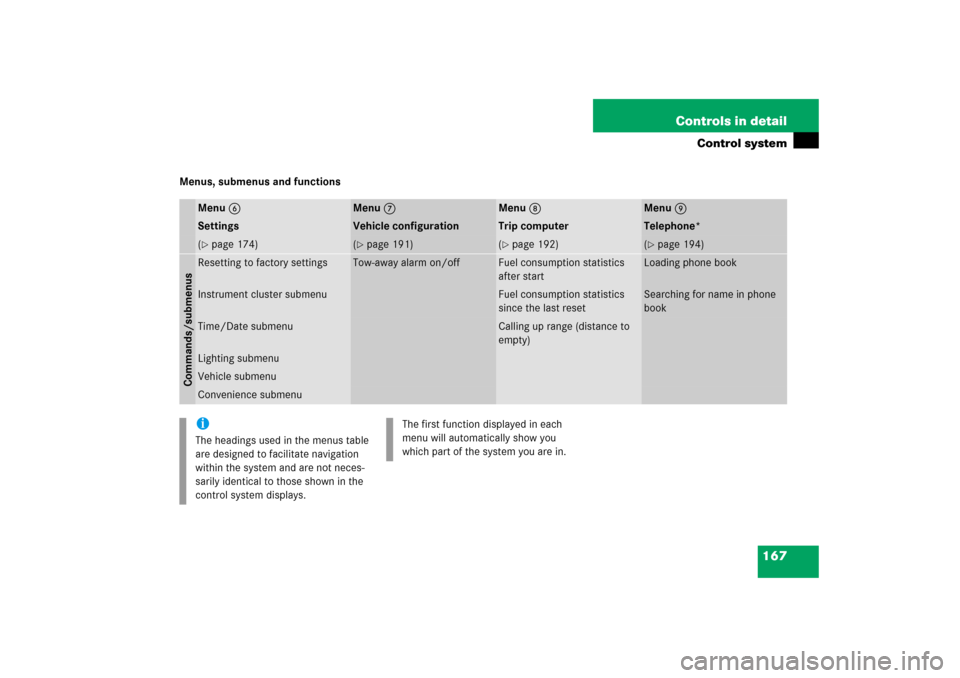
Menus, submenus and functions
Menu6
Menu7
Menu8
Menu9
Settings
Vehicle configuration
Trip computer
Telephone*
(�page 174)
(�page 191)
(�page 192)
(�page 194)
Commands/submenusResetting to factory settings
Tow-away alarm on/off
Fuel consumption statistics
after start
Loading phone book
Instrument cluster submenu
Fuel consumption statistics
since the last reset
Searching for name in phone
book
Time/Date submenu
Calling up range (distance to
empty)
Lighting submenuVehicle submenuConvenience submenuiThe headings used in the menus table
are designed to facilitate navigation
within the system and are not neces-
sarily identical to those shown in the
control system displays.
The first function displayed in each
menu will automatically show you
which part of the system you are in.
Page 176 of 561

175 Controls in detail
Control system
The following settings and submenus are
available in the
Settings
menu:Resetting all settings
You can reset all the functions of all
submenus to the factory settings.
�
Press the reset button in the
instrument cluster (
�page 158) for
approximately 3 seconds.
The request to press the reset button
once more to confirm appears in the
multifunction display.
�
Press the reset button once more.
The functions of all the submenus will
reset to factory settings.
Function
Page
Resetting all settings
175
Submenus in the Settings menu
176
Resetting the functions of a
submenu
176
Instrument cluster submenu
178
Time/date submenu
180
Lighting submenu
182
Vehicle submenu
186
Convenience submenu
189
iThe settings you have changed will not
be reset unless you confirm the action
by pressing the reset button a second
time.
After approximately 5 seconds, the Settings
menu reappears in the
multifunction display (
�page 174).
iFor safety reasons, the function Light circuit headlamp mode
in the
Lighting
submenu cannot be reset
while driving.
The following message appears in the
multifunction display:
Lighting
Cannot be completely reset
to factory settings while driving
Page 177 of 561

176 Controls in detailControl systemSubmenus in the Settings menu�
Press buttonj.
The collection of the submenus
appears in the multifunction display.
�
Press buttonç.
The selection marker moves to the next
submenu.
The submenus are arranged by hierarchy.
Scroll down with buttonç, scroll up
with buttonæ.With the selection marker on the desired
submenu, use thej button to access
the individual functions within that sub-
menu. Once within that submenu, you can
use thejbutton to move to the next
function or thekbutton to move to the
previous function within that submenu.
The settings themselves are made with
buttonæ orç.
Resetting the functions of a submenu
You can reset all the functions for each
submenu to the factory settings.
�
Move to a function in the submenu.
�
Press the reset button in the
instrument cluster (
�page 158) for
approximately 3 seconds.
The request to press the reset button
once more to confirm appears in the
multifunction display.
�
Press the reset button once more.
All functions of the submenu will reset
to factory settings.
iThe settings you have changed will not
be reset unless you confirm the action
by pressing the reset button a second
time.
After approximately 5 seconds, the Settings
menu reappears in the
multifunction display (
�page 174).
iFor safety reasons, the function Lamp circuit headlamp
(�page 182)
in the
Lighting
submenu cannot be
reset while driving.
The following message appears in the
multifunction display:
Lighting
Cannot be completely reset
to factory settings while driving
Page 178 of 561

177 Controls in detail
Control system
The table below shows what settings can
be changed within the various menus.
Detailed instructions on making individual
settings can be found on the following
pages.INSTRUMENT CLUSTER
TIME/DATE
LIGHTING
VEHICLE
CONVENIENCE
Selecting speedometer display
mode
Setting the time
(hours)
Setting daytime running
lamp mode (USA only)
Calling up the compass
Activating
easy-entry/exit feature*
Selecting language
Setting the time
(minutes)
Setting locator lighting
Compass adjustment
Setting parking position
for exterior rear view
mirror
Selecting display (digital
speedometer or outside
temperature) for status indicator
Setting the date
(month)
Setting night security
illumination
Compass calibration
Setting fold-in function
for exterior rear view
mirrors
Setting the date
(day)
Setting interior lighting
delayed shut-off
Setting which display to
appear with ignition
switched off
Setting the date
(year)
Setting automatic
lockingLimiting opening height
of tailgate*
Page 179 of 561

178 Controls in detailControl systemInstrument cluster submenu
Access the
Instr. cluster
submenu via
the
Settings
menu. Use the
Instr.
cluster
submenu to change the instru-
ment cluster display settings.
The following functions are available:Selecting speedometer display mode
�
Move the selection marker with
buttonæ orç to the
Instr.
cluster
submenu.
�
Press buttonj ork repeatedly
until the message
Display unit
Digital speedometer
appears in the
multifunction display.
The selection marker is on the current
setting.
�
Press buttonæ orç to set
speedometer unit to
km or
miles
.Selecting language
�
Move the selection marker with
buttonæ orç to the
Instr.
cluster
submenu.
�
Press buttonj ork repeatedly
until the message
Language
appears in
the multifunction display.
The selection marker is on the current
setting.
�
Press buttonæ orç to select
the language to be used for the
multifunction display messages.
Function
Page
Selecting speedometer display
mode
178
Selecting language
178
Selecting display (digital
speedometer or outside
temperature) for status indicator
179
Page 193 of 561

192 Controls in detailControl systemTrip computer menu
Use the trip computer menu to call up
statistical data on your vehicle.
The following information is available:Fuel consumption statistics after start
�
Press buttonÿ orè repeatedly
until the message
After start
appears
in the multifunction display.
1Distance driven since start
2Time elapsed since start
3Average speed since start
4Average fuel consumption since startResetting fuel consumption statistics
�
Press buttonÿ orè repeatedly
until the message
After start
appears
in the multifunction display.
�
Press and hold the reset button in the
instrument cluster (
�page 158) until
the value is reset to0.
Function
Page
Fuel consumption statistics after
start
192
Fuel consumption statistics
since last reset
193
Calling up range (distance to
empty)
193
iWhen you enter the trip computer
menu, you will always see the fuel
consumption statistics after start first.
iAll statistics stored since the last
engine start will be reset approximately
4 hours after the SmartKey in the start-
er switch is turned to position0 or re-
moved from the starter switch.
Resetting will not occur if you turn the
SmartKey back to position1 or2
within this time period.
Page 194 of 561

193 Controls in detail
Control system
Fuel consumption statistics since last
reset�
Press buttonÿ orè repeatedly
until the message
After start
appears
in the multifunction display.
�
Press buttonj ork repeatedly
until the message
After reset
appears
in the multifunction display.
1Distance driven since last reset
2Time elapsed since last reset
3Average speed since last reset
4Average fuel consumption since last
resetResetting fuel consumption statistics
manually
�
Press buttonÿ orè repeatedly
until the message
After start
appears
in the multifunction display.
�
Press buttonj ork repeatedly
until the message
After reset
appears
in the multifunction display.
�
Press and hold the reset button in the
instrument cluster (
�page 158) until
the value is reset to0.
Resetting fuel consumption statistics
automatically
The fuel consumption statistics reset auto-
matically to
0 when either of the following
values is exceeded:
�
distance covered:100 000 miles
�
time elapsed: 10 000 hoursCalling up range (distance to empty)
�
Press buttonÿ orè repeatedly
until the message
After start
appears
in the multifunction display.
�
Press buttonj ork repeatedly
until the message
Range:
appears in
the multifunction display.
The calculated range based on the
current fuel tank level appears in the
multifunction display.
Page 313 of 561

312 Controls in detailUseful featurestrol counterclockwise or press
buttonç on the multifunction steering
wheel.�
To activate, press the SOS button, the
Roadside Assistance button• or
the Information button¡, depend-
ing on the type of response required.System self-check
Initially, after switching on the ignition,
malfunctions are detected and indicated
(the indicator lamps in the SOS button, the
Roadside Assistance button• and the
Information button¡ stay on longer
than 10 seconds or do not come on). The
message
Malfunction. Drive to work-
shop
appears in the multifunction display.
iThe SOS button is located in the over-
head control panel.
The Roadside Assistance button•
and the Information button¡ are
located below the center armrest
cover.!The Tele Aid system utilizes the cellular
network for communication and the
GPS (G
lobal P
ositioning S
ystem) satel-
lites for vehicle location. If either of
these signals are unavailable, the
Tele Aid system may not function and if
this occurs, assistance must be sum-
moned by other means.
iWhen a Tele Aid call has been initiated,
the Modular COMAND System audio is
muted and the selected mode (radio,
CD etc.) pauses. The optional cellular
phone (if installed) inserted in cradle
switches off. If you must use this
phone, we recommend that you use it
only with the vehicle at a standstill in a
safe location. Remove the phone from
the cradle and place the call. The navi-
gation* system (if engaged) will contin-
ue to run. The display in the instrument
cluster is available for use, and spoken
commands are only available by press-
ing the RPT button on the Modular
COMAND System. A pop-up window
will appear in the Modular COMAND
System display to indicate that a Tele
Aid call is in progress. After the Tele Aid
call has ended, the optional cellular
phone inserted in the cradle switches
on again. A PIN entry might be neces-
sary.