Page 98 of 561
97 Safety and Security
Driving safety systems
�Driving safety systems
In this section you will find information on
the following driving safety systems:�
ABS (A
ntilock B
rake S
ystem)
�
BAS (B
rake A
ssist S
ystem)
�
ESP
® (E
lectronic S
tability P
rogram)
�
EBP (E
lectronic B
rake P
roportioning)
�
4-ETS (E
lectronic T
raction S
ystem)
ABS
The Antilock Brake System (ABS) regulates
the brake pressure so that the wheels do
not lock during braking. This allows you to
maintain the ability to steer your vehicle.
The ABS is functional above a speed of ap-
proximately 5 mph (8 km / h) independent
of road surface conditions.
On slippery road surfaces, the ABS will re-
spond even to light brake pressure.
The -indicator lamp in the instrument
cluster (
�page 24) comes on when you
switch on the ignition. It goes out when the
engine is running.
Warning!
G
The following factors increase the risk of
accidents:�
Excessive speed, especially in turns
�
Wet and slippery road surfaces
�
Following another vehicle too closely
The ABS, BAS, ESP
® and 4-ETS cannot re-
duce this risk.
Always adjust your driving style to the pre-
vailing road and weather conditions.
iIn winter operation, the maximum ef-
fectiveness of the ABS, the BAS, the
ESP
®, the EBP, and the 4-ETS is only
achieved with winter tires (
�page 390)
or snow chains as required.
Warning!
G
Do not pump the brake pedal. Use firm,
steady brake pedal pressure instead. Pump-
ing the brake pedal defeats the purpose of
the ABS and significantly reduces braking
effectiveness.
Page 104 of 561
103 Safety and Security
Driving safety systems
For more information, see the “Practical
hints” section (
�page 404) and
(
�page 416).
Warning!
G
When you see the ESP
® warning lampv
flashing in the instrument cluster, then pro-
ceed as follows:
�
While driving off, apply as little throttle
as possible.
�
While driving, ease up on the accelera-
tor.
�
Adapt your speed and driving style to
the prevailing road conditions.
Failure to observe these guidelines could
cause the vehicle to skid.
The 4-ETS cannot prevent accidents resul-
ting from excessive speed.
!Because of the ESP’s
® automatic oper-
ation, the engine must be shut off
(SmartKey in starter switch position0
or1) when the parking brake is being
tested on a brake test dynamometer.
Active braking action through ESP
®
may otherwise seriously damage the
brake system.
Operational tests with the engine
running can only be conducted on a
two-axle dynamometer.
iIf the yellow ESP
® warning lampv
comes on while driving, the 4-ETS is be-
ing switched off temporarily to prevent
overheating of the drive wheel brakes.
In addition, the message
ESP unavail-
able See Operator’s Manual
appears
in the multifunction display.
Page 110 of 561
109 Controls in detail
Locking and unlocking
Seats
Memory function*
Lighting
Instrument cluster
Control system
Automatic transmission
Good visibility
Climate control
3-zone automatic climate control*
Power windows
Power tilt/sliding sunroof*
Panorama roof with power tilt/sliding panel*
Driving systems
Loading
Useful features
Page 153 of 561
152 Controls in detailLighting�
Push the combination switch in
direction of arrow1 to switch on the
high beam.
The high beam headlamp indicator
lampA in the instrument cluster
comes on (
�page 24).
�
Pull the combination switch in direction
of arrow2 to its original position to
switch off the high beam.
The high beam headlamp indicator
lampA in the instrument cluster
goes out.
High beam flasher
�
Pull the combination switch briefly in
direction of arrow2.
Corner-illuminating front fog lamps*
The corner-illuminating front fog lamps im-
prove illumination of the road into which
you are turning.
The corner-illuminating front fog lamps will
operate with the engine running and with�
the exterior lamp switch in
positionB (
�page 147)
or
�
the exterior lamp switch in
positionU (
�page 147)
or
�
the daytime running lamp mode
activated (
�page 149)Driving forward
Switching on corner-illuminating front
fog lamps
�
Depending on whether you are turning
left or right, switch on the left or right
turn signal (
�page 58).
The respective front fog lamp comes on
and illuminates the road onto which
you are turning.
iCorner-illuminating front fog lamps will
only come on in low ambient lighting
conditions.
The corner-illuminating front fog lamps
function is not available at a vehicle
speed above 25 mph (40 km/h).
iThe corner-illuminating front fog lamps
will come on automatically depending
on the steering angle, even if you did
not switch on either turn signal. If the
corner-illuminating front fog lamps
came on automatically, they will also
go out automatically depending on the
steering angle.
��
Page 159 of 561
158 Controls in detailInstrument clusterFor a full view illustration of the instrument
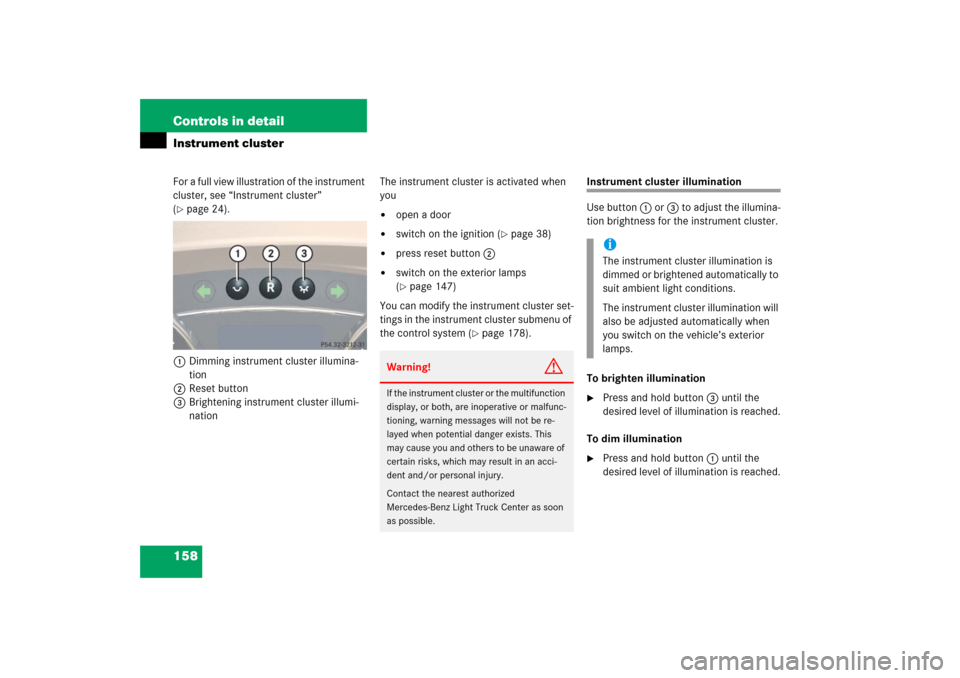
cluster, see “Instrument cluster”
(�page 24).
1Dimming instrument cluster illumina-
tion
2Reset button
3Brightening instrument cluster illumi-
nationThe instrument cluster is activated when
you
�
open a door
�
switch on the ignition (
�page 38)
�
press reset button 2
�
switch on the exterior lamps
(�page 147)
You can modify the instrument cluster set-
tings in the instrument cluster submenu of
the control system (
�page 178).
Instrument cluster illumination
Use button 1 or 3 to adjust the illumina-
tion brightness for the instrument cluster.
To brighten illumination�
Press and hold button 3 until the
desired level of illumination is reached.
To dim illumination
�
Press and hold button 1 until the
desired level of illumination is reached.
Warning!
G
If the instrument cluster or the multifunction
display, or both, are inoperative or malfunc-
tioning, warning messages will not be re-
layed when potential danger exists. This
may cause you and others to be unaware of
certain risks, which may result in an acci-
dent and/or personal injury.
Contact the nearest authorized
Mercedes-Benz Light Truck Center as soon
as possible.
iThe instrument cluster illumination is
dimmed or brightened automatically to
suit ambient light conditions.
The instrument cluster illumination will
also be adjusted automatically when
you switch on the vehicle’s exterior
lamps.
Page 160 of 561
159 Controls in detail
Instrument cluster
Trip odometer
Make sure you are viewing the trip odome-
ter display (
�page 161).
�
If it is not displayed, press buttonè
orÿ on the multifunction steering
wheel (
�page 162) repeatedly until
the trip odometer appears in the multi-
function display.
�
Press and hold reset button 2
(�page 158) until the trip odometer is
reset.
Tachometer
The red marking on the tachometer
(�page 24) denotes excessive engine
speed.
To help protect the engine, the fuel supply
is interrupted if the engine is operated
within the red marking.
Outside temperature indicator
The outside temperature is indicated in the
multifunction display (
�page 161).
!Avoid driving at excessive engine
speeds, as it may result in serious
engine damage that is not covered by
the Mercedes-Benz Limited Warranty.
Warning!
G
The outside temperature indicator is not de-
signed to serve as an ice-warning device and
is therefore unsuitable for that purpose.
Indicated temperatures just above the freez-
ing point do not guarantee that the road sur-
face is free of ice. The road may still be icy,
especially in wooded areas or on bridges.
Page 161 of 561
160 Controls in detailInstrument clusterThe temperature sensor is located in the
front bumper area. Due to its location, the
sensor can be affected by road or engine
heat during idling or slow driving. This
means that the accuracy of the displayed
temperature can only be verified by com-
parison to a thermometer placed next to
the sensor, not by comparison to external
displays (e.g. bank signs etc.).
When moving the vehicle into colder ambi-
ent temperatures (e.g. when leaving your
garage), you will notice a delay before the
lower temperature is displayed.
A delay also occurs when ambient temper-
atures rise. This prevents inaccurate tem-
perature indications caused by heat
radiated from the engine during idling or
slow driving.
Page 162 of 561

161 Controls in detail
Control system
�Control system
The control system is activated as soon as
the SmartKey in the starter switch is
turned to position1 (
�page 38) or as
soon as the KEYLESS-GO start / stop but-
ton* is in position1 (�page 39). The con-
trol system enables you to
�
call up information about your vehicle
�
change vehicle settings
For example, you can use the control sys-
tem to find out when your vehicle is next
due for maintenance service, to set the
language for messages in the instrument
cluster display, and much more.
The control system relays information to
the multifunction display.
Multifunction display
1Trip odometer
2Main odometer
3Gear position indicator
4Current transmission program mode
5Status indicator (outside temperature
or digital speedometer)
For more information on menus displayed
in the multifunction display, see “Menus”
(�page 164).
iThe displays for the audio systems
(radio, CD player) will appear in English,
regardless of the language selected.
Warning!
G
A driver’s attention to the road and traffic
conditions must always be his/her primary
focus when driving.
For your safety and the safety of others, se-
lecting features through the multifunction
steering wheel should only be done by the
driver when traffic and road conditions per-
mit it to be done safely.
Bear in mind that at a speed of just 30 mph
(approximately 50 km/h), your vehicle is
covering a distance of 44 feet (approximate-
ly 14 m) every second.