Page 452 of 561
451 Practical hints
What to do if …
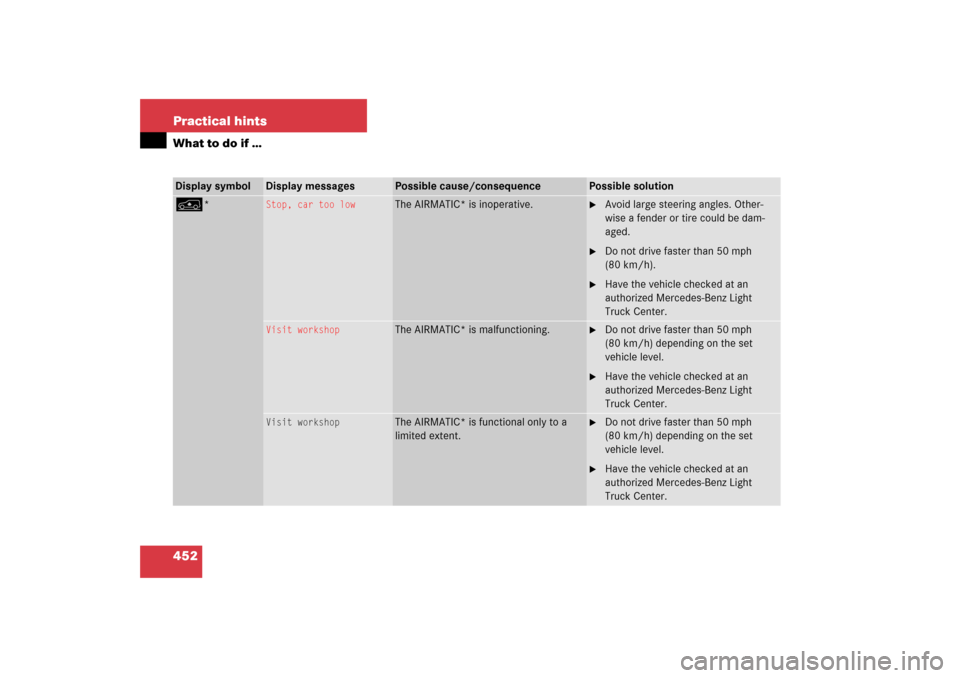
Display symbol
Display messages
Possible cause/consequence
Possible solution
L
Malfunction
Drive to workshop
One or more main functions of the
Tele Aid* system are malfunctioning.
�
Have the Tele Aid* system checked
by an authorized Mercedes-Benz Light
Truck Center.
Battery
Drive to workshop
The emergency power battery for the
Tele Aid* system is malfunctioning. If the
vehicle battery is also malfunctioning or
drained, Tele Aid* will not be operational.
�
Have the Tele Aid* system checked
by an authorized Mercedes-Benz Light
Truck Center.
t
Function
unavailable
This display appears if buttont or
son the multifunction steering wheel
is pressed and the vehicle is not equipped
with a telephone.
W
Washer fluid
Check level
The fluid level has dropped to
about
1/3of total reservoir capacity.
�
Add washer fluid (
�page 352).
Page 453 of 561
452 Practical hintsWhat to do if …Display symbol
Display messages
Possible cause/consequence
Possible solution
n
*
Stop, car too low
The AIRMATIC* is inoperative.
�
Avoid large steering angles. Other-
wise a fender or tire could be dam-
aged.
�
Do not drive faster than 50 mph
(80 km/h).
�
Have the vehicle checked at an
authorized Mercedes-Benz Light
Truck Center.
Visit workshop
The AIRMATIC* is malfunctioning.
�
Do not drive faster than 50 mph
(80 km/h) depending on the set
vehicle level.
�
Have the vehicle checked at an
authorized Mercedes-Benz Light
Truck Center.
Visit workshop
The AIRMATIC* is functional only to a
limited extent.
�
Do not drive faster than 50 mph
(80 km/h) depending on the set
vehicle level.
�
Have the vehicle checked at an
authorized Mercedes-Benz Light
Truck Center.
Page 463 of 561

462 Practical hintsOpening / closing in an emergencyPower tilt/sliding sunroof*
You can open or close the tilt/sliding
sunroof manually should an electrical
malfunction occur.
The tilt/sliding sunroof drive is located
behind a cover on the overhead control
panel.
1Cover�
Remove the SmartKey from the starter
switch.Vehicles with KEYLESS-GO*:
�
Turn off the engine by pressing the
KEYLESS-GO start/stop button
(�page 66).
�
Open the driver’s door (this puts
the starter switch to position0,
same as with the SmartKey re-
moved from starter switch). The
driver’s door can then be closed
again.
�
Press on cover1 at the position indi-
cated by the arrow.
�
Take off cover 1.
2Crank
�
Take crank 2 out of the Operator’s
Manual pouch.
�
Insert crank2 into hole.
�
Turn crank2 clockwise to�
slide sunroof closed
�
raise sunroof at the rear
�
Turn crank2 counterclockwise to�
slide sunroof open
�
lower sunroof at the rear
iTurn crank2 slowly and smoothly.
The tilt/sliding sunroof must be syn-
chronized if it has been operated man-
ually (
�page 258).
iThe panorama roof with power
tilt/sliding panel* cannot be operated
as described. Contact an authorized
Mercedes-Benz Light Truck Center.
Page 464 of 561

463 Practical hints
Replacing SmartKey batteries
�Replacing SmartKey batteries
If the batteries in the SmartKey or the
SmartKey with KEYLESS-GO* are dis-
charged, the vehicle can no longer be
locked or unlocked. It is recommended to
have the batteries replaced at an autho-
rized Mercedes-Benz Light Truck Center.
Batteries contain materials that can harm
the environment if disposed of improperly.
Recycling of batteries is the preferred
method of disposal. Many states require
sellers of batteries to accept old batteries
for recycling.
SmartKey
Replacement batteries: Lithium, type
CR 2025 or equivalent.�
Remove mechanical key1 from the
SmartKey (
�page 459).
1Mechanical key
2Slide
3Battery compartment
�
Insert mechanical key 1 in side open-
ing in direction of arrow.
�
Using mechanical key 1, push gray
slide 2 to unlatch battery compart-
ment 3.
Warning!
G
Keep the batteries out of reach of children.
If a battery is swallowed, seek medical help
immediately.
iWhen replacing batteries, make sure
they are clean and free of lint.iWhen replacing batteries, always
replace both batteries. The required re-
placement batteries are available at
any Mercedes-Benz Light Truck Center.
��
Page 466 of 561
465 Practical hints
Replacing bulbs
�Replacing bulbs
Bulbs
Safe vehicle operation depends on proper
exterior lighting and signaling. It is there-
fore essential that all bulbs and lamp as-
semblies are in good working order at all
times.
Correct headlamp adjustment is extremely
important. Have headlamps checked and
readjusted at regular intervals and when a
bulb has been replaced. See an authorized
Mercedes-Benz Light Truck Center for
headlamp adjustment.
iIf the headlamps or front fog lamps are
fogged up on the inside as a result of
high humidity, driving the vehicle a dis-
tance with the lights on should clear up
the fogging.
iBackup bulbs will be brought into use
when the following lamps malfunction:�
Turn signal lamps
�
Brake lamps
�
Parking lamps
�
Tail lamps
Read and observe messages in the
multifunction display (
�page 442).
Page 467 of 561
466 Practical hintsReplacing bulbsFront lamps Rear lamps
Lamp
Type
1
Parking/standing lamp
W 5 W
2
Turn signal lamp
PY 21 W
3
Additional turn signal
lamp
LED
4
Headlamps:
Low beam
H7 (55W)
Bi-Xenon headlamps*:
Low beam
1
1Vehicles with Bi-Xenon* headlamps: Do not
replace the Bi-Xenon bulbs yourself. Contact an
authorized Mercedes-Benz Light Truck Center.
D2S-35 W
5
Headlamps:
High beam/high beam
flasher
H7 (55W)
Bi-Xenon headlamps*:
High beam/high beam
flasher spot lamp
H7 (55W)
6
Sidemarker lamp
WY 5 W
7
Corner-illuminating
front fog lamp*
H11 (55W)
Lamp
Type
8
High-mounted brake
lamp
LED
9
Tail, brake, and
sidemarker lamp
P 21 W
a
Turn signal lamp
PY 21 W
b
Backup lamp
P 21 W
c
Rear fog lamp (driver’s
side only)
P 21 W
d
License plate lamps
C 5 W
Page 468 of 561

467 Practical hints
Replacing bulbs
Notes on bulb replacement�
Only use 12-volt bulbs of the same type
and with the specified watt rating.
�
Switch the lights off before changing a
bulb to prevent short circuits.
�
Always use a clean lint-free cloth when
handling bulbs.
�
Your hands should be dry and free of oil
and grease.
�
If the newly installed bulb does not
come on, visit an authorized
Mercedes-Benz Light Truck Center.Have the LEDs and bulbs for the following
lamps replaced by an authorized
Mercedes-Benz Light Truck Center:
�
the additional turn signal lamps in the
exterior rear view mirrors
�
the high mounted brake lamp
�
the Bi-Xenon* low beam lamps
�
the Bi-Xenon high beam flasher spot-
light*
�
the front sidemarker lamps
Warning!
G
Bulbs and bulb sockets can be very hot.
Allow the lamp to cool down before chang-
ing a bulb.
Keep bulbs out of reach of children.
Halogen lamps contain pressurized gas.
A bulb can explode if you:�
touch or move it when hot
�
drop the bulb
�
scratch the bulb
Wear eye and hand protection.
Because of high voltage in Xenon lamps, it is
dangerous to replace the bulb or repair the
lamp and its components. We recommend
that you have such work done by a qualified
technician.
Page 473 of 561

472 Practical hintsReplacing bulbs�
Turn bulb socket 5 clockwise until it
engages.
�
Insert corner-illuminating front fog
lamp 1 back into bumper.
�
Fasten retaining screws4.
�
Reinsert cover 2 and press it in until it
engages.
�
Fasten retaining screw3.Additional turn signal lamps bulbs
The additional turn signal lamps in the
exterior rear view mirrors have LEDs.
If a malfunction occurs or LEDs fail to func-
tion, the entire turn signal unit must be re-
placed. Have the turn signal unit replaced
by an authorized Mercedes-Benz Light
Truck Center.
Front sidemarker lamp bulbs
Since replacing the sidemarker lamp bulbs
is a technically highly demanding process,
we recommend you have the sidemarker
lamp bulbs replaced by an authorized
Mercedes-Benz Light Truck Center.
Replacing bulbs for rear lamps
Before you start to replace a bulb for a rear
lamp, do the following first:�
Turn the combination switch to
positionM (
�page 147).
Tail lamp unit
�
Open the tailgate (
�page 122).
iTo access the tail lamp units, you have
to remove the cover in the correspond-
ing side trim panel of the cargo com-
partment.
��


Bi-Xenon h")