Page 476 of 561
475 Practical hints
Replacing wiper blades
�Replacing wiper blades
Front wiper blades Removing
�
Remove the SmartKey from the starter
switch.
or
�
Vehicles with KEYLESS-GO*:
Make sure the vehicle’s on-board
electronics have status0 (
�page 39).
�
Fold the wiper arms forward until they
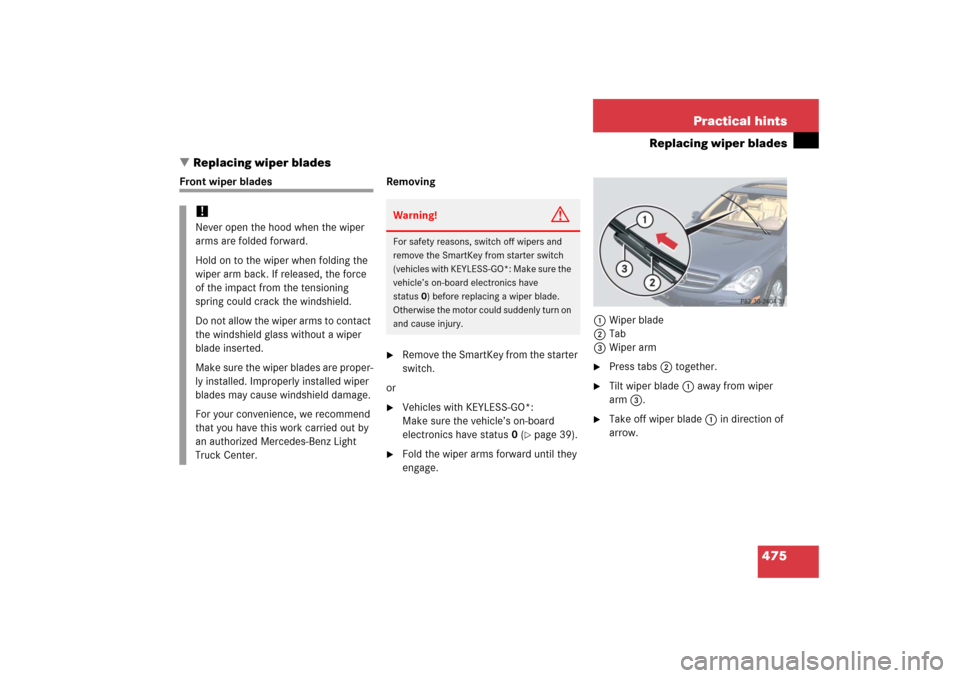
engage.1Wiper blade
2Tab
3Wiper arm
�
Press tabs2 together.
�
Tilt wiper blade 1 away from wiper
arm 3.
�
Take off wiper blade 1 in direction of
arrow.
!Never open the hood when the wiper
arms are folded forward.
Hold on to the wiper when folding the
wiper arm back. If released, the force
of the impact from the tensioning
spring could crack the windshield.
Do not allow the wiper arms to contact
the windshield glass without a wiper
blade inserted.
Make sure the wiper blades are proper-
ly installed. Improperly installed wiper
blades may cause windshield damage.
For your convenience, we recommend
that you have this work carried out by
an authorized Mercedes-Benz Light
Truck Center.
Warning!
G
For safety reasons, switch off wipers and
remove the SmartKey from starter switch
(vehicles with KEYLESS-GO*: Make sure the
vehicle’s on-board electronics have
status0) before replacing a wiper blade.
Otherwise the motor could suddenly turn on
and cause injury.
Page 478 of 561
477 Practical hints
Replacing wiper blades
Removing�
Remove the SmartKey from the starter
switch.
or
�
Vehicles with KEYLESS-GO*:
Make sure the vehicle’s on-board
electronics have status0 (
�page 39).
�
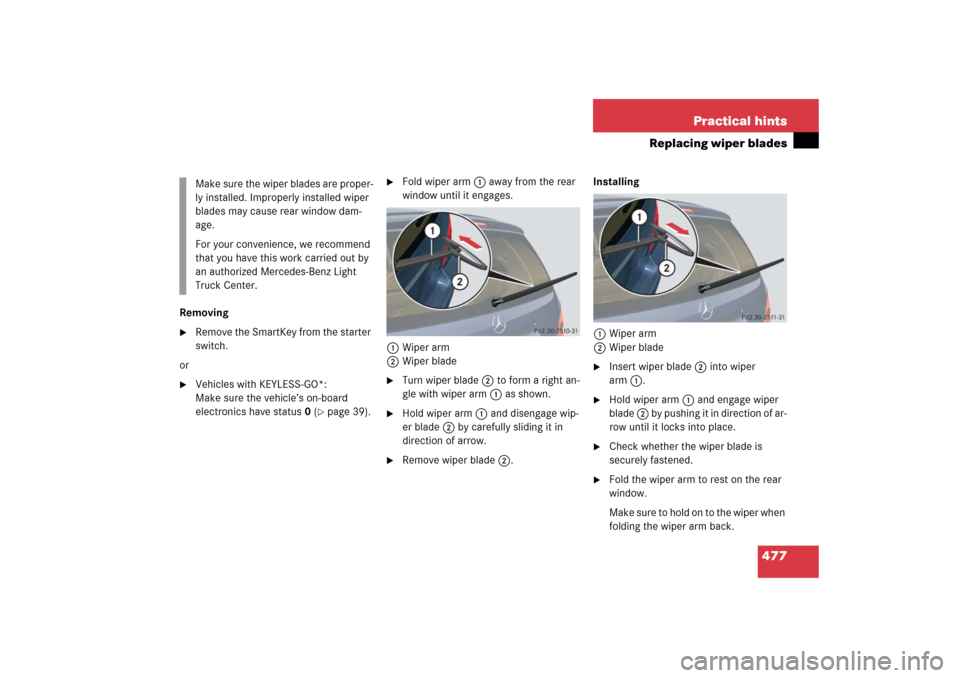
Fold wiper arm 1 away from the rear
window until it engages.
1Wiper arm
2Wiper blade
�
Turn wiper blade2 to form a right an-
gle with wiper arm 1 as shown.
�
Hold wiper arm 1 and disengage wip-
er blade 2 by carefully sliding it in
direction of arrow.
�
Remove wiper blade 2.Installing
1Wiper arm
2Wiper blade
�
Insert wiper blade 2 into wiper
arm1.
�
Hold wiper arm 1 and engage wiper
blade 2 by pushing it in direction of ar-
row until it locks into place.
�
Check whether the wiper blade is
securely fastened.
�
Fold the wiper arm to rest on the rear
window.
Make sure to hold on to the wiper when
folding the wiper arm back. Make sure the wiper blades are proper-
ly installed. Improperly installed wiper
blades may cause rear window dam-
age.
For your convenience, we recommend
that you have this work carried out by
an authorized Mercedes-Benz Light
Truck Center.
Page 479 of 561
478 Practical hintsFlat tire
Preparing the vehicle�
Park the vehicle in a safe distance from
moving traffic on a hard, flat surface
when possible.
�
Turn on the hazard warning flasher
(�page 153).
�
Turn the steering wheel so that the
front wheels are in a straight-ahead
position.
�
Set the parking brake (
�page 65).
�
Set the automatic transmission to P
(�page 197).
Vehicles with SmartKey:
�
Turn off the engine (
�page 66).
�
Remove the SmartKey from the starter
switch.Vehicles with KEYLESS-GO*:
�
Turn off the engine by pressing the
KEYLESS-GO* button once
(�page 66).
�
Open the driver’s door (this puts the
starter switch in position 0, same as
with the SmartKey removed from the
starter switch). The driver’s door then
can be closed again.
�
Have any passenger exit the vehicle at
a safe distance from the roadway.
Warning!
G
The dimensions of the spare wheel are dif-
ferent from those of the road wheels. As a
result, the vehicle handling characteristics
change when driving with a spare wheel
mounted. Adapt your driving style accord-
ingly.
The spare wheel is for temporary use only.
When driving with spare wheel mounted,
ensure proper tire inflation pressure and do
not exceed a vehicle speed of
50 mph (80 km/ h).
Drive to the nearest Mercedes-Benz Light
Truck Center as soon as possible to have the
spare wheel replaced with a regular road
wheel.
Never operate the vehicle with more than
one spare wheel mounted.
Do not switch off the ESP
® with a spare
wheel mounted.
iOpen doors only when conditions are
safe to do so.
Page 482 of 561
481 Practical hints
Flat tire
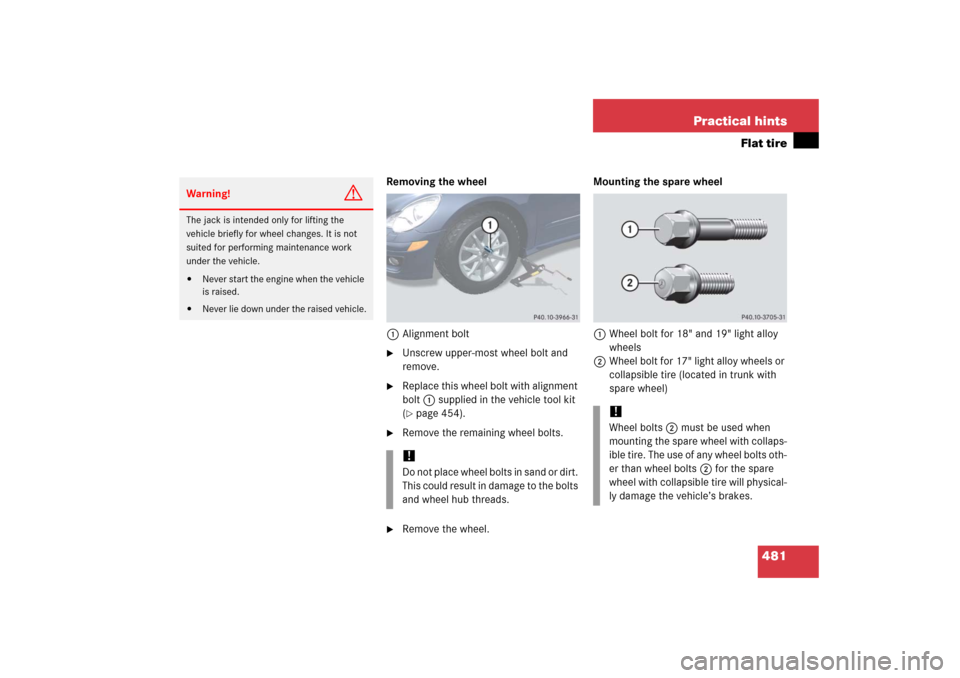
Removing the wheel
1Alignment bolt�
Unscrew upper-most wheel bolt and
remove.
�
Replace this wheel bolt with alignment
bolt1 supplied in the vehicle tool kit
(�page 454).
�
Remove the remaining wheel bolts.
�
Remove the wheel.Mounting the spare wheel
1Wheel bolt for 18" and 19" light alloy
wheels
2Wheel bolt for 17" light alloy wheels or
collapsible tire (located in trunk with
spare wheel)
Warning!
G
The jack is intended only for lifting the
vehicle briefly for wheel changes. It is not
suited for performing maintenance work
under the vehicle.�
Never start the engine when the vehicle
is raised.
�
Never lie down under the raised vehicle.
!Do not place wheel bolts in sand or dirt.
This could result in damage to the bolts
and wheel hub threads.
!Wheel bolts2 must be used when
mounting the spare wheel with collaps-
ible tire. The use of any wheel bolts oth-
er than wheel bolts2 for the spare
wheel with collapsible tire will physical-
ly damage the vehicle’s brakes.
Page 483 of 561
482 Practical hintsFlat tire�
Clean contact surfaces of wheel and
wheel hub.
�
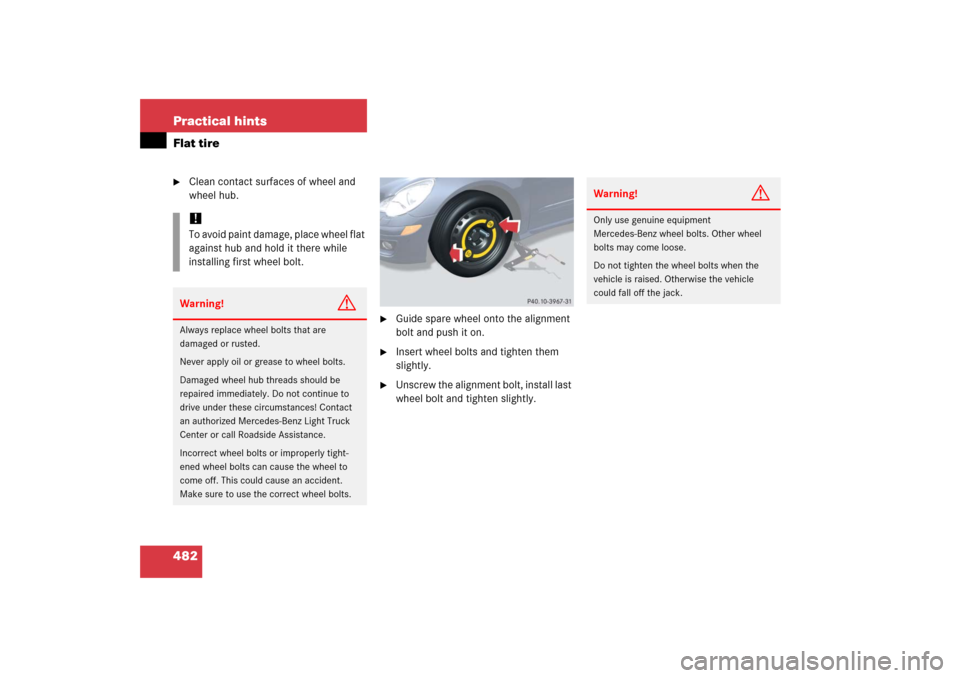
Guide spare wheel onto the alignment
bolt and push it on.
�
Insert wheel bolts and tighten them
slightly.
�
Unscrew the alignment bolt, install last
wheel bolt and tighten slightly.
!To avoid paint damage, place wheel flat
against hub and hold it there while
installing first wheel bolt.Warning!
G
Always replace wheel bolts that are
damaged or rusted.
Never apply oil or grease to wheel bolts.
Damaged wheel hub threads should be
repaired immediately. Do not continue to
drive under these circumstances! Contact
an authorized Mercedes-Benz Light Truck
Center or call Roadside Assistance.
Incorrect wheel bolts or improperly tight-
ened wheel bolts can cause the wheel to
come off. This could cause an accident.
Make sure to use the correct wheel bolts.
Warning!
G
Only use genuine equipment
Mercedes-Benz wheel bolts. Other wheel
bolts may come loose.
Do not tighten the wheel bolts when the
vehicle is raised. Otherwise the vehicle
could fall off the jack.
Page 484 of 561
483 Practical hints
Flat tire
Inflating the collapsible tire�
Take the electric air pump out of the
vehicle tool kit storage well
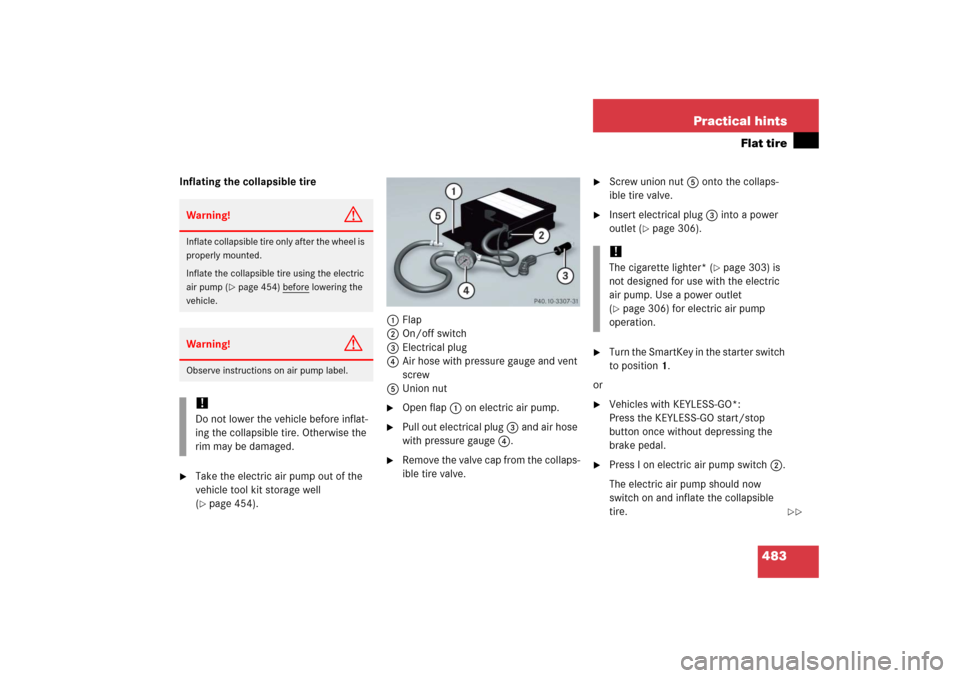
(�page 454).1Flap
2On/off switch
3Electrical plug
4Air hose with pressure gauge and vent
screw
5Union nut
�
Open flap 1 on electric air pump.
�
Pull out electrical plug 3 and air hose
with pressure gauge 4.
�
Remove the valve cap from the collaps-
ible tire valve.
�
Screw union nut 5 onto the collaps-
ible tire valve.
�
Insert electrical plug 3 into a power
outlet (
�page 306).
�
Turn the SmartKey in the starter switch
to position1.
or
�
Vehicles with KEYLESS-GO*:
Press the KEYLESS-GO start/stop
button once without depressing the
brake pedal.
�
Press I on electric air pump switch 2.
The electric air pump should now
switch on and inflate the collapsible
tire.
Warning!
G
Inflate collapsible tire only after the wheel is
properly mounted.
Inflate the collapsible tire using the electric
air pump (
�page 454) before
lowering the
vehicle.
Warning!
G
Observe instructions on air pump label.!Do not lower the vehicle before inflat-
ing the collapsible tire. Otherwise the
rim may be damaged.
!The cigarette lighter* (
�page 303) is
not designed for use with the electric
air pump. Use a power outlet
(
�page 306) for electric air pump
operation.
��
Page 488 of 561
487 Practical hints
Battery
�Battery
The battery is located under the front
passenger seat.
The battery should always be sufficiently
charged in order to achieve its rated ser-
vice life.
If you use your vehicle mostly for
short-distance trips, you will need to have
the battery charge checked more
frequently.
When replacing the battery, always use
batteries approved by Mercedes-Benz.
If you do not intend to operate your vehicle
for an extended period of time, consult an
authorized Mercedes-Benz Light Truck
Center about steps you need to observe.Batteries contain materials that can harm
the environment if disposed of improperly.
Recycling of batteries is the preferred
method of disposal. Many states require
sellers of batteries to accept old batteries
for recycling.
iMercedes-Benz recommends to have
the battery replaced at authorized
Mercedes-Benz Light Truck Center.
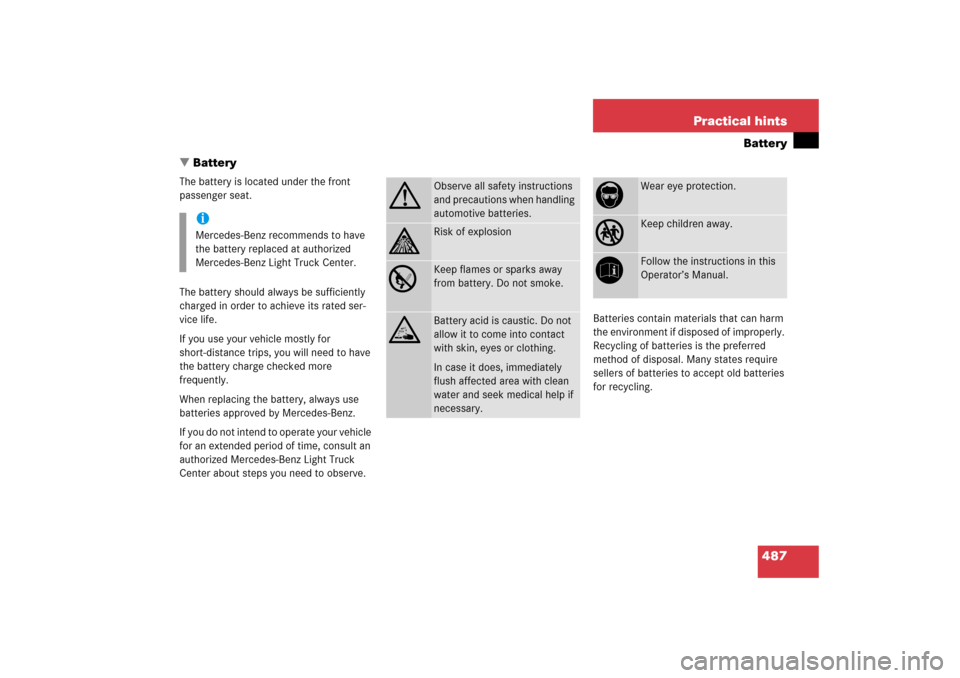
G
Observe all safety instructions
and precautions when handling
automotive batteries.
A
Risk of explosion
D
Keep flames or sparks away
from battery. Do not smoke.
B
Battery acid is caustic. Do not
allow it to come into contact
with skin, eyes or clothing.
In case it does, immediately
flush affected area with clean
water and seek medical help if
necessary.
E
Wear eye protection.
C
Keep children away.
F
Follow the instructions in this
Operator’s Manual.
Page 489 of 561
488 Practical hintsBattery
!
The battery is a valve-regulated lead
acid (VRLA) battery, also referred to as
“fleece” battery. Such batteries do not
require topping-up of the electrolyte
level. VRLA batteries therefore do not
have cell caps and the battery cover is
non-removable. Do not attempt to
open the battery as otherwise the bat-
tery will be damaged.
Even though VRLA batteries do not
require topping-up of the electrolyte
level and cannot be opened to check
the electrolyte level, the battery condi-
tion must be checked periodically by
performing a battery conductance test.
Refer to Maintenance Booklet for bat-
tery condition testing intervals.
As with any other battery, the battery
may discharge if the vehicle is not
operated for an extended period of
time. You can connect a battery
maintenance charge unit tested and
approved for use on your vehicle model
or disconnected the battery to prevent
battery discharge. Contact an
authorized Mercedes-Benz Light Truck
Center for more information.
!The factory-equipped VRLA battery is
leak-proofed. Only use a battery as re-
placement that has the same security
features and is of identical size,
voltage, and capacity as the
factory-equipped battery.
The battery, the battery ventilation and
the lateral plug must always be
securely installed when the vehicle is in
operation.Warning!
G
Jump starting must only be done using the
jump-start contacts located in the engine
compartment (
�page 496).