Page 102 of 561
101 Safety and Security
Driving safety systems
Switching off the ESP
®
To improve the vehicle’s traction, turn off
the ESP
® in driving situations where it
would be advantageous to have the drive
wheels spin and thus cut into surfaces for
better grip such as:
�
starting out on slippery surfaces and in
deep snow in conjunction with snow
chains
�
in sand or gravelWhen you switch off the ESP
®
�
the ESP
® does not stabilize the vehicle
�
the engine output is not limited, which
allows the drive wheels to spin and
thus cut into surfaces for better grip
�
the 4-ETS will still brake a spinning
wheel
�
the ESP
® continues to operate when
you are brakingThe ESP
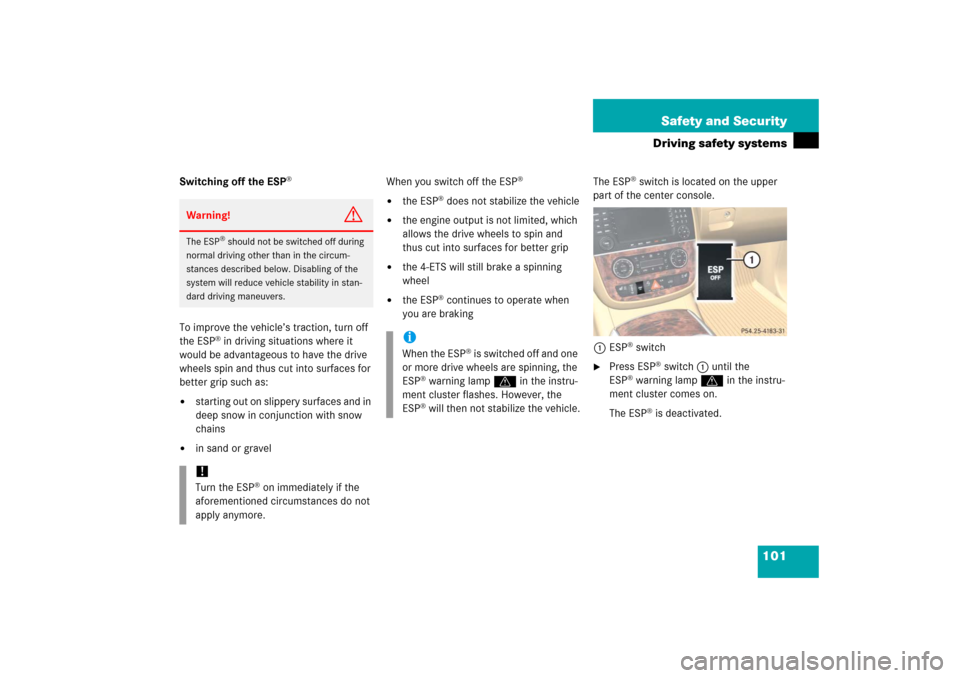
® switch is located on the upper
part of the center console.
1ESP® switch
�
Press ESP
® switch1 until the
ESP
®warning lampv in the instru-
ment cluster comes on.
The ESP® is deactivated.
Warning!
G
The ESP
® should not be switched off during
normal driving other than in the circum-
stances described below. Disabling of the
system will reduce vehicle stability in stan-
dard driving maneuvers.
!Turn the ESP
® on immediately if the
aforementioned circumstances do not
apply anymore.
iWhen the ESP
® is switched off and one
or more drive wheels are spinning, the
ESP
® warning lamp v in the instru-
ment cluster flashes. However, the
ESP® will then not stabilize the vehicle.
Page 103 of 561
102 Safety and SecurityDriving safety systems
Switching on the ESP
®
�
Press ESP
® switch1.
The ESP
® warning lampv in the in-
strument cluster goes out.
You are now again in normal driving
mode with the ESP
® switched on.
For more information, see the “Practical
hints” section (
�page 404).
EBP
The EBP enhances braking effectiveness
by allowing the rear brakes to supply a
greater proportion of the braking effort
without a loss of vehicle stability.
4-ETS
The 4-Electronic Traction System (4-ETS)
improves the vehicle’s ability to utilize
available traction, especially under slip-
pery road conditions. The brakes are ap-
plied to the spinning wheel and power is
transferred to the wheel(s) with traction.
The ESP
® warning lampvin the instru-
ment cluster starts to flash at any vehicle
speed, as soon as a tire loses traction and
the wheel begins to spin.
Warning!
G
When the ESP
® warning lampv is
illuminated continuously, the ESP
® is
switched off.
Adapt your speed and driving to the prevail-
ing road conditions and to the non-operating
status of the ESP
®.
!Avoid spinning of a drive wheel for an
extended period of time with the ESP
®
switched off. This may cause serious
damage to the drivetrain which is not
covered by the Mercedes-Benz Limited
Warranty.
Page 104 of 561
103 Safety and Security
Driving safety systems
For more information, see the “Practical
hints” section (
�page 404) and
(
�page 416).
Warning!
G
When you see the ESP
® warning lampv
flashing in the instrument cluster, then pro-
ceed as follows:
�
While driving off, apply as little throttle
as possible.
�
While driving, ease up on the accelera-
tor.
�
Adapt your speed and driving style to
the prevailing road conditions.
Failure to observe these guidelines could
cause the vehicle to skid.
The 4-ETS cannot prevent accidents resul-
ting from excessive speed.
!Because of the ESP’s
® automatic oper-
ation, the engine must be shut off
(SmartKey in starter switch position0
or1) when the parking brake is being
tested on a brake test dynamometer.
Active braking action through ESP
®
may otherwise seriously damage the
brake system.
Operational tests with the engine
running can only be conducted on a
two-axle dynamometer.
iIf the yellow ESP
® warning lampv
comes on while driving, the 4-ETS is be-
ing switched off temporarily to prevent
overheating of the drive wheel brakes.
In addition, the message
ESP unavail-
able See Operator’s Manual
appears
in the multifunction display.
Page 106 of 561
105 Safety and Security
Anti-theft systems
Arming the alarm system
The alarm system is armed after you have
locked the vehicle with the SmartKey or
SmartKey with KEYLESS-GO*.
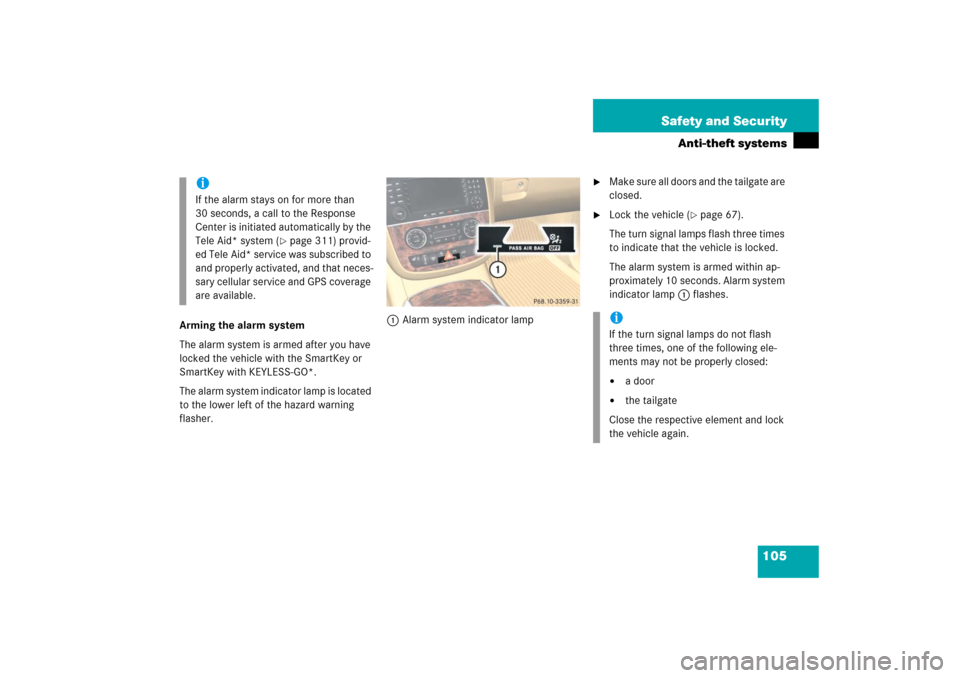
The alarm system indicator lamp is located
to the lower left of the hazard warning
flasher.1Alarm system indicator lamp
�
Make sure all doors and the tailgate are
closed.
�
Lock the vehicle (
�page 67).
The turn signal lamps flash three times
to indicate that the vehicle is locked.
The alarm system is armed within ap-
proximately 10 seconds. Alarm system
indicator lamp 1 flashes.
iIf the alarm stays on for more than
30 seconds, a call to the Response
Center is initiated automatically by the
Tele Aid* system (
�page 311) provid-
ed Tele Aid* service was subscribed to
and properly activated, and that neces-
sary cellular service and GPS coverage
are available.
iIf the turn signal lamps do not flash
three times, one of the following ele-
ments may not be properly closed:�
a door
�
the tailgate
Close the respective element and lock
the vehicle again.
Page 107 of 561
106 Safety and SecurityAnti-theft systemsDisarming the alarm system�
Unlock the vehicle (
�page 36).
The turn signal lamps flash once to
indicate that the vehicle is disarmed.Canceling the alarm
To cancel the alarm:
With the SmartKey
�
Insert the SmartKey in the starter
switch.
or
�
Press theŒ or ‹button on the
SmartKey.
With KEYLESS-GO*
�
Grasp an outside door handle.
The SmartKey with KEYLESS-GO must
be within 3 ft (1 m) of the vehicle.
or
�
Press the KEYLESS-GO start / stop
button (
�page 40).
The SmartKey with KEYLESS-GO must
be inside the vehicle.
Tow-away alarm
Once the tow-away alarm is armed, a visual
and audible alarm will be triggered when
someone attempts to raise the vehicle.
iThe alarm system will rearm automati-
cally again after approximately
40 seconds if neither a door nor the
tailgate is opened.
iThe tow-away protection alarm is trig-
gered, for example, if the vehicle is
lifted on one side.
If the alarm stays on for more than
30 seconds, a call to the Response
Center is initiated automatically by the
Tele Aid* system (
�page 311) provid-
ed Tele Aid* service was subscribed to
and properly activated, and that neces-
sary cellular service and GPS coverage
are available.
Page 111 of 561
110 Controls in detailIn the “Controls in detail” section you will
find detailed information on how to oper-
ate the equipment installed in your vehicle.
If you are already familiar with the basic
functions of your vehicle, this section will
be of particular interest to you.
To quickly familiarize yourself with the ba-
sic functions of the vehicle, refer to the
“Getting started” section of this manual.
The corresponding page numbers are
given at the beginning of each segment.Locking and unlocking
For more information on locking and un-
locking, see the “Getting started” section
(�page 36) and (
�page 67).
SmartKey
Your vehicle comes supplied with two
SmartKeys, each with remote control and
a removable mechanical key.
The locking tabs for the mechanical key
portion of the two SmartKeys are a differ-
ent color to help distinguish each
SmartKey unit.
The SmartKey provides an extended oper-
ating range. To prevent theft, however, it is
advisable to only unlock the vehicle when
you are in close proximity to it.
The SmartKey centrally locks and unlocks:�
the doors
�
the tailgate
�
the fuel filler flap
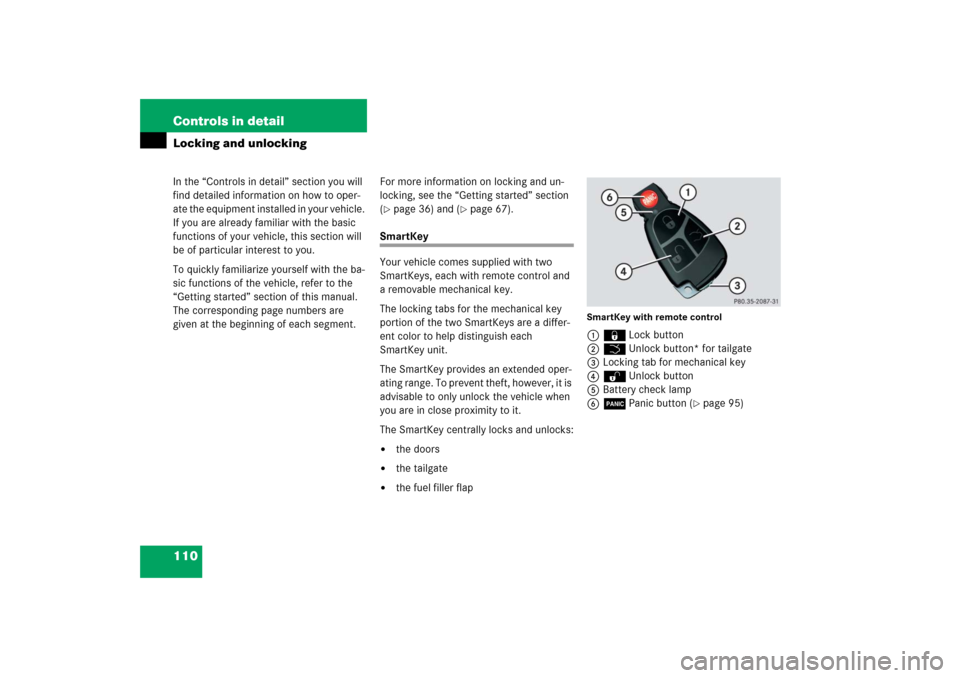
SmartKey with remote control1‹Lock button
2ŠUnlock button* for tailgate
3Locking tab for mechanical key
4ŒUnlock button
5Battery check lamp
6ÂPanic button (
�page 95)
Page 117 of 561
116 Controls in detailLocking and unlocking
Important notes on using KEYLESS-GO*�
You can also use the SmartKey with
KEYLESS-GO like a normal SmartKey
(�page 110).
�
You can combine KEYLESS-GO func-
tions with normal SmartKey functions
(e.g. unlocking with KEYLESS-GO and
locking with the ‹button).
�
Always carry the SmartKey with
KEYLESS-GO with you.
�
Never store the SmartKey with
KEYLESS-GO together with�
electronic items such as a cellular
phone or another SmartKey with
KEYLESS-GO
�
metallic objects such as coins or
metal foil
Doing so could impair the function of
the KEYLESS-GO system.
�
To lock or unlock the vehicle, the
SmartKey with KEYLESS-GO must be
located outside the vehicle within ap-
proximately 3 ft (1 m) of the respective
door or the tailgate.
�
In order to start the engine with the
SmartKey with KEYLESS-GO:�
The SmartKey with KEYLESS-GO
must be located in the vehicle.
�
All doors must be closed.
�
The brake pedal must be firmly de-
pressed. Do not depress the accel-
erator.
iCanada only:
This device complies with RSS-210 of
Industry Canada. Operation is subject
to the following two conditions:
(1) This device may not cause
interference, and
(2) this device must accept any inter-
ference received, including interfer-
ence that may cause undesired
operation of the device.
Any unauthorized modification to this
device could void the user’s authority
to operate the equipment.iYou can also open and close the power
windows (
�page 248) and tilt/sliding
sunroof* (�page 255), or the
tilt/sliding panel* (
�page 259) using
the SmartKey with KEYLESS-GO.
Page 122 of 561
121 Controls in detail
Locking and unlocking
Loss of the SmartKey with KEYLESS-GO
If you lose your SmartKey with
KEYLESS-GO or mechanical key, you
should do the following:�
Have the SmartKey with KEYLESS-GO
deactivated by an authorized
Mercedes-Benz Light Truck Center.
�
Report the loss of the SmartKey with
KEYLESS-GO or the mechanical key im-
mediately to your car insurance com-
pany.
�
Have the mechanical lock replaced if
necessary.
Your authorized Mercedes-Benz Light
Truck Center will be glad to supply you
with a replacement.
Opening the doors from the inside
You can open a locked door from the in-
side. Open door only when conditions are
safe to do so.
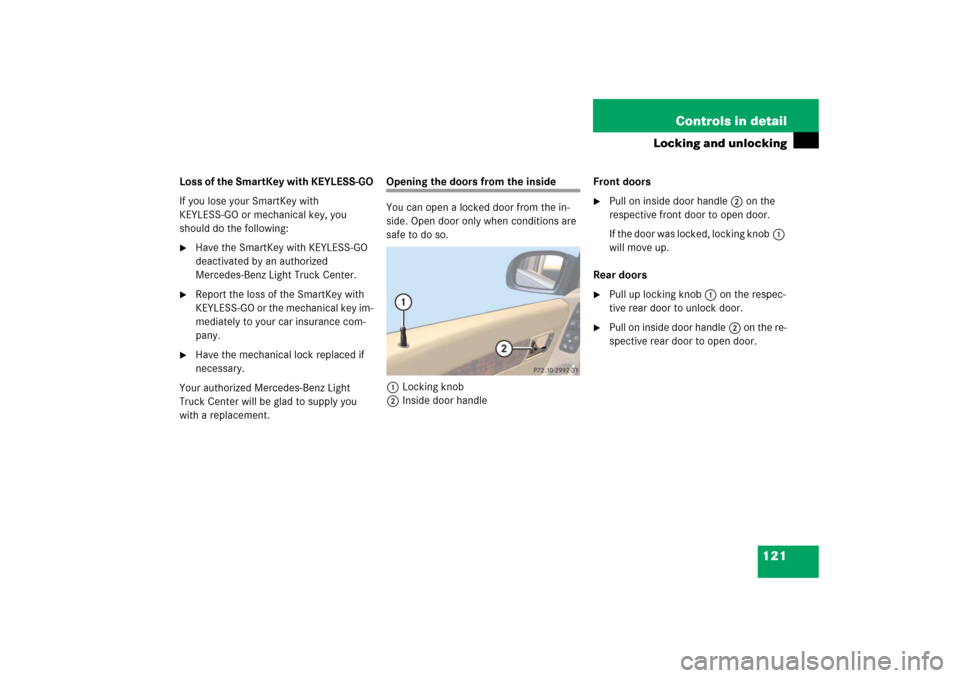
1Locking knob
2Inside door handleFront doors
�
Pull on inside door handle2 on the
respective front door to open door.
If the door was locked, locking knob1
will move up.
Rear doors
�
Pull up locking knob1 on the respec-
tive rear door to unlock door.
�
Pull on inside door handle2 on the re-
spective rear door to open door.