Page 171 of 561
170 Controls in detailControl systemAUDIO menu
The functions in the
AUDIO
menu operate
the audio equipment which you currently
have turned on.
If no audio equipment is currently turned
on, the message
AUDIO OFF
appears in the
multifunction display.
The following functions are available:Selecting radio station
�
Turn on the Modular COMAND System
and select radio. Refer to separate
Modular COMAND System operating
instructions.
�
Press buttonè orÿ repeatedly
until the currently tuned station
appears in the multifunction display.
1Waveband setting
2Station frequency
�
Press buttonk orj repeatedly
until the desired station is found.
Function
Page
Selecting radio station
170
Selecting satellite radio station*
(USA only)
171
Operating CD player
171
iYou can only store new stations using
the corresponding feature on the radio.
Refer to separate Modular COMAND
System operating instructions. You can
also operate the radio in the usual man-
ner.
Page 172 of 561

The satellite radio is treated as a radio
application.�
Select satellite radio with the
corresponding soft key on")
171 Controls in detail
Control system
Selecting satellite radio station*
(USA only)
The satellite radio is treated as a radio
application.�
Select satellite radio with the
corresponding soft key on the Modular
COMAND System.
1SAT mode
2Channel name or number
�
Press buttonk orj repeatedly
until the desired channel is found.Operating the CD player
�
Turn on the Modular COMAND System
and select CD. Refer to separate
Modular COMAND System operating
instructions.
�
Press buttonè orÿ repeatedly
until the settings for the CD currently
being played appear in the multifunc-
tion display.
1Current CD (for CD changer*)
2Current track
�
Press buttonk orj repeatedly
until the desired track is selected.
iFeature description is based on
preliminary information available at
time of printing.
Additional optional satellite radio
equipment and a subscription to satel-
lite radio service provider are required
for satellite radio operation. At time of
printing, no date for the availability of
optional equipment required for satel-
lite radio operation had been set.
Contact an authorized Mercedes-Benz
Light Truck Center for details and
availability for your vehicle.
For more information, refer to separate
Modular COMAND System operating
instructions.
��
Page 174 of 561

173 Controls in detail
Control system
Vehicle status message memory menu
Use the vehicle status message memory
menu to scan malfunction and warning
messages that may be stored in the
system. Such messages appear in the
multifunction display and are based on
conditions or system status the vehicle’s
system has recorded.
�
Press buttonè orÿ repeatedly
until the vehicle status message
memory appears in the multifunction
display.
No vehicle status messages
If no conditions have been recorded in
memory, the message in the multifunction
display is:
No message
.Vehicle status messages have been
recorded
If conditions have occurred causing status
messages to be recorded, the number of
messages appears in the multifunction
display:
�
Press buttonk orj.
The stored messages will now be
displayed in order in which they have
occurred. For malfunctions and
warning messages, see “Vehicle status
messages in the multifunction display”
(�page 416).
Warning!
G
Malfunction and warning messages are only
indicated for certain systems and are inten-
tionally not very detailed. The malfunction
and warning messages are simply a remind-
er with respect to the operation of certain
systems and do not replace the owner’s
and/or driver’s responsibility to maintain
the vehicle’s operating safety by having all
required maintenance and safety checks
performed on the vehicle and by bringing
the vehicle to an authorized Mercedes-Benz
Light Truck Center to address the malfunc-
tion and warning messages (
�page 416).
iAfter you have scrolled through all
recorded status messages, the first
recorded message appears again.
Page 180 of 561
179 Controls in detail
Control system
Available languages:�
German (
Deutsch
)
�
English (
English
)
�
French (
Français
)
�
Italian (
Italiano
)
�
Spanish (
Español
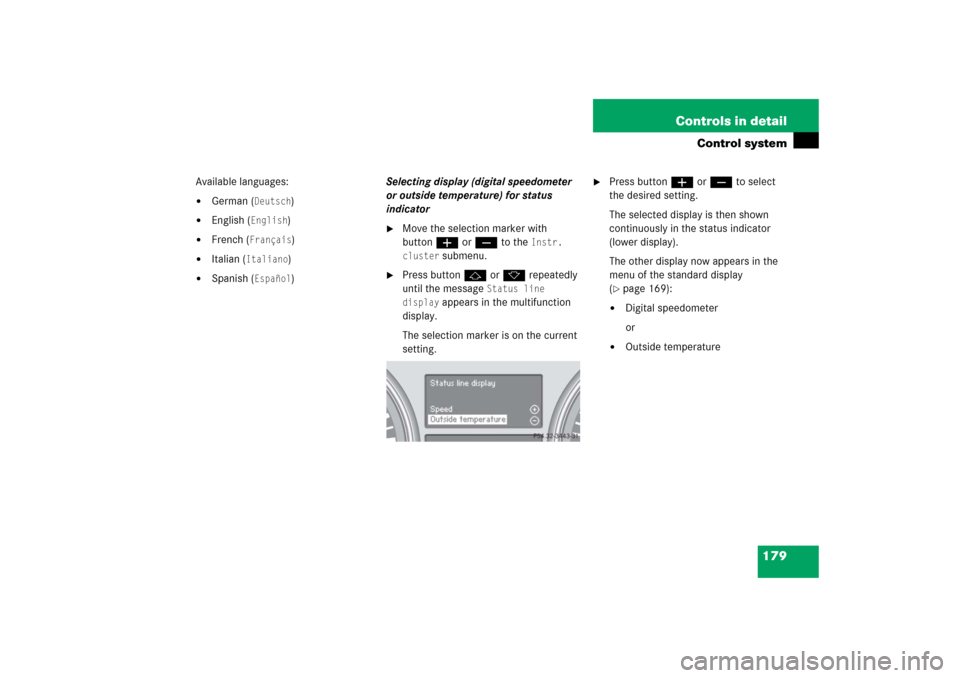
)Selecting display (digital speedometer
or outside temperature) for status
indicator
�
Move the selection marker with
buttonæ orç to the
Instr.
cluster
submenu.
�
Press buttonj ork repeatedly
until the message
Status line
display
appears in the multifunction
display.
The selection marker is on the current
setting.
�
Press buttonæ orç to select
the desired setting.
The selected display is then shown
continuously in the status indicator
(lower display).
The other display now appears in the
menu of the standard display
(�page 169):
�
Digital speedometer
or
�
Outside temperature
Page 188 of 561

187 Controls in detail
Control system
�
Press buttonj ork repeatedly
until the message
Compass Adjustment
appears in the multifunction display.
The selection marker is on the current
setting.
�
Press buttonæ orç to set the
respective compass zone.
For information on how to select the prop-
er geographic zone, see “Compass”
(
�page 327).Compass calibration
This function is not available if your vehicle
is equipped with the Modular COMAND
system with navigation module*.
In order to calibrate the compass properly,
mind the following:
�
Calibrate the compass in open terrain.
Nearby buildings, bridges, power lines
and large antenna masts, for example,
could impair compass calibration.
�
Switch off electrical consumers (e.g.
climate control, windshield wipers, or
rear window defroster).
�
Close all doors and the tailgate.
�
Start the engine (
�page 53).
�
Press buttonæ orç to move
the selection marker to the
Vehicle
submenu.
�
Press buttonj ork repeatedly
until the message
Compass Calibra-
tion
appears in the multifunction
display.
The selection marker is on setting
off
.
�
Press buttonæ orç to set the
selection marker to
Start
.
The following message appears in the
multifunction display:
Compass Calibration Active
Please drive in a full circle
��
Page 202 of 561

201 Controls in detail
Automatic transmission
Even though this is possible, make it a
practice to always shift into park
positionP before turning off the engine
and remove the SmartKey from the
starter switch, or when using
KEYLESS-GO*, before turning off the
engine with the start/stop button and
opening the driver’s door.!If you want the gear position to remain
inN (for example when the vehicle is
pulled through a car wash)
�
do not remove the SmartKey from
the starter switch
or, when using KEYLESS-GO*
�
do not turn off the engine using the
KEYLESS-GO start/stop button*
and open the driver’s door
Otherwise, the transmission will shift
toP and lock the wheels, preventing
the vehicle from being pulled through a
car wash.
Effect
í
Reverse gear
Shift into reverse gearR only
when the vehicle is stopped.
ë
Neutral
No power is transmitted from the
engine to the drive axle. When
the brakes are released, the
vehicle can be moved freely
(pushed or towed).
To avoid damage to the trans-
mission, never shift into neutral
positionN while driving.
If the ESP
® is deactivated or
malfunctioning:
Shift into neutral positionN only
if the vehicle is in danger of
skidding, e.g. on icy roads.
ê
Drive
The transmission shifts
automatically. All forward gears
are available.
!Coasting the vehicle, or driving for any
other reason in neutral positionN can
result in transmission damage that is
not covered by the Mercedes-Benz
Limited Warranty.Warning!
G
Getting out of your vehicle without shifting
into park positionP is dangerous. Also, park
positionP alone is not intended to or capa-
ble of preventing your vehicle from moving,
possibly hitting people or objects.
Always set the parking brake in addition to
shifting to park positionP (
�page 65).
When parked on an incline, turn the front
wheels towards the road curb.
Do not park this vehicle in areas where com-
bustible materials such as grass, hay or
leaves can come into contact with the hot
exhaust system, as these materials could be
ignited and cause a vehicle fire.
Page 203 of 561

202 Controls in detailAutomatic transmission
Gear ranges
With the automatic transmission in drive
positionD, you can select a gear range for
the automatic transmission to operate
within.
You can limit the gear range by pressing
the respective downshift button on the
steering wheel gearshift control, and
reverse the gear range limit by pressing
the respective upshift button on the
steering wheel gearshift control.
1Current gear range
The selected gear range appears in the
multifunction display (
�page 199). If you
press on the accelerator when the engine
has reached its rpm limit, the transmission
will upshift beyond any gear range limit
selected.
Warning!
G
When leaving the vehicle, always remove the
SmartKey or SmartKey with KEYLESS-GO*
from the starter switch, take it with you, and
lock the vehicle. Do not leave children unat-
tended in the vehicle, or with access to an
unlocked vehicle. Children could shift the
automatic transmission out of park
positionP, which could result in an accident
and/or serious personal injury.
Effect
ï
The transmission shifts through
sixth gear only.
î
The transmission shifts through
fifth gear only.
é
The transmission shifts through
fourth gear only.
è
The transmission shifts through
third gear only.
With this selection you can use
the braking effect of the engine.
Page 205 of 561

204 Controls in detailAutomatic transmissionRocking the vehicle
Rocking the vehicle by shifting betweenD
andR can help free a vehicle stuck in mud
or snow. The engine control system of this
vehicle electronically limits shifting
betweenD andR to very low speeds
(i.e. approx. 2 mph). To shift betweenD
andR, move the gear selector lever past
the resistance point up or down.
Hill start assist system
On uphill grades, the hill start assist
system maintains the pressure in the
brake system for approximately 1 second
after you have released the brake pedal.
Therefore, you can start off smoothly with-
out the vehicle moving immediately after
releasing the brake pedal.
The hill start assist system is inactive�
when driving downhill
�
with the transmission in neutral
position N
�
with the parking brake setWorking on the vehicle
Automatic shift program
The program mode selector switch is
located on the upper part of the center
console.Program mode selector switchC Comfort For comfort driving
S Sport For standard driving
Warning!
G
The hill start assist system is not designed
to function as a parking brake and does not
prevent the vehicle from moving when
parked on an incline.
Always set the parking brake in addition to
shifting to park position P.iIf the ESP
® has switched off due to a
malfunction, the hill start assist system
is also unavailable.
Warning!
G
When working on the vehicle, set the
parking brake and shift to park positionP.
Otherwise the vehicle could roll away.